DE AT CH
FAHRRAD-FALTSCHLOSS
Bedienungsanleitung
Einleitung:
Herzlichen Glückwunsch!
Mit Ihrem Kauf haben Sie sich für ein hoch
-
wertiges Produkt entschieden. Machen
Sie sich vor der ersten Inbetriebnahme mit
dem Produkt vertraut. Lesen Sie hierzu auf
-
merksam die nachfolgende Bedienungs-
anleitung. Benutzen Sie das Produkt nur
wie beschrieben und für die angegebenen
Einsatzbereiche. Bewahren Sie diese Bedie
-
nungsanleitung gut auf. Händigen Sie alle
Unterlagen bei Weitergabe des Produkts an
Dritte ebenfalls mit aus.
Zeichen in dieser Gebrauchs- &
Montageanleitung:
!
Dieses Zeichen warnt Sie vor Verlet-
zungsgefahren.
!
So sind ergänzende Informationen
gekennzeichnet.
!
Bestimmungsgemäße
Verwendung:
Dieses Fahrrad-Faltschloss ist zum Abschlie-
ßen von Fahrrädern, Rollern und ähnlichen
Fahrzeugen an dafür vorgesehene und ge
-
eignete Stellen oder feste Objekte gedacht.
Andere Verwendung oder Veränderung am
Produkt gelten als nicht bestimmungsgemäß
und können zu Risiken wie Verletzungen
und Beschädigungen führen. Für Schäden,
die aus der nicht bestimmungsgemäßen Ver
-
wendung resultieren, übernimmt der Inver-
kehrbringer keine Haftung. Das Produkt ist
nicht für den gewerblichen Einsatz bestimmt.
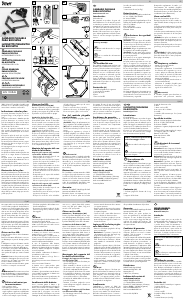
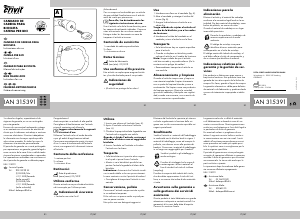
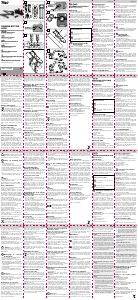
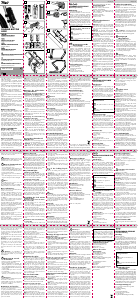
Lieferumfang: (A1)
1 x Faltschloss, bestehend aus 6 Segmenten
1 x Schlosshalterung
2 x Klettverschlussband
oder ähnliches vor Diebstahl zu sichern.
Batteriehinweis:
Batterien dürfen nicht auseinander genom-
men, ins Feuer geworfen oder kurzgeschlos-
sen werden.
Ausgelaufene oder beschädigte Batterien
können bei Berührung mit der Haut Verät
-
zungen verursachen. Berühren Sie die Bat-
terien nicht mit bloßen Händen. Batterien
sollten nicht in der Nähe von Kindern auf
-
bewahrt werden.
Sollte eine Batterie verschluckt worden sein,
suchen Sie bitte umgehend einen Arzt auf.
Verwenden Sie nur Batterien gleicher Her
-
steller.
Setzen Sie Batterien Ihrer Polarität entspre
-
chend in das dafür vorgesehene Batterie-
fach ein.
Verwenden Sie keine Kombinationen aus al
-
ten und neuen Batterien oder Akkus.
Lagern Sie Ihre Batterien trocken und kühl,
nicht feucht.
Werfen Sie Batterien auf keinen Fall ins Feu
-
er.
Schließen Sie Batterien nicht kurz. Einweg
-
batterien verlieren auch bei der Lagerung
einen Teil ihrer Energie.
Leere Batterien oder verbrauchte Akkus sind
fachgerecht zu entsorgen. Batterien dürfen
nicht geladen werden.
Lagern Sie Einwegbatterien getrennt von
entladenen Batterien, um Verwechslungen
zu vermeiden.
Batterieentsorgung:
Batterien und Akkus dürfen nicht im Haus-
müll entsorgt werden, sondern Sie sind zur
Rückgabe gebrauchter Batterien und Akkus
gesetzlich verpflichtet. Sie können die Bat
-
terien nach Gebrauch entweder in unserer
Verkaufsstelle oder in unmittelbarer Nähe (z.
B. im Handel oder in kommunalen Sammel
-
stellen) unentgeltlich zurückgeben. Batterien
und Akkus sind mit einer durchgekreuzten
Mülltonne sowie dem chemischen Symbol
des Schadstoffes bezeichnet, nämlich „Cd“
für Cadmium, „Hg“ für Quecksilber und „Pb“
für Blei.
pose off at local recycling centres. The prod-
uct may not be disposed of in household
waste. Please enquire with your community
or municipal administration regarding possi
-
bilities for the disposal of the product.
Warranty:
Guaranteed by MONZ Handelsgesell-
schaft International mbH & Co. KG.
Dear Customer, we grant you 2 years war
-
ranty from the purchase date of this equip-
ment. In the event that this product is faulty
you have the same rights against the product
seller. These statutory rights are not limited
by the warranty described below.
Warranty conditions:
The warranty period begins on the purchase
date. Please keep the original receipt in a
safe place. This document is required as
proof of purchase.
In the event that a material or manufacturing
fault occurs within two years of the purchase
date then we will either repair or replace the
product free of charge, as we choose. This
guarantee requires that the defective product
is presented within the two-year period with
proof of purchase (receipt) and a brief de
-
scription of the defect and when it occurred.
If the defect is covered by our warranty then
you will receive either the repaired product
or a new product. The repair or replacement
of the product does not mark the beginning
of a new guarantee period.
Distributor:
MONZ Handelsgesellschaft
International mbH & Co. KG
Metternichstr. 37
54292 Trier / Germany
Service address:
MONZ SERVICE CENTER
c/o Teknihall Elektronik GmbH
Breitefeld 15, 64839 Münster / Germany
Hotline: 00800 / 68546854
(free of charge)
Status as of: 09/2014
Eliminação:
A embalagem é composta a 100% por materiais
ecológicos que poderá eliminar através dos
pontos de reciclagem locais. O produto não pode
ser deitado no lixo doméstico normal. Informe-
se na sua Junta ou Câmara Municipal sobre as
possibilidades de eliminação do produto.
Garantia:
Garantia da MONZ Handelsgesell-schaft
International mbH & Co. KG. Exma. Cliente,
Exmo. Cliente, concedemos para este aparelho
uma garantia de 2 anos válida a partir da data
de compra. Se este produto apresentar defeitos,
tem o direito de reclamar junto do vendedor do
produto. Estes direitos legais não são limitados
pela nossa garantia, que a seguir apresentamos.
Condições da garantia:
O prazo da garantia começa na data de compra.
Por favor, guarde o talão original. É necessário
apresentar este documento como prova de
compra. Se, no espaço de dos anos a partir
da data de compra deste produto, surgir um
defeito de material ou de fabrico, nós reparamos
ou substituímos (opção nossa) o produto
gratuitamente. Esta garantia pressupõe que, no
espaço do prazo de dos anos, se entregue o
aparelho avariado e o recibo (talão de compra)
e que se descreva, de forma sucinta, em que
consiste o defeito e quando surgiu. Se a nossa
garantia cobrir o defeito, você receberá o produto
reparado ou um novo produto. A reparação ou
substituição do produto não implica um recomeço
do prazo da garantia.
Responsável pela colocação no
mercado:
MONZ Handelsgesellschaft
International mbH & Co. KG
Metternichstr. 37, 54292 Trier / Germany
Endereço da assistência técnica:
MONZ SERVICE CENTER
c/o Teknihall Elektronik GmbH
Breitefeld 15, 64839 Münster / Germany
Número verde: 00800 / 68546854 (gratuito)
Versão: 01-2014
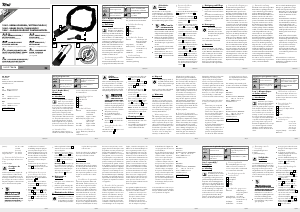
Schlüssel mit LED-Licht:
Ein-/Ausschalten (A2)
Drücken Sie den on/off-Taster auf der Ober
-
seite des Schlüsselgriffs und halten Sie die-
sen gedrückt, um das LED-Licht einzuschal-
ten. Beim Loslassen des on/off-Tasters geht
das LED-Licht aus.
Batteriewechsel (A3)
Öffnen Sie das Batteriefach mit einem fla
-
chen Schraubenzieher. Stecken Sie den
Schraubenzieher wie abgebildet in den
Schlitz und schieben Sie das Batteriefach
ein Stück weit aus dem Schlüssel. Nun zie
-
hen Sie das Batteriefach vorsichtig ganz aus
dem Schlüssel heraus.
(A4) Ziehen Sie die Batterie aus der Halte
-
rung heraus, verbiegen Sie dabei nicht die
Kontaktdrähte. Anschließend können Sie
eine neue Batterie (CR1620) in die Aufnah
-
me stecken. Achten Sie auf die richtige Po-
larität: der Pluspol muss nach unten zeigen.
Stecken Sie nun die Batteriehalterung wie
-
der bis zum Anschlag in das Batteriefach.
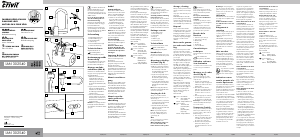
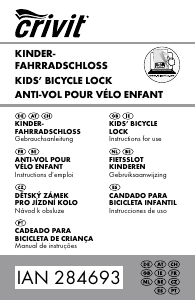
Montage der Schlosshalte-
rung am Fahrrad:
Befestigung der Schlosshalterung
mit Schrauben am Rahmen (A5)
- Entnehmen Sie zur Montage das Falt
-
schloss aus der Schlosshalterung
- Öffnen Sie die beiden Klettverschlüsse
an der Rückseite der Schlosshalterung
und ziehen Sie diese vollständig aus der
Schlosshalterung heraus.
- Befestigen Sie die Schlosshalterung mit
den beiden mitgelieferten Schrauben
wie abgebildet an den Bohrungen für die
Trinkflaschenhalterung an Unter- oder Sitz
-
rohr.
- Prüfen Sie den festen Sitz der Schlosshalte
-
rung
- Stecken Sie das Faltschloss wieder in die
Schlosshalterung und fixieren Sie es mit
dem Halteband.
Befestigung der Schlosshalterung
mit Klettverschluss (A6)
- Entnehmen Sie zur Montage das Falt
-
schloss aus der Schlosshalterung
- Stecken Sie die Klettverschlussbänder
durch die rückseitigen Halter.
- Legen Sie die Klettverschlussbänder um
das Unterrohr und ziehen Sie die Klettver
-
schlussbänder durch die jeweilige Lasche.
- Ziehen Sie die Klettverschlussbänder straff
an und schließen Sie die Klettverschlüsse.
- Stecken Sie das Faltschloss wieder in die
Schlosshalterung und fixieren Sie es mit
dem Halteband.
Verwendung des Fahrrad-
Faltschlosses:
- Entnehmen Sie zur Verwendung das Falt-
schloss aus der Schlosshalterung
Achtung! Es besteht Quetschgefahr
durch die einzelnen Faltschloss-Segmente!
- (A7) Öffnen Sie das Faltschloss mit einem
der mitgelieferten Schlüssel und ziehen
Sie die beiden Enden des Faltschlosses
auseinander.
- Falten Sie die Segmente auseinander
und legen Sie das Faltschloss vorsichtig
um den Fahrradrahmen. Sie können das
Faltschloss um den Fahrradrahmen und
Vorder- oder Hinterrad legen, oder Ihr
Fahrrad an einem festen Objekt (z. B. ei
-
nem geeigneten Pfosten/Laternenpfahl)
sichern.
- Stecken Sie die beiden Enden des Falt
-
schlosses zusammen und verschließen Sie
das Faltschloss mit dem Schlüssel.
!
Hinweis!
Es reicht nicht, dass Fahrrad-Faltschloss nur
durch das Vorder- oder Hinterrad zu legen
und dann an einem geeigneten Objekt (z.
B. einem geeigneten Pfosten/Laternenpfahl)
zu sichern, da das jeweilige Rad durch ein
-
faches Öffnen der Achsschraube vom Fahr-
rad gelöst werden kann.
Entsorgung:
Die Verpackung besteht zu 100% aus um-
weltfreundlichen Materialien, die Sie über
die örtlichen Recyclingstellen entsorgen
können. Über Entsorgungsmöglichkeiten in
-
formieren Sie sich bitte bei Ihrer Gemeinde
oder Stadtverwaltung.
GB/MT GB/MTGB/MTGB/MTGB/MT
DE/AT/CH DE/AT/CH DE/AT/CHDE/AT/CHDE/AT/CHDE/AT/CH
Garantie:
Garantie der MONZ Handelsgesellschaft
International mbH & Co. KG.
Sehr geehrte Kundin, sehr geehrter Kunde,
Sie erhalten auf dieses Produkt 2 Jahre Ga
-
rantie ab Kaufdatum. Im Falle von Mängeln
dieses Produkts stehen Ihnen gegen den
Verkäufer des Produkts gesetzliche Rechte
zu. Diese gesetzlichen Rechte werden durch
unsere im Folgenden dargestellte Garantie
nicht eingeschränkt.
Garantiebedingungen:
Die Garantiefrist beginnt mit dem Kaufda-
tum. Bitte bewahren Sie den Original Kas-
senbon gut auf. Diese Unterlage wird als
Nachweis für den Kauf benötigt.
Tritt innerhalb von zwei Jahren ab dem Kauf
-
datum dieses Produkts ein Material- oder
Fabrikationsfehler auf, wird das Produkt
von uns – nach unserer Wahl – für Sie kos
-
tenlos repariert oder ersetzt. Diese Garan-
tieleistung setzt voraus, dass innerhalb der
Zwei-Jahres-Frist das defekte Produkt und
der Kaufbeleg (Kassenbon) vorgelegt und
schriftlich kurz beschrieben wird, worin der
Mangel besteht und wann er aufgetreten ist.
Wenn der Defekt von unserer Garantie ge
-
deckt ist, erhalten Sie das reparierte oder
ein neues Produkt zurück. Mit Reparatur
oder Austausch des Produkts beginnt kein
neuer Garantiezeitraum.
Inverkehrbringer:
MONZ Handelsgesellschaft
International mbH & Co. KG
Metternichstr. 37
54292 Trier / Germany
Serviceadresse:
Monz Service Center
c/o Teknihall Elektronik GmbH
Breitefeld 15, 64839 Münster / Germany
Hotline: 00800 / 68546854 (kostenfrei)
Stand: 09/2014
their power during storage.
Empty batteries or spent storage batteries
must be disposed of correctly. Batteries may
not be charged.
Store single-use batteries away from spent
batteries in order to avoid confusion.
Battery disposal:
Batteries and storage batteries may not be
disposed of with household waste. You are
bound by law to return used batteries and
storage batteries. After use you can either
return batteries to our point of sale or some
-
where in the immediate vicinity (e.g. at the
shop or at communal collection points) free
of charge. Batteries and storage batteries
are marked with a rubbish bin with a red
cross through it and the chemical symbol
for the hazardous material, namely ‘Cd’ for
cadmium, ‘Hg’ for mercury and ‘Pb’ for lead.
Key with LED light:
Switching on and off (A2)
Press the on/off button on the top of the key
grip and hold it down to switch the LED light
on. The LED light switches off again when
you release the on/off button.
Changing the battery (A3)
Open the battery compartment with a flat
screwdriver. Insert the screwdriver into the
slot as shown and push the battery com
-
partment out of the key a little. Now pull the
battery compartment carefully out of the key.
(A4) Pull the battery out of the holder, taking
care not to bend the contact wires. Then you
can insert a new battery (CR1620) into the
holder. Ensure correct polarity: the positive
pole must face downwards. Now slide the
battery holder into the battery compartment
as far as possible.
Assembling the lock mount on
the bicycle:
Attach the lock mount to the frame
with screws (A5)
- Take the folding lock out of the lock mount
for assembly
- Open the two Velcro straps on the back of
the lock mount and pull them completely
out of the lock mount
Nunca lance as pilhas para o fogo. Não
estabeleça curto-circuito às pilhas. Mesmo quando
estão guardadas, as pilhas não recarregáveis
perdem parte da sua energia. As pilhas vazias ou
baterias gastas devem ser eliminadas de um modo
tecnicamente correcto. As pilhas não podem ser
carregadas. Guarde as pilhas não recarregáveis
separadamente de pilhas descarregadas, para
evitar trocas.
Eliminação de pilhas:
As pilhas e as baterias não podem ser deitadas
no lixo doméstico, e você tem o dever legal
de devolver as pilhas e baterias usadas. Pode
devolver as pilhas, depois de usadas, no nosso
ponto de vendas ou próximo de si (p. ex.
no comércio local ou nos pontos de recolha
municipais) sem qualquer custo. As pilhas ou
baterias estão identificadas com uma cruz por
cima de um contentor de lixo, bem como, com
o símbolo químico da substância poluente,
nomeadamente “Cd” para cádmio, “Hg” para
mercúrio e “Pb” para chumbo.
Chave com LED:
Ligar/Desligar (A2)
Pressione o botão on/off na parte superior da
pega da chave e mantenha-o assim para ligar
o LED. Ao largar o botão on/off, o LED volta a
desligar.
Substituição de pilhas (A3)
Abra o compartimento da pilha com uma chave
de fendas plana. Enfie a chave de fendas como
ilustrado na ranhura e empurre o compartimento
da pilha um pouco para fora da chave. Puxe ago
-
ra com cuidado o compartimento da pilha total-
mente para fora da chave.
(A4) Puxe a pilha para fora do suporte, tendo o
cuidado para não dobrar os fios de contacto. Em
seguida, pode encaixar uma nova pilha (CR1620)
na receção. Preste atenção à polaridade correta:
o polo positivo tem de apontar para baixo. Volte a
encaixar agora o suporte da pilha até ao encosto
no respetivo compartimento.
Montagem do suporte do fecho
na bicicleta:
Fixação do suporte do fecho com parafu-
sos ao quadro (A5)
- Retire do suporte do fecho o fecho dobrável
- Use the two screws that are included to fix
the lock mount as shown to the holes for
the drinking bottle mount on the upper or
lower seat tube.
- Check that the lock mount is fitted securely
- Insert the folding lock back into the lock
mount and attach it with the retaining strap.
Attach the lock mount with the Vel
-
cro strap (A6)
- Take the folding lock out of the lock mount
for assembly
- Insert the Velcro straps through the holders
on the rear.
- Lay the Velcro straps around the lower tube
and pull the Velcro straps through the rele
-
vant tab.
- Pull the Velcro straps tight and close the
Velcro straps
- Insert the folding lock back into the lock
mount and attach it with the retaining strap.
Use of the folding bicycle lock:
- Remove the folding lock from the lock
mount for use
Caution! There is a risk of crushing in the
individual folding lock segments.
- (A7) Open the folding lock with one of the
included keys and pull the two ends of the
folding lock apart.
- Unfold the segments and lay the folding
lock carefully around the bicycle frame.
You can lay the folding lock around the bi
-
cycle frame and the front or back wheel or
secure your bicycle on a fixed object (e.g.
a suitable pole/lamppost).
- Insert the two ends of the folding lock into
one another and lock the folding lock with
the key.
!
Note!
It is not sufficient to insert the folding bicycle
lock only through the front or back wheel
and then to a suitable object (e.g. a suita
-
ble pole/lamppost) as the wheel can be re-
moved from the bicycle by simply opening
the axle bolt.
Disposal:
The packaging comprises 100% environ-
mentally friendly materials that you can dis-
para montagem.
- Abra ambos os fechos de velcro na parte de trás
do suporte do fecho e puxe-os totalmente para
fora do suporte do fecho.
- Fixe, como ilustrado, o suporte do fecho com
ambos os parafusos fornecidos nos furos para o
suporte do cantil, no tubo inferior ou do selim.
- Verifique a fixação segura do suporte do fecho.
- Volte a encaixar o fecho dobrável no suporte do
fecho e fixe-o com a fita de prender.
Fixação do suporte do fecho com fecho
de velcro (A6)
- Para montar o fecho dobrável, retire-o do supor
-
te do fecho.
- Enfie as fitas de fecho de velcro através dos su
-
portes na parte de trás.
- Coloque as fitas de fecho de velcro à volta do
tubo inferior e puxe-as através da respetiva tala.
- Estique as fitas de fecho de velcro de modo a
ficarem justas e feche-as.
- Volte a encaixar o fecho dobrável no suporte do
fecho e fixe-o com a fita de prender.
Utilização do fecho dobrável
para bicicleta:
- Para utilizar o fecho dobrável, retire-o do suporte
do fecho.
Atenção! Existe perigo de entalamento devido
aos segmentos individuais do fecho dobrável!
- (A7) Abra o fecho dobrável com uma das cha
-
ves fornecidas e afaste ambas as extremidades
do fecho dobrável.
- Desdobre os segmentos e coloque o fecho do
-
brável com cuidado em volta do quadro da bi-
cicleta. Pode colocar o fecho dobrável em volta
do quadro da bicicleta e a roda dianteira ou
traseira, ou prender a sua bicicleta a um objeto
fixo (um poste de iluminação adequado, por
exemplo).
- Encaixe ambas as extremidades do fecho do
-
brável e feche-o com a chave.
!
Nota!
Não é suficiente colocar o fecho dobrável para bi
-
cicleta em volta da roda dianteira ou traseira e de-
pois prendê-lo a um objeto adequado (um poste
de iluminação adequado, por exemplo), visto que
a respetiva roda pode ser separada da bicicleta
desapertando o parafuso do eixo.
GB
MT
FOLDING BICYCLE LOCK
Instruction Manual
Introduction:
Congratulations!
You have purchased a high quality product.
Please familiarise yourself with the product be
-
fore initial use. Read the following instruction
manual carefully. Only use the product as de
-
scribed and for the given areas of application.
Keep these instructions in a safe place. If you
pass the product on to a third party please
also pass on all documentation.
Symbols in this instruction & instal
-
lation manual:
!
This symbol indicates a risk of injury.
!
This is how additional information is
earmarked.
!
Correct usage:
This folding bicycle lock is designed for lock-
ing bicycles, scooters and similar on fixed
objects and at locations that are intended
and suitable for this purpose
Any other uses of or modifications to the
product are considered incorrect and can
lead to risks such as injuries and damage.
The distributor does not accept liability for
damage resulting from incorrect usage. The
product is not intended for commercial use.
Contents: (A1)
1 x Folding lock, comprising 6 segments
1 x Lock mount
2 x Velcro strips
2 x Keys
1 x Key with LED light
2 x Cross-head screws 2 x 28 mm
2 x Washers
1 x Operating instructions (no illustration)
Technical data:
Type: Folding bicycle lock
Article no.: 21260 / IAN 103943
Monz no.: E83081
Length: 6 segments, total length approx. 85 cm
Size of folding lock including lock mount:
60 x 55 x 190 mm
Battery: 3V CR 1620
Production date: 2014
Guarantee: 2 years
!
Safety notes!
Risk of injury
Risk to children
Caution! Only attach the lock mount on a
position of the bicycle frame where it cannot
impede movement or cause injury.
Caution! There is a risk of crushing in the
individual folding lock segments.
Caution! Not suitable for children under
the age of 36 months. Risk of swallowing
small parts.
This article is not a toy. Keep this article
away from children.
Batteries can be life-threatening if swallowed
and the article and the corresponding batter
-
ies must be kept out of the reach of children
for this reason.
Seek medical help immediately if a battery
is swallowed.
For reasons of safety please read the oper
-
ating instructions and the safety notes they
contain with great care and keep them for
later reference as they can be helpful in the
event of problems with your bicycle lock. The
instructions are an integral part of this prod
-
uct and must be passed on if the product is
transferred to a third party.
Do not make any modifications to the folding
bicycle lock as this has a significant impact
on function and safety.
Check the condition and function of the fold
-
ing bicycle lock at regular intervals. A defec-
tive folding bicycle lock must be disposed of
correctly (see disposal).
Key with LED light:
Avoid looking directly into the beam.
Remove the batteries from the key if it is out
of use for longer periods.
Remove empty batteries from the key imme
-
diately in order to avoid battery leakage.
Dados técnicos:
Tipo: Fecho dobrável para bicicleta
N.º do artigo: 21260 / IAN 103943
N.º Monz: E83081
Comprimento: 6 segmentos, comprimento total
aprox. 85 cm
Dimensões do fecho dobrável incl. suporte do fe
-
cho: 60 x 55 x 190 mm
Pilha: 3V CR 1620
Data da produção: 2014
Garantia: 2 anos
!
Indicações de segurança!
Perigo de ferimento
Perigo para as crianças
Atenção! Fixe o suporte do fecho apenas num
local do quadro da bicicleta onde não dificulta
a condução nem provoca ferimentos durante a
mesma.
Atenção! Existe perigo de entalamento devido
aos segmentos individuais do fecho dobrável!
Atenção! Não adequado a crianças com idade
inferior a 36 meses. Perigo de ingestão de peças
pequenas.
Este artigo não é um brinquedo. Guarde este arti
-
go afastado das crianças.
As pilhas podem ser mortais por ingestão e, por
isso, este artigo e as respetivas pilhas devem ser
guardados num local inacessível a crianças pe
-
quenas. Se alguém engolir uma pilha, deve procu-
rar imediatamente ajuda médica.
Por razões de segurança, pedimos-lhe que leia ao
pormenor o manual de instruções e as indicações
de segurança aí contidas e que as guarde, pois
podem ser-lhe sempre úteis em caso de proble
-
mas com o seu fecho dobrável para bicicleta. O
manual é parte integrante fixa deste produto e
deve ser entregue caso se transmita o produto a
terceiros. Não proceda a quaisquer alterações no
fecho dobrável para bicicleta, pois isso interfere
fortemente nas funções e na segurança. Verifique
regularmente o estado e a funcionalidade do fe
-
cho dobrável para bicicleta. Um fecho dobrável
para bicicleta com defeito deve ser eliminado de
modo tecnicamente adequado (ver Eliminação).
Chave com LED:
Evite olhar diretamente para o raio de luz.
Remova as pilhas da chave quando não a utilizar
Empty batteries must be removed from the
key immediately in order to avoid damage.
Caution! Leaking or damaged batteries
can cause burns to the skin on contact. Do
not touch the batteries with your bare hands.
Batteries may not be dismantled, thrown into
the fire or short-circuited.
#
!
Caution! Packaging material and
small parts must be kept away from small
children. There is a risk of suffocation.
!
Note on cleaning and care:
- clean with a damp cloth
- do not submerge in water
- check the mobility of the individual seg
-
ments regularly and lubricate the connec-
tions if necessary (the lubricant must be
frost-proof and acid-free).
- the folding bicycle lock is maintenance free
- store the folding bicycle lock in a cool, dry
place and protect it from UV-light.
!
Note!
The folding bicycle lock does not offer 100%
protection from theft.
The folding bicycle lock is not suitable as
theft-protection for motorbikes or similar.
Note on batteries:
Batteries may not be dismantled, thrown into
fire or short-circuited.
Leaking or damaged batteries can cause
acid burns to skin on contact. Do not touch
the batteries with bare hands. Batteries
should not be stored in the vicinity of chil
-
dren.
If a battery is swallowed please immediately
consult a doctor. Only use batteries from the
same manufacturer.
Insert the batteries into the battery compart
-
ment in accordance with their polarity.
Do not use a combination of old and new
batteries and storage batteries.
Store your batteries in a cool dry place
where they cannot become damp.
Never throw batteries into the fire.
Do not short-circuit batteries.
Single-use batteries will also lose some of
por um período de tempo mais prolongado. As
pilhas descarregadas devem ser rapidamente reti
-
radas da chave, para evitar fugas. As pilhas com
fugas devem ser imediatamente retiradas da cha
-
ve, para evitar danos. Cuidado! As pilhas com
fugas ou danificadas podem causar queimaduras
em contacto com a pele. Não toque nas pilhas
com as mãos sem proteção. As pilhas não podem
ser decompostas, lançadas para o fogo ou curto-
circuitadas.
!
Atenção! O material de embalagem e
as peças pequenas devem ser mantidos longe de
crianças pequenas. Existe perigo de asfixia.
!
Limpeza e nota relativa
à conservação:
- limpar com um pano húmido
- não submergir em água
- verifique regularmente a mobilidade de cada
um dos segmentos; se necessário, aplique um
lubrificante adequado nos pontos de ligação (o
lubrificante deve ser à prova de congelação e
livre de ácidos!)
- o fecho dobrável para bicicleta não necessita
de manutenção
- guardar o fecho dobrável para bicicleta em lo
-
cal fresco, seco e abrigo da luz ultravioleta
!
Nota!
O fecho dobrável para bicicleta não oferece
100% de proteção contra furto. O fecho dobrável
para bicicleta não é adequado para proteger mo
-
tos ou similares contra furto.
Indicação sobre pilhas:
As pilhas não podem ser decompostas, lançadas
para o fogo ou curto-circuitadas. As pilhas com
fugas ou danificadas podem causar queimaduras
em contacto com a pele. Não toque nas pilhas
com as mãos sem protecção. As pilhas não devem
ser guardadas na proximidade de crianças.
Em caso de ingestão de uma pilha, procure
imediatamente um médico. Utilize somente pilhas
do mesmo fabricante. Insira as pilhas, de acordo
com a sua polaridade, no compartimento de
pilhas previsto para o efeito. Não combine pilhas
ou baterias antigas com novas. Guarde as suas
pilhas em local seco e fresco, mas não húmido.
PT PTPTPTPT
Auswirkung auf die Funktionen und Sicher-
heit hat.
Überprüfen Sie regelmäßig den Zustand
und die Funktion des Fahrrad-Faltschlosses.
Ein defektes Fahrrad-Faltschloss ist fachge
-
recht zu entsorgen (siehe Entsorgung).
Schlüssel mit LED-Licht:
Vermeiden Sie direkt in den Lichtstrahl zu
schauen.
Entfernen Sie die Batterien aus dem Schlüs
-
sel, wenn Sie diesen über einen längeren
Zeitraum nicht benutzen.
Entladene Batterien müssen unverzüglich
aus dem Schlüssel entfernt werden, um ein
Auslaufen der Batterien zu vermeiden.
Ausgelaufene Batterien müssen sofort aus
dem Schlüssel entfernt werden, um eine Be
-
schädigung zu vermeiden.
Vorsicht! Ausgelaufene oder beschädig
-
te Batterien können bei Berührung mit der
Haut Verätzungen verursachen. Berühren
Sie die Batterien nicht mit bloßen Händen.
Batterien dürfen nicht auseinander genom
-
men, ins Feuer geworfen oder kurzgeschlos-
sen werden.
!
Achtung! Verpackungsmaterial und
Kleinteile sind von Kleinkindern fern zu hal
-
ten. Es besteht Erstickungsgefahr.
!
Reinigung &
Pflegehinweis:
- mit feuchtem Lappen reinigen
- nicht ins Wasser tauchen
- kontrollieren Sie regelmäßig die Beweg
-
lichkeit der einzelnen Segmente, ggfs. ge-
ben Sie ein geeignetes Schmiermittel auf
die Verbindungsstellen (das Schmiermittel
muss frostsicher und säurefrei sein!)
- das Fahrrad-Faltschloss ist wartungsfrei
- das Fahrrad-Faltschloss kühl, trocken und
vor UV-Licht geschützt lagern
!
Hinweis!
Das Fahrrad-Faltschloss bietet keinen
100%igen Schutz vor Diebstahl. Das Fahr
-
rad-Faltschloss ist nicht geeignet Motorräder
2 x Schlüssel
1 x Schlüssel mit LED-Licht
2 x Inbusschraube 2 x 28 mm
1 x Bedienungsanleitung (ohne Abb.)
Technische Daten:
Typ: Fahrrad-Faltschloss
Artikel-Nr.: 21260 / IAN 103943
Monz-Nr.: E83081
Länge: 6 Segmente, Gesamtlänge ca. 85 cm
Größe Faltschloss inkl. Schlosshalterung:
60 x 55 x 190 mm
Typ Batterie: CR1620
Produktionsdatum: 2014
Garantie: 2 Jahre
!
Sicherheitshinweis!
Verletzungsgefahr
Gefahr für Kinder
Achtung! Befestigen Sie die Schlosshal
-
terung nur an einer Stelle des Fahrradrah-
mens, an der diese während des Fahrens
nicht stören bzw. Verletzungen verursachen
kann.
Achtung! Es besteht Quetschgefahr durch
die einzelnen Faltschloss-Segmente!
Achtung! Nicht geeignet für Kinder unter
36 Monaten. Gefahr des Verschluckens von
Kleinteilen.
Dieser Artikel ist kein Spielzeug. Halten Sie
diesen Artikel fern von Kindern.
Batterien können beim Verschlucken lebens
-
gefährlich sein, daher muss dieser Artikel
und die dazugehörigen Batterien für Klein
-
kinder unzugänglich aufbewahrt werden.
Sollte jemand eine Batterie verschlucken, so
muss sofort medizinische Hilfe in Anspruch
genommen werden.
Aus Sicherheitsgründen bitten wir Sie, die
Bedienungsanleitung und die darin enthalte
-
nen Sicherheitshinweise genauestens durch-
zulesen und aufzubewahren, da sie Ihnen
bei Problemen mit Ihrem Fahrrad-Faltschloss
immer hilfreich sein kann. Die Anleitung ist
ein fester Bestandteil dieses Produktes und
muss bei Weitergabe des Produktes an Drit
-
te mitgegeben werden.
Nehmen Sie keine Veränderungen an dem
Fahrrad-Faltschloss vor, da dies eine starke

Participe da conversa sobre este produto
Aqui você pode compartilhar o que pensa sobre Crivit IAN 103943 Cadeado de bicicleta. Se você tiver alguma dúvida, primeiro leia atentamente o manual. A solicitação de manual pode ser feita através do nosso formulário de contato.