FOLDING BICYCLE
LOCK
IAN 271535
FAHRRAD-FALTSCHLOSS
BEDIENUNGSANLEITUNG
DE AT CH
DE AT CH
FAHRRAD-FALTSCHLOSS
Bedienungsanleitung
Einleitung:
Herzlichen Glückwunsch!
Mit Ihrem Kauf haben Sie sich für ein hoch-
wertiges Produkt entschieden. Machen
Sie sich vor der ersten Inbetriebnahme mit
dem Produkt vertraut. Lesen Sie hierzu auf-
merksam die nachfolgende Bedienungsan-
leitung. Benutzen Sie das Produkt nur wie
beschrieben und für die angegebenen Ein-
satzbereiche. Bewahren Sie diese Bedie-
nungsanleitung gut auf. Händigen Sie alle
Unterlagen bei Weitergabe des Produkts
an Dritte ebenfalls mit aus.
Zeichen in dieser Gebrauchs- &
Montageanleitung:
!
Dieses Zeichen warnt Sie vor Ver-
letzungsgefahren.
!
So sind ergänzende Informationen
gekennzeichnet.
!
Bestimmungsgemäße
Verwendung:
Dieses Fahrrad-Faltschloss ist zum Ab-
schließen von Fahrrädern, Rollern und
ähnlichen Fahrzeugen an dafür vorge-
sehene und geeignete Stellen oder feste
Objekte gedacht. Andere Verwendung
oder Veränderung am Produkt gelten als
nicht bestimmungsgemäß und können zu
Risiken wie Verletzungen und Beschädi-
gungen führen. Für Schäden, die aus der
nicht bestimmungsgemäßen Verwendung
resultieren, übernimmt der Inverkehrbrin-
ger keine Haftung. Das Produkt ist nicht für
den gewerblichen Einsatz bestimmt.
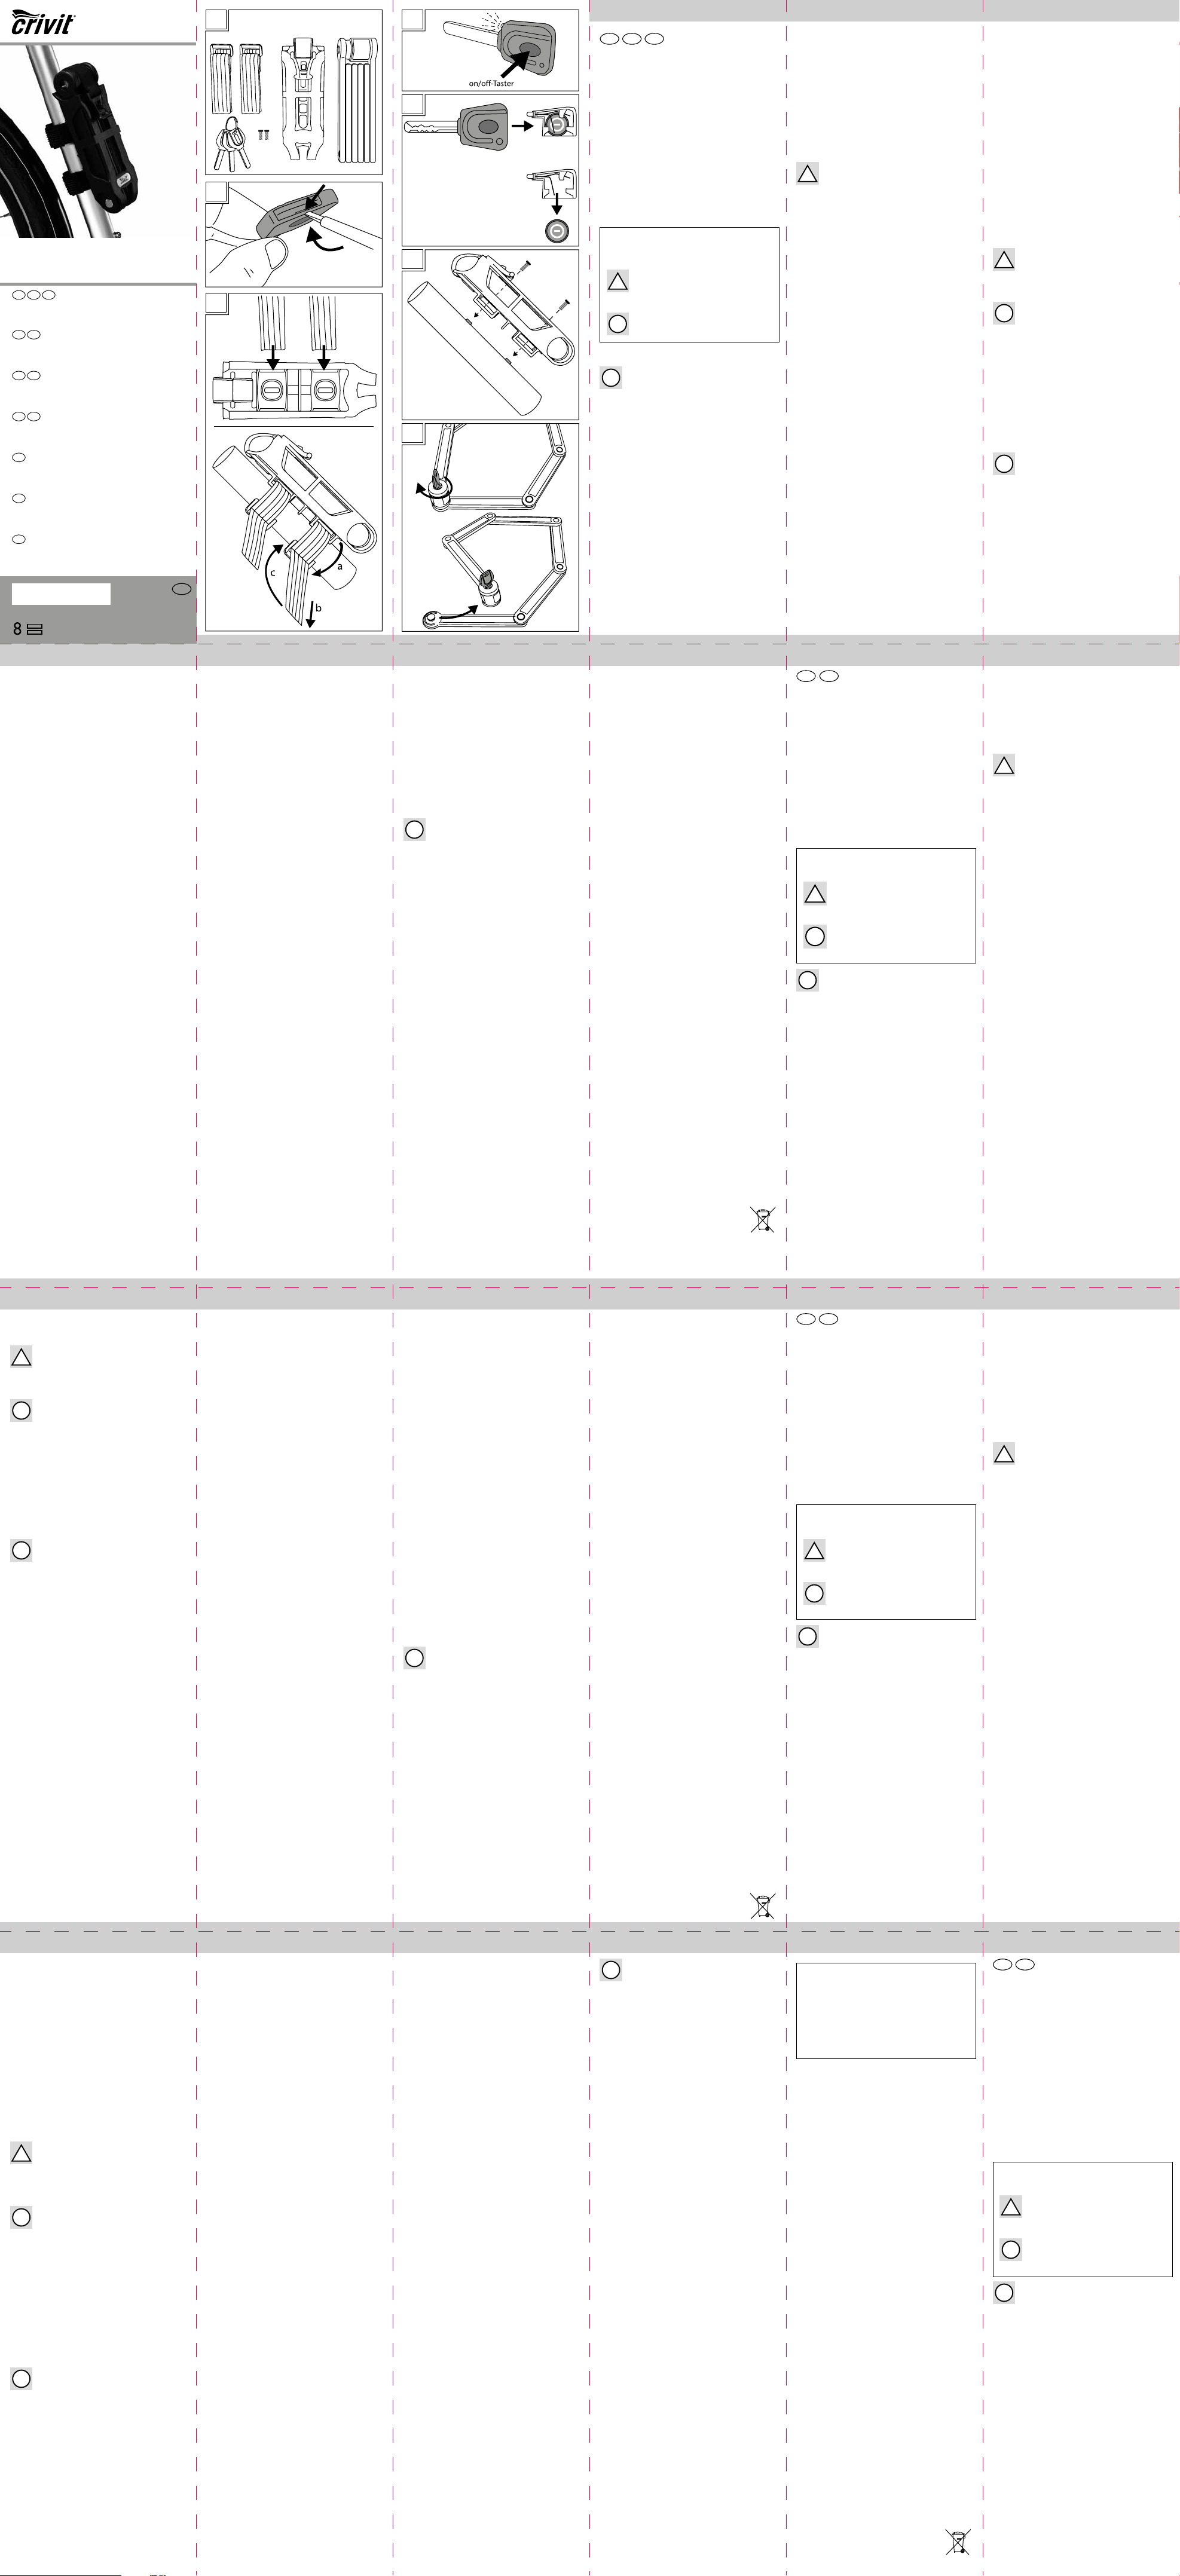
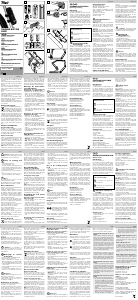
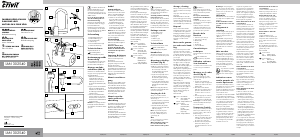
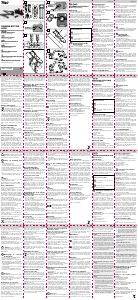
Lieferumfang: (A1)
1 x Faltschloss, bestehend aus 6 Segmenten
1 x Schlosshalterung
2 x Klettverschlussband
2 x Schlüssel
1 x Schlüssel mit LED-Licht
2 x Inbusschraube 2 x 28 mm
GB
IE
FOLDING BICYCLE LOCK
Instruction Manual
Introduction:
Congratulations!
You have purchased a high quality prod-
uct. Please familiarise yourself with the
product before initial use. Read the follow-
ing instruction manual carefully. Only use
the product as described and for the given
areas of application.
Keep these instructions in a safe place. If
you pass the product on to a third party
please also pass on all documentation.
Symbols in this instruction & in-
stallation manual:
!
This symbol indicates a risk of in-
jury.
!
This is how additional information
is earmarked.
!
Correct usage:
This folding bicycle lock is designed for
locking bicycles, scooters and similar on
fixed objects and at locations that are in-
tended and suitable for this purpose
Any other uses of or modifications to the
product are considered incorrect and can
lead to risks such as injuries and damage.
The distributor does not accept liability for
damage resulting from incorrect usage.
The product is not intended for commercial
use.
Contents: (A1)
1 x Folding lock, comprising 6 segments
1 x Lock mount
2 x Velcro strips
2 x Keys
1 x Key with LED light
2 x Cross-head screws 2 x 28 mm
2 x Washers
1 x Operating instructions (no illustration)
Technical data:
Type: Folding bicycle lock
Article no.: 21260 / IAN 271535
Monz no.: PO30000061
Length: 6 segments, total length approx.
85 cm
Size of folding lock including lock mount:
60 x 55 x 190 mm
Battery: 3V CR 1620
Production date: 2015
Guarantee: 2 years
!
Safety notes!
Risk of injury
Risk to children
Caution! Only attach the lock mount on a
position of the bicycle frame where it can-
not impede movement or cause injury.
Caution! There is a risk of crushing in the
individual folding lock segments.
Caution! Not suitable for children under
the age of 36 months. Risk of swallowing
small parts.
This article is not a toy. Keep this article
away from children.
Batteries can be life-threatening if swal-
lowed and the article and the correspond-
ing batteries must be kept out of the reach
of children for this reason.
Seek medical help immediately if a battery
is swallowed.
For reasons of safety please read the oper-
ating instructions and the safety notes they
contain with great care and keep them for
later reference as they can be helpful in the
event of problems with your bicycle lock.
The instructions are an integral part of this
product and must be passed on if the prod-
uct is transferred to a third party.
Do not make any modifications to the fold-
ing bicycle lock as this has a significant
impact on function and safety.
Check the condition and function of the
folding bicycle lock at regular intervals. A
defective folding bicycle lock must be dis-
posed of correctly (see disposal).
Key with LED light:
Avoid looking directly into the beam.
Remove the batteries from the key if it is out
of use for longer periods.
Remove empty batteries from the key imme-
diately in order to avoid battery leakage.
Empty batteries must be removed from the
key immediately in order to avoid damage.
Caution! Leaking or damaged batteries
can cause burns to the skin on contact.
Do not touch the batteries with your bare
hands.
1 x Bedienungsanleitung (ohne Abb.)
Technische Daten:
Typ: Fahrrad-Faltschloss
Artikel-Nr.: 21260 / IAN 271535
Monz-Nr.: PO30000061
Länge: 6 Segmente, Gesamtlänge ca. 85 cm
Größe Faltschloss inkl. Schlosshalterung:
60 x 55 x 190 mm
Typ Batterie: CR1620
Produktionsdatum: 2015
Garantie: 2 Jahre
!
Sicherheitshinweis!
Verletzungsgefahr
Gefahr für Kinder
Achtung! Befestigen Sie die Schlosshal-
terung nur an einer Stelle des Fahrradrah-
mens, an der diese während des Fahrens
nicht stören bzw. Verletzungen verursa-
chen kann.
Achtung! Es besteht Quetschgefahr
durch die einzelnen Faltschloss-Segmente!
Achtung! Nicht geeignet für Kinder unter
36 Monaten. Gefahr des Verschluckens
von Kleinteilen.
Dieses Produkt ist kein Spielzeug. Halten
Sie dieses Produkt fern von Kindern.
Batterien können beim Verschlucken le-
bensgefährlich sein, daher muss dieses
Produkt und die dazugehörigen Batterien
für Kleinkinder unzugänglich aufbewahrt
werden.
Sollte jemand eine Batterie verschlucken,
so muss sofort medizinische Hilfe in An-
spruch genommen werden.
Aus Sicherheitsgründen bitten wir Sie,
die Bedienungsanleitung und die darin
enthaltenen Sicherheitshinweise genau-
estens durchzulesen und aufzubewahren,
da sie Ihnen bei Problemen mit Ihrem
Fahrrad-Faltschloss immer hilfreich sein
kann. Die Anleitung ist ein fester Bestand-
teil dieses Produktes und muss bei Weiter-
gabe des Produktes an Dritte mitgegeben
werden.
Nehmen Sie keine Veränderungen an dem
Fahrrad-Faltschloss vor, da dies eine starke
Auswirkung auf die Funktionen und Sicher-
heit hat.
Überprüfen Sie regelmäßig den Zustand
und die Funktion des Fahrrad-Faltschlos-
ses. Ein defektes Fahrrad-Faltschloss ist
fachgerecht zu entsorgen (siehe Entsor-
gung).
Schlüssel mit LED-Licht:
Vermeiden Sie direkt in den Lichtstrahl zu
schauen.
Entfernen Sie die Batterien aus dem Schlüs-
sel, wenn Sie diesen über einen längeren
Zeitraum nicht benutzen.
Entladene Batterien müssen unverzüglich
aus dem Schlüssel entfernt werden, um ein
Auslaufen der Batterien zu vermeiden.
Ausgelaufene Batterien müssen sofort aus
dem Schlüssel entfernt werden, um eine
Beschädigung zu vermeiden.
Vorsicht! Ausgelaufene oder beschädig-
te Batterien können bei Berührung mit der
Haut Verätzungen verursachen. Berühren
Sie die Batterien nicht mit bloßen Händen.
Batterien dürfen nicht auseinander ge-
nommen, ins Feuer geworfen oder kurzge-
schlossen werden.
!
Achtung! Verpackungsmaterial
und Kleinteile sind von Kleinkindern fern
zu halten. Es besteht Erstickungsgefahr.
!
Reinigung &
Pflegehinweis:
- mit feuchtem Lappen reinigen
- nicht ins Wasser tauchen
- kontrollieren Sie regelmäßig die Beweg-
lichkeit der einzelnen Segmente, ggfs.
geben Sie ein geeignetes Schmiermittel
auf die Verbindungsstellen (das Schmier-
mittel muss frostsicher und säurefrei sein!)
- das Fahrrad-Faltschloss ist wartungsfrei
- das Fahrrad-Faltschloss kühl, trocken und
vor UV-Licht geschützt lagern
!
Hinweis!
Das Fahrrad-Faltschloss bietet keinen
100%igen Schutz vor Diebstahl. Das
Fahrrad-Faltschloss ist nicht geeignet Mo-
torräder oder ähnliches vor Diebstahl zu
sichern.
Batteriehinweis:
Batterien dürfen nicht auseinander ge-
nommen, ins Feuer geworfen oder kurzge-
schlossen werden.
Ausgelaufene oder beschädigte Batterien
können bei Berührung mit der Haut Ver-
ätzungen verursachen. Berühren Sie die
Batterien nicht mit bloßen Händen. Batte-
rien sollten nicht in der Nähe von Kindern
aufbewahrt werden.
Sollte eine Batterie verschluckt worden
sein, suchen Sie bitte umgehend einen Arzt
auf. Verwenden Sie nur Batterien gleicher
Hersteller.
Setzen Sie Batterien Ihrer Polarität entspre-
chend in das dafür vorgesehene Batterie-
fach ein.
Verwenden Sie keine Kombinationen aus
alten und neuen Batterien oder Akkus.
Lagern Sie Ihre Batterien trocken und kühl,
nicht feucht.
Werfen Sie Batterien auf keinen Fall ins
Feuer.
Schließen Sie Batterien nicht kurz. Einweg-
batterien verlieren auch bei der Lagerung
einen Teil ihrer Energie.
Leere Batterien oder verbrauchte Akkus
sind fachgerecht zu entsorgen. Batterien
dürfen nicht geladen werden.
Lagern Sie Einwegbatterien getrennt von
entladenen Batterien, um Verwechslungen
zu vermeiden.
Batterieentsorgung:
Batterien und Akkus dürfen nicht im Haus-
müll entsorgt werden, sondern Sie sind
zur Rückgabe gebrauchter Batterien und
Akkus gesetzlich verpflichtet. Sie können
die Batterien nach Gebrauch entweder
in unserer Verkaufsstelle oder in unmit-
telbarer Nähe (z. B. im Handel oder in
kommunalen Sammelstellen) unentgeltlich
zurückgeben. Batterien und Akkus sind mit
einer durchgekreuzten Mülltonne sowie
dem chemischen Symbol des Schadstoffes
bezeichnet, nämlich „Cd“ für Cadmium,
„Hg“ für Quecksilber und „Pb“ für Blei.
Schlüssel mit LED-Licht:
Ein-/Ausschalten (A2)
Drücken Sie den on/off-Taster auf der
Oberseite des Schlüsselgriffs und halten
Sie diesen gedrückt, um das LED-Licht ein-
zuschalten. Beim Loslassen des on/off-Tas-
ters geht das LED-Licht aus.
Batteriewechsel (A3)
Öffnen Sie das Batteriefach mit einem fla-
chen Schraubenzieher. Stecken Sie den
Schraubenzieher wie abgebildet in den
Schlitz und schieben Sie das Batteriefach
ein Stück weit aus dem Schlüssel. Nun zie-
hen Sie das Batteriefach vorsichtig ganz
aus dem Schlüssel heraus.
(A4) Ziehen Sie die Batterie aus der Halte-
rung heraus, verbiegen Sie dabei nicht die
Kontaktdrähte. Anschließend können Sie
eine neue Batterie (CR1620) in die Halte-
rung stecken. Achten Sie auf die richtige
Polarität: der Pluspol muss nach unten zei-
gen. Stecken Sie nun die Batteriehalterung
wieder bis zum Anschlag in das Batterie-
fach.
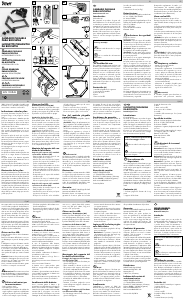
Montage der Schlosshalte-
rung am Fahrrad:
Befestigung der Schlosshalterung
mit Schrauben am Rahmen (A5)
- Entnehmen Sie zur Montage das Falt-
schloss aus der Schlosshalterung
- Öffnen Sie die beiden Klettverschlüsse
an der Rückseite der Schlosshalterung
und ziehen Sie diese vollständig aus der
Schlosshalterung heraus.
- Befestigen Sie die Schlosshalterung mit
den beiden mitgelieferten Schrauben
wie abgebildet an den Bohrungen für
die Trinkflaschenhalterung an Unter- oder
Sitzrohr.
- Prüfen Sie den festen Sitz der Schlosshal-
terung
- Stecken Sie das Faltschloss wieder in die
Schlosshalterung und fixieren Sie es mit
dem Halteband.
Befestigung der Schlosshalterung
mit Klettverschluss (A6)
- Entnehmen Sie zur Montage das Falt-
schloss aus der Schlosshalterung
- Stecken Sie die Klettverschlussbänder
durch die rückseitigen Halter.
- Legen Sie die Klettverschlussbänder um
das Unterrohr und ziehen Sie die Klett-
verschlussbänder durch die jeweilige La-
sche.
- Ziehen Sie die Klettverschlussbänder
straff an und schließen Sie die Klettver-
schlüsse.
- Stecken Sie das Faltschloss wieder in die
Schlosshalterung und fixieren Sie es mit
dem Halteband.
Verwendung des Fahrrad-
Faltschlosses:
- Entnehmen Sie zur Verwendung das Falt-
schloss aus der Schlosshalterung
Achtung! Es besteht Quetschgefahr
durch die einzelnen Faltschloss-Segmente!
- (A7) Öffnen Sie das Faltschloss mit ei-
nem der mitgelieferten Schlüssel und zie-
hen Sie die beiden Enden des Faltschlos-
ses auseinander.
- Falten Sie die Segmente auseinander
und legen Sie das Faltschloss vorsichtig
um den Fahrradrahmen. Sie können das
Faltschloss um den Fahrradrahmen und
Vorder- oder Hinterrad legen, oder Ihr
Fahrrad an einem festen Objekt (z. B. ei-
nem geeigneten Pfosten/Laternenpfahl)
sichern.
- Stecken Sie die beiden Enden des Falt-
schlosses zusammen und verschließen
Sie das Faltschloss mit dem Schlüssel.
!
Hinweis!
Es reicht nicht, dass Fahrrad-Faltschloss
nur durch das Vorder- oder Hinterrad zu
legen und dann an einem geeigneten Ob-
jekt (z. B. einem geeigneten Pfosten/Later-
nenpfahl) zu sichern, da das jeweilige Rad
durch einfaches Öffnen der Achsschraube
vom Fahrrad gelöst werden kann.
Entsorgung:
Die Verpackung besteht zu 100% aus um-
weltfreundlichen Materialien, die Sie über
die örtlichen Recyclingstellen entsorgen
können. Über Entsorgungsmöglichkeiten
informieren Sie sich bitte bei Ihrer Gemein-
de oder Stadtverwaltung.
Garantie:
Garantie der MONZ Handelsgesellschaft
International mbH & Co. KG.
Sehr geehrte Kundin, sehr geehrter Kunde,
Sie erhalten auf dieses Produkt 2 Jahre
Garantie ab Kaufdatum. Im Falle von Män-
geln dieses Produkts stehen Ihnen gegen
den Verkäufer des Produkts gesetzliche
Rechte zu. Diese gesetzlichen Rechte wer-
den durch unsere im Folgenden dargestell-
te Garantie nicht eingeschränkt.
Garantiebedingungen:
Die Garantiefrist beginnt mit dem Kaufda-
tum. Bitte bewahren Sie den Original Kas-
senbon gut auf. Diese Unterlage wird als
Nachweis für den Kauf benötigt.
Tritt innerhalb von zwei Jahren ab dem
Kaufdatum dieses Produkts ein Material-
oder Fabrikationsfehler auf, wird das Pro-
dukt von uns – nach unserer Wahl – für
Sie kostenlos repariert oder ersetzt. Diese
Garantieleistung setzt voraus, dass in-
nerhalb der Zwei-Jahres-Frist das defekte
Produkt und der Kaufbeleg (Kassenbon)
vorgelegt und schriftlich kurz beschrieben
wird, worin der Mangel besteht und wann
er aufgetreten ist.
Wenn der Defekt von unserer Garantie ge-
deckt ist, erhalten Sie das reparierte oder
ein neues Produkt zurück. Mit Reparatur
oder Austausch des Produkts beginnt kein
neuer Garantiezeitraum.
Inverkehrbringer:
MONZ Handelsgesellschaft
International mbH & Co. KG
Metternichstr. 37
54292 Trier / Germany
Serviceadresse:
Monz Service Center
c/o Teknihall Elektronik GmbH
Breitefeld 15, 64839 Münster / Germany
Hotline: 00800 / 68546854 (kostenfrei)
Stand: 09/2015
Das Symbol der durchgestrichenen Müll-
tonne zeigt an, dass Batterien nicht in den
normalen Hausmüll entsorgt werden dürfen.
DE/AT/CH DE/AT/CH
GB/IEDE/AT/CH DE/AT/CH DE/AT/CHDE/AT/CH
Batteries may not be dismantled, thrown
into the fire or short-circuited.
#
!
Caution! Packaging material and
small parts must be kept away from small
children. There is a risk of suffocation.
!
Note on cleaning and care:
- clean with a damp cloth
- do not submerge in water
- check the mobility of the individual seg-
ments regularly and lubricate the connec-
tions if necessary (the lubricant must be
frost-proof and acid-free).
- the folding bicycle lock is maintenance
free
- store the folding bicycle lock in a cool,
dry place and protect it from UV-light.
!
Note!
The folding bicycle lock does not offer
100% protection from theft.
The folding bicycle lock is not suitable as
theft-protection for motorbikes or similar.
Note on batteries:
Batteries may not be dismantled, thrown
into fire or short-circuited.
Leaking or damaged batteries can cause
acid burns to skin on contact. Do not
touch the batteries with bare hands. Bat-
teries should not be stored in the vicinity
of children.
If a battery is swallowed please immedi-
ately consult a doctor. Only use batteries
from the same manufacturer.
Insert the batteries into the battery com-
partment in accordance with their polarity.
Do not use a combination of old and new
batteries and storage batteries.
Store your batteries in a cool dry place
where they cannot become damp.
Never throw batteries into the fire.
Do not short-circuit batteries.
Single-use batteries will also lose some of
their power during storage.
Empty batteries or spent storage batteries
must be disposed of correctly. Batteries
may not be charged.
Store single-use batteries away from spent
batteries in order to avoid confusion.
Enlever les piles de la clé si elle ne sera
pas utilisée pendant quelque temps.
Les piles usagées doivent être immédia-
tement retirées de la clé afin d’éviter les
éventuelles fuites.
En cas de fuite d’une pile, il faut la retirer
immédiatement de la clé afin d’éviter tout
dommage.
Prudence ! Les piles endommagées ou
présentant des fuites peuvent provoquer
des brûlures en cas de contact avec la
peau. Ne pas toucher les piles à mains
nues.
Les piles ne doivent pas être démontées,
être jetées dans le feu ou être court-circui-
tées.
!
Attention ! Les emballages et
petites pièces doivent être tenus hors de
portée des petits enfants. Il y a un risque
d’étouffement.
!
Nettoyage & conseils
d’entretien :
- Nettoyer à l’aide d’un chiffon humide.
- Ne pas immerger dans l’eau.
- Vérifier régulièrement la mobilité des
différents segments, le cas échéant appli-
quer un lubrifiant approprié sur les jonc-
tions (le lubrifiant doit être résistant au gel
et sans acide !).
- L’antivol pliable pour vélo ne nécessite
pas d’entretien.
- Conserver l’antivol pliable dans un en-
droit frais, sec et à l’abri des rayons UV.
!
Remarque !
L’antivol pliable ne garantit pas une protec-
tion à 100 % contre le vol.
L’antivol pliable pour vélo ne convient pas
à la protection contre le vol de motos ou
de véhicules semblables.
Remarques sur les piles :
Les piles ne doivent pas être désossées, je-
tées au feu ou court-circuitées.
Les piles présentant des fuites ou endom-
magées peuvent entraîner des brûlures en
cas de frottement avec la peau. Ne pas
touchez les piles avec les mains nues. Les
piles doivent être conservées hors de la
portée des enfants.
Battery disposal:
Batteries and storage batteries may not be
disposed of with household waste. You are
bound by law to return used batteries and
storage batteries. After use you can either
return batteries to our point of sale or some-
where in the immediate vicinity (e.g. at the
shop or at communal collection points) free
of charge. Batteries and storage batteries are
marked with a rubbish bin with a red cross
through it and the chemical symbol for the
hazardous material, namely ‘Cd’ for cadmi-
um, ‘Hg’ for mercury and ‘Pb’ for lead.
Key with LED light:
Switching on and off (A2)
Press the on/off button on the top of the
key grip and hold it down to switch the LED
light on. The LED light switches off again
when you release the on/off button.
Changing the battery (A3)
Open the battery compartment with a flat
screwdriver. Insert the screwdriver into the
slot as shown and push the battery compart-
ment out of the key a little. Now pull the bat-
tery compartment carefully out of the key.
(A4) Pull the battery out of the holder, tak-
ing care not to bend the contact wires. Then
you can insert a new battery (CR1620)
into the holder. Ensure correct polarity: the
positive pole must face downwards. Now
slide the battery holder into the battery
compartment as far as possible.
Assembling the lock mount
on the bicycle:
Attach the lock mount to the frame
with screws (A5)
- Take the folding lock out of the lock
mount for assembly
- Open the two Velcro straps on the back
of the lock mount and pull them com-
pletely out of the lock mount
- Use the two screws that are included to
fix the lock mount as shown to the holes
for the drinking bottle mount on the upper
or lower seat tube.
- Check that the lock mount is fitted securely
- Insert the folding lock back into the lock
mount and attach it with the retaining
strap.
Attach the lock mount with the Vel-
cro strap (A6)
- Take the folding lock out of the lock
Appelez immédiatement un médecin en
cas d’ingestion. Utilisez uniquement les
piles des mêmes fabricants.
Respectez les polarités lorsque vous insé-
rez les piles dans leur logement.
Ne pas mélangez des piles ou des accu-
mulateurs anciens et neufs.
Conservez vos piles dans un endroit frais,
sec et non humide.
Ne jamais jetez les piles au feu.
Ne pas court-circuitez.
Les piles jetables perdent une partie de
leur énergie même quand elles sont stoc-
kées.
Les piles vides ou les accumulateurs usa-
gés doivent être jetés conformément au
bon usage. Les piles ne doivent pas être
rechargées.
Afin d’éviter toute confusion, conservez les
piles jetables et les piles déchargées dans
des endroits séparés.
Élimination des piles :
Les piles et les accumulateurs ne doivent
pas être jetés avec les ordures ménagères.
La loi vous oblige à retourner les piles et
les accumulateurs usagés. Vous pouvez
rendre gratuitement les piles usagées dans
notre point de vente ou au point le plus
proche (p. ex. en magasin ou dans des
points de collecte municipaux). Les piles
et les accumulateurs sont marqués d’une
poubelle barrée et portent aussi le symbole
chimique représentant les polluants (« Cd »
pour le cadmium, « Hg » pour le mercure et
« Pb » pour le plomb).
Clé avec lumière LED :
Allumer/éteindre (A2)
Appuyer sur le bouton on/off sur le des-
sus de la tête de la clé et rester appuyé
pour allumer la lumière LED. En relâchant
le bouton on/off, la lumière LED s’éteint.
Remplacement des piles (A3)
Ouvrir le compartiment des piles à l’aide
d’un tournevis plat. Enfoncer le tournevis
comme illustré dans la fente et pousser le
compartiment de piles en dehors de la clé.
Enlever alors doucement le compartiment
de pile complètement de la clé.
(A4) Enlever la pile de son emplacement,
veiller à ne pas tordre les fils de contact.
Puis, une nouvelle pile (CR1620) peut être
installée dans l’emplacement. Veiller à la
mount for assembly
- Insert the Velcro straps through the hold-
ers on the rear.
- Lay the Velcro straps around the lower
tube and pull the Velcro straps through
the relevant tab.
- Pull the Velcro straps tight and close the
Velcro straps
- Insert the folding lock back into the lock
mount and attach it with the retaining
strap.
Use of the folding bicycle
lock:
- Remove the folding lock from the lock
mount for use
Caution! There is a risk of crushing in
the individual folding lock segments.
- (A7) Open the folding lock with one of
the included keys and pull the two ends
of the folding lock apart.
- Unfold the segments and lay the folding
lock carefully around the bicycle frame.
You can lay the folding lock around
the bicycle frame and the front or back
wheel or secure your bicycle on a fixed
object (e.g. a suitable pole/lamppost).
- Insert the two ends of the folding lock into
one another and lock the folding lock
with the key.
!
Note!
It is not sufficient to insert the folding bi-
cycle lock only through the front or back
wheel and then to a suitable object (e.g.
a suitable pole/lamppost) as the wheel
can be removed from the bicycle by simply
opening the axle bolt.
Disposal:
The packaging comprises 100% environ-
mentally friendly materials that you can
dispose off at local recycling centres. The
product may not be disposed of in house-
hold waste. Please enquire with your
community or municipal administration re-
garding possibilities for the disposal of the
product.
Warranty:
Guaranteed by MONZ Handelsgesell-
schaft International mbH & Co. KG.
Dear Customer, we grant you 2 years war-
ranty from the purchase date of this equip-
ment. In the event that this product is faulty
bonne polarité : le pôle positif doit être di-
rigé vers le bas. Positionner la fixation de
la pile à nouveau jusqu’en butée dans le
compartiment de piles.
Montage du support de l’an-
tivol sur le vélo :
Fixation du support de l’antivol à
l’aide de vis sur le cadre (A5)
- Retirer l’antivol pliable de son support
pour le montage.
- Ouvrir les deux bandes velcro à l’arrière
du support et les retirer complètement du
support.
- Fixer le support à l’aide des deux vis four-
nies comme illustré dans les perçages
prévus pour le porte-bidon sur le tube
inférieur ou de selle.
- Vérifier la bonne fixation du support de
l’antivol.
- Remettre l’antivol pliable dans le support
et l’attacher à l’aide de la sangle.
Fixation du support de l’antivol à
l’aide des bandes velcro (A6)
- Retirer l’antivol pliable de son support
pour le montage.
- Passer les bandes velcro à travers les sup-
ports arrière.
- Placer les bandes velcro autour du tube
inférieur et passer les bandes velcro par
les languettes respectives.
- Tendre puis fermer les bandes velcro.
- Remettre l’antivol pliable dans le support
et l’attacher à l’aide de la sangle.
Utilisation de l’antivol pliable
pour vélo :
- Retirer l’antivol pliable de son support
pour l’utilisation.
Attention ! Il y a un risque d’écrase-
ment lié aux différents segments de l’an-
tivol pliable !
- (A7) Ouvrir l’antivol pliable à l’aide
d’une clé fournie et tirer sur les deux ex-
trémités de l’antivol.
- Déplier les segments et positionner l’an-
tivol pliable avec précaution autour du
cadre du vélo. L’antivol pliable peut être
positionné autour du cadre et autour de
la roue avant ou arrière, ou servir à at-
tacher le vélo à un objet fixe (p. ex. un
poteau/lampadaire approprié).
- Raccorder les deux extrémités de l’an-
tivol et fermer l’antivol à l’aide de la clé.
!
Remarque !
Il ne suffit pas de passer l’antivol pliable à
travers la roue avant ou arrière puis de l’at-
tacher à un objet fixe approprié (p. ex. un
poteau/lampadaire adapté), car la roue
en question peut être facilement enlevée
du vélo en desserrant la vis axiale.
Élimination :
L’emballage est entièrement constitué de
matières respectant l’environnement et
pouvant être éliminées dans des points
de recyclage proches. Le produit ne doit
pas être jeté avec les ordures ménagères
classiques. Veuillez vous informer des pos-
sibilités d’élimination de ce produit auprès
de votre commune ou de vos services mu-
nicipaux.
Garantie :
Garantie de MONZ Handelsgesellschaft
International mbH & Co. KG.
Chères clientes, chers clients, vous bénéfi-
ciez de 2 ans de garantie sur ce produit (à
compter de la date d’achat). Vous pouvez
faire valoir vos droits légaux vis-à-vis du
vendeur si vous constatez des défauts sur
le produit. Notre garantie décrite ci-après
ne restreint pas vos droits légaux.
Conditions de garantie :
La durée de garantie démarre à compter
de la date d’achat du produit. Veuillez
conserver précieusement l’original du
ticket de caisse. Ce document vous permet-
tra de prouver que vous avez bien acheté
le produit.
Nous réparons ou remplaçons gratuite-
ment le produit en cas de défaut de maté-
riau ou de fabrication ; cette prestation est
réalisée dans les deux ans suivant la date
d’achat. Le remplacement ou la réparation
du produit est à notre appréciation. Cette
prestation de garantie est réalisée si dans
un délai de deux ans, l’utilisateur présente
l’appareil défectueux et la preuve de son
achat (ticket de caisse) et qu’il décrit briè-
vement l’emplacement et la date d’appari-
tion du problème (description écrite).
Si notre garantie prend en charge le dys-
fonctionnement, vous recevrez le produit
réparé ou un nouveau produit. Une répa-
ration ou un échange de produit ne donne
pas lieu à un nouveau délai de garantie.
Indépendamment de la garantie com-
merciale souscrite, le vendeur reste tenu
des défauts de conformité du bien et des
vices rédhibitoires dans les conditions
prévues aux articles L211-4 et suivants
du Code de la consommation et aux
articles 1641 et suivants du Code Civil.
Responsable de la commer-
cialisation du produit :
MONZ Handelsgesellschaft
International mbH & Co. KG
Metternichstr. 37
54292 Trier / Germany
Adresse du service
après-vente :
MONZ SERVICE CENTER
c/o Teknihall P/A Siemtech
ZA.Les Anguillarires 1
31410 Noe / France
Hotline: 00800 / 68546854 (gratuit)
c/o teknihall Benelux bvba
Brusselstraat 33
2321 MEER
BELGIUM
Hotline: 00800 / 68546854 (gratis)
État: 09/2015
FR/BEGB/IE GB/IE
FR/BE FR/BE
GB/IE
FR/BE
GB/IE
FR/BE
FR BE
ANTIVOL PLIABLE POUR VELO
Mode d’emploi
Introduction :
Toutes nos félicitations !
En achetant ces bandes réfléchissantes,
vous avez choisi un produit de grande
qualité. Lisez attentivement ce mode d’em-
ploi pour découvrir le produit avant une
première utilisation. Utilisez les bandes ré-
fléchissantes uniquement selon l’usage dé-
crit et les domaines d’utilisation indiqués.
Gardez précieusement ce mode d’emploi
et donnez l’ensemble des documents à des
tiers lors de la remise du produit.
Symboles dans cette notice d‘uti-
lisation et de montage :
!
Ce symbole vous signale les
risques de blessures.
!
Les informations complémentaires
sont caractérisées ainsi.
!
Utilisation conforme à
l’usage :
Cet antivol pliable est prévu pour attacher
des vélos, des scooters ou des véhicules
semblables à des endroits adaptés et pré-
vus à cet effet ou à des objets fixes.
Toute autre utilisation ou modification
du produit est considérée comme non
conforme à l’usage prévu et peut s’avérer
dangereuse (p. ex. risques de blessures et
de dommages). Le responsable de la com-
mercialisation du produit décline toute res-
ponsabilité quant aux dommages résultant
d’une utilisation non conforme à l’usage
prévu. Le produit n’est pas destiné à une
utilisation professionnelle.
Contenu : (A1)
1 x antivol pliable composé de 6 segments
1 x support d’antivol
2 x bandes velcro
2 x clés
1 x clé avec lumière LED
2 x vis cruciformes 2 x 28 mm
2 x rondelles
1 x mode d’emploi (sans ill.
)
Données techniques :
Type : Antivol pliable pour vélo
N° d’article : 21260 / IAN 271535
N° Monz : PO30000061
Longueur : 6 segments, longueur totale :
env. 85 cm
Dimension antivol avec support d’antivol :
60 x 55 x 190 mm
Pile : 3V CR 1620
Date de production : 2015
Garantie : 2 ans
!
Consignes de sécurité !
Risque de blessure
Danger pour les enfants
Attention ! Fixer le support de l’antivol à
un endroit du cadre du vélo où il ne pour-
ra pas gêner ou occasionner de blessures
pendant les déplacements.
Attention ! Il y a un risque d’écrasement
lié aux différents segments de l’antivol
pliable !
Attention ! Ne convient pas aux enfants
de moins de 36 mois. Risque d’étouffement
lié aux petites pièces.
Cet article n’est pas un jouet. Le tenir hors
de portée des enfants.
Les piles peuvent en cas d’ingestion pré-
senter un danger de mort, il faut par consé-
quent conserver cet article et ses piles hors
de portée des petits enfants.
Si une pile devait être ingérée, il faut im-
médiatement avoir recours à des soins
médicaux.
Pour des raisons de sécurité, vous êtes
priés de lire attentivement le mode d’em-
ploi et les consignes de sécurité qui y fi-
gurent et de conserver le mode d’emploi
pour d’éventuels problèmes ou questions
ultérieurs. Le mode d’emploi fait partie in-
tégrante de ce produit et doit être transmis
lors de la cession du produit à des tiers.
Toute modification de l’antivol pliable est
interdite, car cela peut avoir un impact
déterminant sur le fonctionnement et la
sécurité.
Il convient de vérifier régulièrement l’état
et le fonctionnement de cet antivol pliable.
Tout antivol pliable défectueux doit être
éliminé conformément à la réglementation
(voir consigne d’élimination).
Clé avec lumière LED :
Eviter de regarder directement dans la lu-
mière.
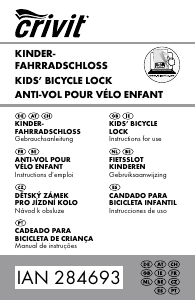
OS
A7
A3
A2
A4
A6
A1
A5
FOLDING BICYCLE LOCK
INSTRUCTION MANUAL
GB IE
ANTIVOL PLIABLE POUR VELO
MODE D’EMPLOI
FR BE
OPVOUWBAAR FIETSSLOT
GEBRUIKSHANDLEIDING
NL BE
LUCCHETTO PIEGHEVOLE DA BICICLETTA
ISTRUZIONI PER L’USO
IT
CANDADO PLEGABLE PARA BICICLETAS
INSTRUCCIONES DE USO
ES
FECHO DOBRÁVEL PARA BICICLETA
MANUAL DE INSTRUÇÕES
PT
you have the same rights against the prod-
uct seller. These statutory rights are not lim-
ited by the warranty described below.
Warranty conditions:
The warranty period begins on the pur-
chase date. Please keep the original
receipt in a safe place. This document is
required as proof of purchase.
In the event that a material or manufac-
turing fault occurs within two years of the
purchase date then we will either repair or
replace the product free of charge, as we
choose. This guarantee requires that the
defective product is presented within the
two-year period with proof of purchase (re-
ceipt) and a brief description of the defect
and when it occurred.
If the defect is covered by our warranty
then you will receive either the repaired
product or a new product. The repair or
replacement of the product does not mark
the beginning of a new guarantee period.
Distributor:
MONZ Handelsgesellschaft
International mbH & Co. KG
Metternichstr. 37
54292 Trier / Germany
Service address:
MONZ SERVICE CENTER
c/o Teknihall Elektronik GmbH
Breitefeld 15, 64839 Münster / Germany
Hotline: 00800 / 68546854
(free of charge)
Status as of: 09/2015
FR/BE
NL BE
OPVOUWBAAR FIETSSLOT
Gebruikshandleiding
Inleiding:
Van harte proficiat!
Met uw aankoop heeft u gekozen voor een
hoogwaardig product. Maak uzelf vertrouwd
met het product alvorens u het voor de eerste
keer gebruikt. Lees daarom aandachtig de
volgende gebruikshandleiding. Gebruik het
product enkel zoals beschreven en voor de
vermelde gebruiksdoeleinden.
Bewaar deze handleiding goed. Zorg bij
overdracht van het product aan derden er-
voor dat alle documenten tevens worden
overgedragen.
Symbolen in deze gebruiks- &
montage-instructies:
!
Dit symbool waarschuwt voor
letselgevaar.
!
Zo wordt de aanvullende informatie
gekenmerkt.
!
Gebruik volgens
bestemming:
Dit opvouwbare fietsslot dient voor het afslui-
ten van fietsen, steps en gelijkaardige rijtui-
gen op de daartoe voorziene en geschikte
plaatsen of om deze vast te maken aan vaste
objecten. Ander gebruik van of wijziging aan
het product geldt niet als bestemd gebruik en
kan leiden tot risico’s zoals verwondingen en
beschadiging. Voor schade die voortvloeit
uit niet-bestemd gebruik kan de verdeler niet
aansprakelijk gesteld worden. Het product is
niet bestemd voor commercieel gebruik.
Leveringsomvang: (A1)
1 x vouwslot, bestaande uit 6 segmenten
1 x slothouder
2 x klittenbandsluiting
2 x sleutels
1 x sleutel met LED-lampje
2 x kruisschroeven 2 x 28 mm
2 x schroefringen
1 x gebruikershandleiding (zonder afb.)

Participe da conversa sobre este produto
Aqui você pode compartilhar o que pensa sobre Crivit IAN 271535 Cadeado de bicicleta. Se você tiver alguma dúvida, primeiro leia atentamente o manual. A solicitação de manual pode ser feita através do nosso formulário de contato.