
English
1 Important
Read this user manual carefully before you use the appliance, and save the user manual for future reference.
Danger
• Do not immerse the motor unit in water nor rinse it
under the tap.
Warning
• Neveruseyourngersoranobjecttopush
ingredientsintothefeedingtubewhiletheappliance
isrunning.Onlyusethepusher.
• Before you connect the appliance to the power, make
surethatthevoltageindicatedonthebottomofthe
appliancecorrespondstothelocalpowervoltage.
• Never connect this appliance to a timer switch, to
avoid a hazardous situation.
• Donotusetheapplianceifthepowercord,theplug,
protectingcover,oranyotherpartsaredamagedor
has visible cracks.
• Ifthepowercordisdamaged,youmusthaveit
replaced by Philips, a service center authorized by
Philips,orsimilarlyqualiedpersonstoavoidahazard.
• This appliance shall not be used by children. Keep the
appliance and its cord out of reach of children.
• This appliance can be used by persons with reduced
physical, sensory or mental capabilities or lack of
experienceandknowledgeiftheyhavebeengiven
supervisionorinstructionconcerninguseoftheappliance
in a safe way and if they understand the hazards involved.
• For their safety, do not allow children to play with the
appliance.
• Never let the appliance run unattended.
• Iffoodstickstothewalloftheblenderjarorbowl,
switchofftheapplianceandunplugit.Thenusea
spatula to remove the food from the wall.
• Be careful when you handle or clean the discs, the
blade unit of the food processor, and the blade unit
oftheblender.Thecuttingedgesareverysharp.
• Do not touch the blades, especially when the
applianceispluggedin.Thebladesareverysharp.
• Ifthebladesgetstuck,unplugtheappliancebefore
youremovetheingredientsthatblocktheblades.
• Be careful if hot liquid is poured into the food
processororblenderasitcanbeejectedoutofthe
applianceduetoasuddensteaming.
• This appliance is intended for household only.
Caution
• Neverswitchofftheappliancebyturningtheblender
jar,thebowl,ortheirlids.Alwaysswitchoffthe
appliancebyturningthespeedselectorto0.
• Unplugtheapplianceimmediatelyafteruse.
• Alwayswaituntilthemovingpartsstoprunning,then
switchoffandunplugtheappliancebeforeopeningthe
lidandreachingintoanyofthepartsthatmoveinuse.
• Beforeyouremove,cleanorchangetheaccessories,
switchoffandunplugtheappliance.
• Thoroughlycleanthepartsthatcomeintocontactwith
foodbeforeyouusetheapplianceforthersttime.
• Never use any accessories or parts from other
manufacturersorthatPhilipsdoesnotspecically
recommend. If you use such accessories or parts,
yourguaranteebecomesinvalid.
• Do not exceed the maximum level indication on the
bowlorthejar.Followthequantities,processing
time nd speed as indicated in the user manual.
• Lethotingredientscooldown(<80ºC)before
processingthem.
• Always let the appliance cool down to room
temperature after each batch that you process.
• Certainingredientsmaycausediscolorationsonthe
surfaceoftheparts.Thisdoesnothaveanegative
effect on the parts. The discolorations usually
disappear after some time.
• Noiselevel=83dB(A)
Electromagnetic elds (EMF)
ThisPhilipsappliancecomplieswithallapplicablestandardsandregulationsregardingexposureto
electromagneticelds(EMF).Ifhandledproperlyandaccordingtotheinstructionsinthisusermanual,
theapplianceissafetousebasedonscienticevidenceavailabletoday.
Recycling
Yourproductisdesignedandmanufacturedwithhighqualitymaterialsandcomponents,whichcanbe
recycled and reused.
When you see the crossed-out wheel bin symbol attached to a product, it means the product is
coveredbytheEuropeanDirective2002/96/EC:
Never dispose of your product with other household waste. Please inform yourself about the local
rules on the separate collection of electrical and electronic products. The correct disposal of your old
producthelpspreventpotentiallynegativeconsequencesontheenvironmentandhumanhealth.
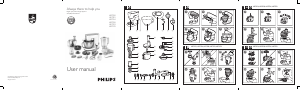
2 Introduction
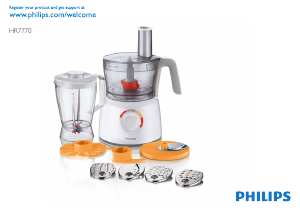
CongratulationsonyourpurchaseandwelcometoPhilips!Tofullybenetfromthesupportthat
Philipsoffers,registeryourproductatwww.philips.com/welcome.
This appliance is equipped with a built-in safety lock. You can only switch on the appliance after you
correctlyassemblethefollowingpartsonthemotorunit:
• the food processor bowl and its lid, or
• theblenderjaranditslid,or
• the mini chopper.
If these parts are assembled correctly, the built-in safety lock is unlocked.
Forrecipes,gotowww.philips.com/kitchen
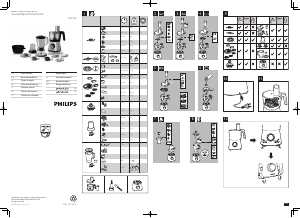
3 Food processor
Blade unit
Beforeyoustart,makesurethatyouassembleaccordingtoFig.2.
Youcanusethebladeunittochop,mix,blend,orpureeingredients.
Caution
• Donotusethebladeunittochophardingredients,likecoffeebeans,turmeric,nutmeg,andice
cubes,asthismaycausethebladetogetblunt.
Note
• Donotlettheapplianceruntoolongwhenyouchop(hard)cheeseorchocolate.Otherwisethese
ingredientsbecometoohot,starttomelt,andturnlumpy.
• Precutlargepiecesoffoodintopiecesofapprox.3x3x3cm.
1 Turnthebowlclockwisetoxitonthemotorunit,andthenputtheshaftinthebowl.
» Whenthebowlisxedcorrectly,youhearaclick.
2 Take the blade unit out of the protective cover.
3 Put the blade unit on the shaft.
4 Puttheingredientsinthebowl.
5 Putthelidonthebowl,andthenturnthelidclockwisetoxit.
» Whenthelidisassembledcorrectly,youhearaclickandthelidisxedtothebowlhandle.
6 Putthepusherintothefeedingtube.
7 Connectthepowerplugtothepowersupply.
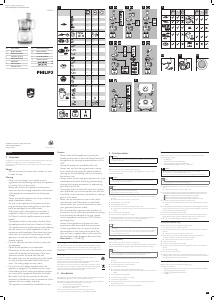
8 Followtheprocessingspeedanddonotexceedtheprocessingtimeandmaximumamountfor
theingredientsasindicatedinTable1.
9 After use, turn the speed selector to 0,andthenunplugtheappliance.
Tip
• When you chop onions, turn the speed selector to P a few times to prevent the onions from
becomingtoonelychopped.
• How to remove food that sticks to the blade or to the inside of the bowl? 1. Switch off the appliance,
andthenunplugit.2.Removethelidfromthebowl.3.Removetheingredientsfromthebladeor
from the side of the bowl with a spatula.
Kneading accessory
Beforeyoustart,makesurethatyouassembleaccordingtoFig.3.
Youcanusethekneadingaccessorytokneadyeastdoughforbreadandpizzas.Youneedtoadjust
theamountofliquidtoformthedoughaccordingtothehumidityandtemperaturecondition.
1 Turnthebowlclockwisetoxitonthemotorunit,andthenputtheshaftinthebowl.
» Whenthebowlisxedcorrectly,youhearaclick.
2 Putthekneadingaccessoryontheshaft.
3 Puttheingredientsinthebowl.
4 Putthelidonthebowl,andthenturnthelidclockwisetoxit.
» Whenthelidisassembledcorrectly,youhearaclickandthelidisxedtothebowlhandle.
5 Connectthepowerplugtothepowersupply.
6 Followtheprocessingspeedanddonotexceedtheprocessingtimeandmaximumamountfor
theingredientsasindicatedinTable1.
• Dependingontherecipe,pourliquidingredientintothefeedingtubewhilethedeviceisturnedon.
7 After use, turn the speed selector to 0,andthenunplugtheappliance.
Discs and Inserts
Beforeyoustart,makesurethatyoupickyourdesireddiscfromfollowingandassembleaccordingto
Fig.4andFig.5:
• Emulsifyingdisc
• Insertforneslicing
• Insertforcoarseslicing
• Insertforneshredding
• Insertforcoarseshredding
• Insertforgranulating
• Insertfornejulienne
Caution
• Becarefulwhenyouhandletheslicingbladeofdisc.Ithasaverysharpcuttingedge.
• Neverusethedisctoprocesshardingredients,likeicecubes.
• Donotexerttoomuchpressureonthepusherwhenyoupressingredientsintothefeedtube.
1 Turnthebowlclockwisetoxitonthemotorunit,andthenputtheshaftinthebowl.
» Whenthebowlisxedcorrectly,youhearaclick.
2 Put the disc on the shaft. For inserts, place an insert in the insert holder as indicated below,
then place the insert holder with insert on the shaft.
Placetheopeningoftheinsertovertheshaftoftheinsertholder.
Pushtheopeningoftheinsertovertheprojectionontheshaft.
Press the insert onto the insert holder until it locks in position with a click.
3 Putthelidonthebowl,andthenturnthelidclockwisetoxit.
» Whenthelidisassembledcorrectly,youhearaclickandthelidisxedtothebowlhandle.
4 Puttheingredientsintothefeedingtubewiththepusher.Fillthefeedingtubeevenlyforthe
bestresults.Whenyouhavetoprocessalargeamountofingredients,processsmallbatches
and empty the bowl between batches.
5 Connectthepowerplugtothepowersupply.
6 Followtheprocessingspeedanddonotexceedtheprocessingtimeandmaximumamountfor
theingredientsasindicatedinTable1.
7 After use, turn the speed selector to 0,andthenunplugtheappliance.
Citrus press
Beforeyoustart,makesureyouassembleaccordingtoFig.6.
You can use the citrus press to squeeze citrus fruits.
1 Turnthethebowlclockwisetoxitonthemotorunit,andthenputthetoolholderinthebowl.
» Whenthebowlisxedcorrectly,youcanhearaclick.
2 Putthesieveforcitruspressonthetoolholderinthebowl.Makesurethattheprojectionon
the sieve is locked in the slot of the bowl handle.
» Whenthesieveisxedcorrectly,youcanhearaclick.
3 Put the cone on the sieve.
4 Connectthepowerplugtothepowersupply.
5 CheckthemaximumamountrequiredfortheingredientsinTable1.Turntheknobtospeed1.
» Theconestartsrotating.
6 Press the citrus fruit onto the cone.
7 Stoppressingfromtimetotimetoremovethepulpfromthesieve.Whenyounishpressing
or when you want to remove the pulp, turn the knob to 0 and remove the bowl from the
appliance with the sieve and cone on it.
Mini chopper
Beforeyoustart,makesureyouassembleaccordingtoFig.7.
Caution
• Donotusetheminichoppertochophardingredients,likenutmeg,Chineserocksugar,oricecubes.
• Never use the mini chopper for more than 30 seconds without interruption.
• Assemblethesealingringontothebladeunitbeforeyouattachthebladeunittotheminichopper,
toavoidleakage.
• Alwaysprocesscloves,staranise,andaniseedtogether.Ifprocessedseparately,theseingredientsmay
attack the plastic materials of the appliance.
• Theminichopperbeakermaybecomediscoloredwhenyouusethemilltoprocessingredients,like
cloves, anise, and cinnamon.
• Donotusetheminichoppertoprocessliquidslikefruitjuice.
• Lethotingredientscooldown(<80ºC)beforeprocessingthem.
1 Puttheingredientsintheminichopperbeakerwithinthemaximumindication.
2 Turnthebladeunitanticlockwiseontheminichopperbeakeruntilitisxedproperly.
3 Turn the mini chopper clockwise onto the motor unit until you hear a click.
4 Connectthepowerplugtothepowersupply.
5 Followtheprocessingspeedanddonotexceedtheprocessingtimeandmaximumamountfor
theingredientsasindicatedinTable1.
6 After use, turn the speed selector to 0,andthenunplugtheappliance.
7 Turn the mini chopper anticlockwise to take it off from the motor unit.
8 Turn the blade unit clockwise to take it off from the mini chopper beaker.
Tip
• Forbestresultswhenprocessingbeef,pleaseuserefrigeratedbeefcubes.Usemaxof100gbeef
cubes at speed P for 5 sec.
• Howtoremovetheingredientsthatsticktothesideoftheminichopper?1.Switchofftheappliance,
andthenunplugit.2.Removethebeakerfromthebladeunit.3.Removetheingredientsfromthe
blade or from the side of the beaker with a spoon.
Blender
Beforeyoustart,makesureyouassembleaccordingtoFig.8.
Theblenderisintendedfor:
• Blendinguids,likedairyproducts,sauces,fruitjuices,soups,mixeddrinks,andshakes,
• Mixingsoftingredients,likepancakebatter,
• Pureeingcookedingredients,likebabyfood.
Note
• Donotexerttoomuchpressureonthehandleoftheblenderjar.
• Neveropenthelidtoputyourhandoranyobjectinthejarwhiletheblenderisrunning.
• Alwaysassemblethesealingringontothebladeunitbeforeyouattachthebladeunittotheblenderjar.
• Toaddliquidingredientsduringprocessing,pourthemintotheblenderjarthroughthefeedinghole.
• Precutsolidingredientsintosmallpiecesbeforeyouprocessthem.
• Ifyouwanttopreparealargequantity,processsmallbatchesofingredientsinsteadofalarge
quantity at once.
• Usecookedingredientswhenyoublendasoup.
• Toavoidspillage:Whenyouprocessaliquidthatishotortendstofoam(forexample,milk),donot
putmorethan1literofliquidintheblenderjar.
• Ifyouarenotsatisedwiththeresult,switchofftheapplianceandstirtheingredientswithaspatula.
Remove some of the contents to process a smaller quantity or add some liquid.
1 Turnthebladeunitontheblenderjar.
2 Placetheblenderjaronthemotorunitandturnitclockwisetoxit.
» Whenthejarisxedcorrectly,youhearaclick.
3 Puttheingredientsintheblenderjarwithinthemaximumlevelindication.
4 Placethelidontheblenderjar,andthenturnitclockwisetoxit.
5 Connectthepowerplugtothepowersupply.
6 Followtheprocessingspeedanddonotexceedtheprocessingtimeandmaximumamountfor
theingredientsasindicatedinTable1.
7 After use, turn the speed selector to 0,andunplugtheappliance.
Tip
• Howtoremovetheingredientsthatsticktothesideoftheblenderjar?1.Switchofftheappliance,
andthenunplugit.2.Openthelid,andthenuseaspatulatoremovetheingredientsfromthesideof
thejar.3.Keepthespatulaatleast2cmfromtheblade.
4 Cleaning and storage
Caution
• Beforeyoucleantheappliance,unplugit.
• Makesurethatthecuttingedgesoftheblades,discs,andtheinsertsdonotcomeintocontactwith
hardobjects.Thismaycausethebladetogetblunt.
• Thecuttingedgesaresharp.Becarefulwhenyouclean.
1 Cleanthemotorunitwithamoistcloth.
2 Cleantheotherpartsinhotwater(<60ºC)withsomewashing-upliquidorinadishwasher.
3 Store the product in a dry place.
Quick cleaning
Youcanfollowthefollowingstepstocleanthefoodprocessorbowlandblenderjareasier.
Note
• Make sure that the blade is assembled in the bowl if you clean the food processor bowl.
1 Pourlukewarmwater(notmorethan0.5liters)andsomewashing-upliquidintothefood
processorbowlorblenderjar.
2 Placethelidonthefoodprocessorbowlorblenderjar,andthenturnitclockwisetoxit.
3 Turn the speed selector to Puntilthebowlorjarisclean.
4 Lettheappliancerunfor30secondsoruntilthefoodprocessorbowlorblenderjarisclean.
5 Detachtheblenderjarorfoodprocessorbowlandrinseitwithcleanwater.
5 Guarantee and service
If you have a problem, need service, or need information, see www.philips.com/support or contact
thePhilipsConsumerCareCenterinyourcountry.Thephonenumberisintheworldwideguarantee
leaet.IfthereisnoConsumerCareCenterinyourcountry,gotoyourlocalPhilipsdealer.


Participe da conversa sobre este produto
Aqui você pode compartilhar o que pensa sobre Philips HR7769 Viva Collection Robot de cozinha. Se você tiver alguma dúvida, primeiro leia atentamente o manual. A solicitação de manual pode ser feita através do nosso formulário de contato.