GB
Safety instructions
Read the instruction manual carefully before using this device, especially the safety instructions, and
keep the instruction manual for future use. Should you give this device to another person, it is vital
that you also pass on these instructions for use.
Zeichenerklärung Explanation of symbols
DE
Sicherheitshinweise
• Bevor Sie das Gerät an Ihre Stromversorgung anschließen,
achten Sie darauf, dass die auf dem Typenschild angegebe-
ne Netzspannung mit der Ihres Stromnetzes übereinstimmt.
• Benutzen Sie das Gerät nur entsprechend seiner Bestim-
mung laut Gebrauchsanweisung. Bei Zweckentfremdung
erlischt der Garantieanspruch.
• Das Gerät ist nur für den Gebrauch im privaten Haushalt und
nicht für die kommerzielle Nutzung bestimmt.
• Benutzen Sie das Gerät nicht, wenn es nicht einwandfrei
funktioniert, wenn es herunter- oder ins Wasser gefallen war
oder beschädigt wurde.
• Greifen Sie nicht nach einem Gerät, das ins Wasser gefallen
ist. Ziehen Sie sofort den Netzstecker bzw. das Netzteil aus
der Steckdose.
•
Wenn das Kabel oder das Netzteil beschädigt sind, darf das
Gerät nicht weiter benutzt werden. Um Gefährdungen zu ver-
meiden, senden Sie das Gerät zur Reparatur an die Servicestelle.
• Betreiben Sie das Gerät nicht in der Nähe von hochfrequen-
ten elektromagnetischen Sendern, da diese die Gerätefunk-
tion stören könnten.
• Setzen Sie das Gerät nicht direkter Sonnenstrahlung oder
hohen Temperaturen aus.
• Schützen Sie das Gerät vor Feuchtigkeit.
• Das Gerät sowie das Kabel und das Netzteil dürfen keines-
falls in Wasser getaucht oder unter laufendes Wasser gehal-
ten werden.
• Fassen Sie das Netzteil stets mit trockenen Händen an.
• Das Kabel darf nicht in der Nähe von Wärmequellen geführt
oder über scharfe Kanten gezogen werden.
• Tragen, ziehen oder drehen Sie das Netzteil nie am Kabel
und klemmen Sie das Kabel nie ein.
• Schützen Sie das Gerät vor Stößen und Erschütterungen.
• Reparieren Sie im Falle einer Störung das Gerät nicht selbst.
Eine Reparatur darf nur von einem autorisierten Fachhändler
oder einer entsprechend qualifizierten Person durchgeführt
werden.
• Stellen Sie das Gerät zum Gebrauch auf eine feste und
ebene Fläche, so dass es nicht kippen oder herunterfallen
kann.
•
Dieses Gerät kann von Kindern ab 8 Jahren und darüber
sowie von Personen mit verringerten physischen, sensori-
schen oder mentalen Fähigkeiten oder Mangel an Erfahrung
und Wissen benutzt werden, wenn Sie beaufsichtigt oder
bezüglich des sicheren Gebrauchs des Gerätes unterwiesen
wurden und die daraus resultierenden Gefahren verstehen.
• WARNUNG! Achten Sie darauf, dass die Verpackungsfolien
nicht in die Hände von Kindern gelangen! Es besteht
Erstickungsgefahr.
• Kinder dürfen nicht mit dem Gerät spielen.
• Batterien von Kindern fernhalten! Batterien nicht ausein-
andernehmen! Batterien nicht wiederaufladen! Nicht kurz-
schließen! Nicht ins Feuer werfen!
•
Reinigung und Benutzer-Wartung dürfen nicht von Kindern
ohne Beaufsichtigung durchgeführt werden.
•
Bevor Sie das Gerät reinigen, vergewissern Sie sich, dass
das Gerät ausgechaltet und der Stecker aus der Steckdose
gezogen ist.
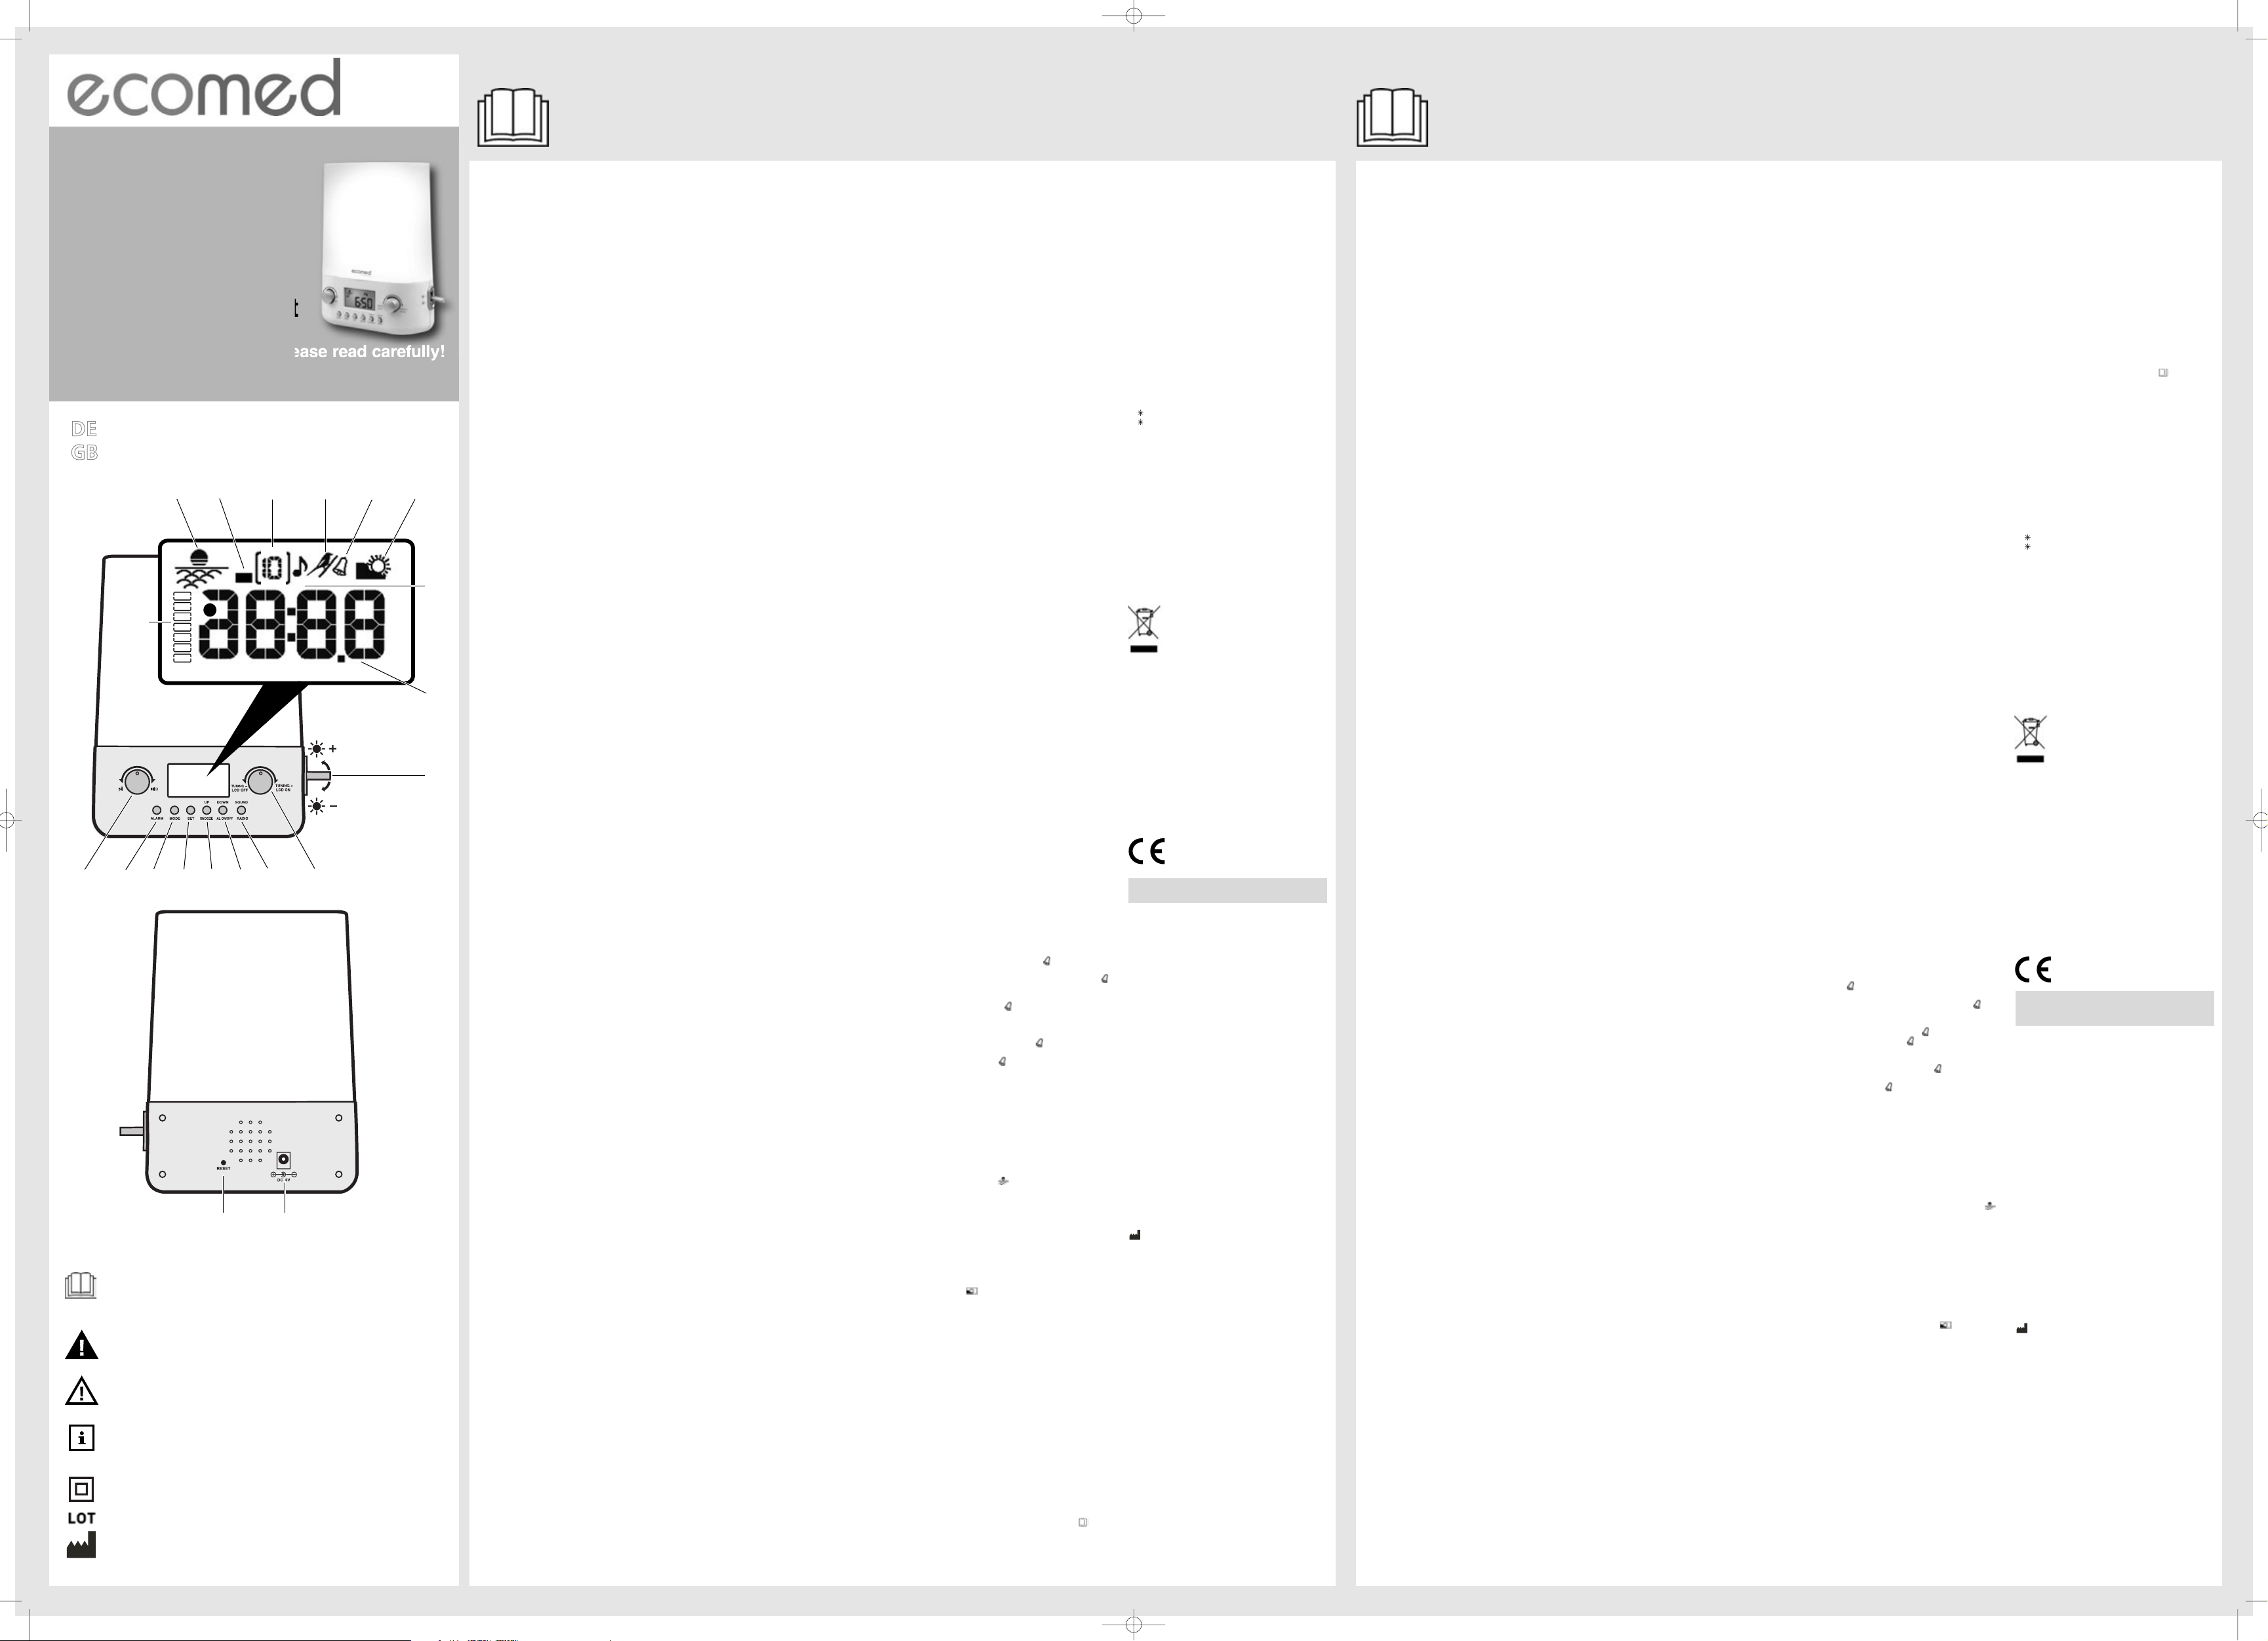
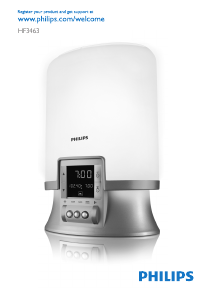
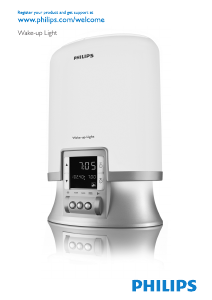
Displayanzeigen
Anzeige für Wochentag
Sonnenaufgang
Radiosymbol
Radiostation
Naturgeräusche
Alarm
Sonnenuntergang
Schlummern
Uhrzeit, Datum, Radio, Frequenzanzeige
Bedienelemente
HELLIGKEIT einstellen
TUNING
—
: Radiofrequenz nach unten
TUNING + : Radiofrequenz nach oben
LCD ON/OFF: Aktivieren / Deaktivieren
der LCD Hintergrundbeleuchtung
SOUND / RADIO: Naturgeräusche, Standard-Radio oder
Summer wählen
DOWN / AL ON/OFF:
- Alarm und Alarmzeit einstellen
- Aktivieren / Deaktivieren des Alarms
UP / SNOOZE:
- Alarm und Alarmzeit einstellen
- Schlummermodus einstellen
SET: Einstellungen
MODE: Modus auswählen
ALARM: Alarm-Modus
LAUTSTÄRKE einstellen
RESET-Taste
BUCHSE für Netzteil
1.
Lieferumfang
Bitte prüfen Sie zunächst, ob das Gerät vollständig ist und
keinerlei Beschädigung aufweist. Im Zweifelsfalle nehmen
Sie das Gerät nicht in Betrieb und wenden Sie sich an Ihren
Händler oder an Ihre Servicestelle.
Zum Lieferumfang gehören:
• 1 Lichtwecker
• 1 Netzteil 6V= 1A
• 1 Gebrauchsanweisung
Sollten Sie beim Auspacken einen Transportschaden bemer-
ken, setzen Sie sich sofort mit Ihrem Händler in Verbindung.
2.
Aufstellen und Einrichten
1. Stellen Sie das Gerät zum Gebrauch auf eine feste und ebene
Fläche, so dass es nicht kippen oder herunterfallen kann.
2. Stellen Sie das Gerät in einer Entfernung von ca. 40 - 50 cm
von Ihrem Kopf entfernt auf, z.B. auf einem Nachttisch.
3. Stecken Sie das Netzteil in die Netzsteckdose. Die Uhrzeit
(12:00) erscheint im Display.
Backup Batterie einlegen (nicht im Lieferumfang)
Als Stromversorgung bei Stromausfall können Sie eine
CR2032, 3V Batterie einlegen.
1. Entfernen Sie das Batteriefach an der Unterseite des Geräts.
2. Achten Sie auf die Polarität
3. Führen Sie nach jedem Batteriewechsel einen RESET durch.
3. Einstellung von Datum und Uhrzeit
Es ist erforderlich, Datum und Uhrzeit
einzustellen.
• Drücken Sie die SET-Taste
, die Jahreszahl blinkt. Sie
können nun mit den UP-
und DOWN-
Tasten die
korrekte Jahreszahl einstellen.
• Drücken Sie erneut die SET-Taste
, der Monat blinkt. Sie
können nun mit den UP-
und DOWN-
Tasten den
korrekten Monat einstellen.
• Drücken Sie erneut die SET-Taste
, der Tag blinkt. Sie
können nun mit den UP-
und DOWN-
Tasten den
korrekten Tag einstellen.
• Drücken Sie erneut die SET-Taste
, das Stundenformat
12-H blinkt. Sie können nun mit den UP-
und DOWN-
Tasten das gewünschte Stundenformat 12-H oder 24-H
einstellen.
• Drücken Sie erneut die SET-Taste
, die Stundenanzeige
blinkt. Sie können nun mit den UP-
und DOWN-
Tasten die korrekte Stunde einstellen.
• Drücken Sie erneut die SET-Taste
, die Minutenanzeige
blinkt. Sie können nun mit den UP-
und DOWN-
Tasten die korrekten Minuten einstellen.
• Drücken Sie zur Bestätigung die SET-Taste
und beenden
Sie damit die Einstellung.
4. Alarm
4.1 Alarmzeit einstellen
• Drücken Sie die ALARM-Taste
, die eingestellte Alarmzeit
(Standarduhrzeit 12:00 AM) erscheint. Drücken Sie erneut
die SET-Taste
, Sie können nun mit den UP-
und
DOWN-
Tasten die Stunde der gewünschten Weckzeit
einstellen. Drücken Sie erneut die SET-Taste
, um die
Minuten einzustellen.
• Drücken Sie erneut die SET-Taste
, um die Alarmeinstel-
lung zu beenden. Im Display erscheint das Radio (FM)- oder
Sound-Symbol. Wählen Sie mit der SOUND/RADIO-Taste
Naturgeräusche, den klassischen Summer oder den ein-
gestellten Radiosender, um geweckt zu werden. Drücken
Sie die SET-Taste
, um die Auswahl zu bestätigen.
4.2 Alarm ein-/ausschalten
• Wenn Sie den Alarm eingestellt haben, ist der Alarm akti-
viert. Im Display wird das Alarmsymbol angezeigt.
• Wenn Sie den Alarm deaktivieren möchten, drücken Sie im
Standby Modus die ALARM-Taste
. Das Alarmsymbol
blinkt. Drücken Sie die AL ON/OFF-Taste
und anschlie-
ßend erneut die ALARM-Taste
, um den Alarm auszu-
schalten. Das Alarmsymbol erlischt.
• Ist der Alarm deaktiviert, wird das Alarmsymbolnicht ange-
zeigt. Wenn Sie die Alarmfunktion aktivieren möchten,
drücken Sie die ALARM-Taste
und anschließend die AL
ON/OFF-Taste
, das Alarmsymbol blinkt. Drücken Sie
erneut die ALARM-Taste
, um den Alarm-Modus zu ver-
lassen. Das Alarmsymbol wird angezeigt.
5. Sonnenaufgang (Sunrise)
• Im SONNENAUFGANG Modus beginnt das Licht langsam
mit einer Intensitätssteigerung. Während der Zeit, die Sie
festlegen, erhellt sich das Licht, bevor der Wecker klingelt.
• Drücken Sie die MODE-Taste
und anschließend die SET-
Taste
, um den Sunrise Modus zu aktivieren. Mit den
Tasten UP
und DOWN
können Sie die Zeit zwischen
00, 15, 30, 45, 60 oder 90 Minuten festlegen.
• Wenn Sie die Einstellung 00 Minuten wählen, ist der
Sunrise Modus deaktiviert. Ist der Sunrise Modus aktiviert,
wird das Sunrise Symbol im Display gezeigt.
6. Sonnenuntergang (Sunset)
• Im SONNENUNTERGANG Modus reduziert sich die Licht-
intensität. Licht und Radio werden ausgeschaltet.
• Drücken Sie zweimal die MODE-Taste
und anschließend
die SET-Taste
, um den Sunset Modus zu aktivieren. Mit
den Tasten UP
und DOWN
können Sie die Zeit zwi-
schen 00, 15, 30, 45, 60 oder 90 Minuten festlegen.
• Wenn Sie die Einstellung 00 Minuten wählen, ist der Sunset
Modus deaktiviert. Ist der Sunset Modus aktiviert, blinkt das
Sunset Symbol im Display.
HINWEIS:
Für die Sunset-Einstellung muss das Licht eingeschaltet sein.
7. Schlummern (Snooze)
• Ist der Alarm eingeschaltet und Sie drücken die SNOOZE-
Taste
, schaltet sich der Alarm nach 5 Minuten erneut ein.
• Der Klingelton ist für 1 Minute zu hören und schaltet sich
nach einer weiteren Minute erneut ein. Dies wiederholt sich
5-mal.
• Wird das Radio als Alarmton verwendet, ist der Alarm zu
hören, bis Sie die SOUND/RADIO-Taste
drücken.
• Werden Naturgeräusche als Alarmton verwendet, schaltet
sich der Alarm nach 20 Minuten aus.
• Um den Alarm abzustellen, drücken Sie die AL ON/OFF--
Taste
.
8. Radio und Naturgeräusche
• Drücken Sie im Standby Modus die SOUND/RADIO-
Taste
, um in den Radio-Modus zu gelangen. Drehen Sie
anschließend den Knopf
, um die FM Radiofrequenz aus-
zuwählen.
• Drücken Sie im Radio-Modus die SET-Taste
, um den
Sender voreinzustellen. Das Radiostation-Symbol blinkt.
Drücken Sie anschließend die UP-
oder DOWN-
Tasten, um den Speicherplatz auszuwählen (insgesamt
10 Voreinstellungen sind möglich) und anschließend die
SET-Taste
, um den Vorgang abzuschließen.
• Möchten Sie einen voreingestellten Sender anhören, drücken
Sie im Radio-Modus die UP-
oder DOWN-
Taste, um
den Speicherplatz auszuwählen.
• Drücken Sie die Taste SOUND/RADIO
zweimal, um in
den Naturgeräusche-Modus zu gelangen. Wählen Sie mit
den Tasten UP-
oder DOWN-
das gewünschte
Naturgeräusch. Das gewählte Naturgeräusch ist 20 Minuten
zu hören, bevor es stoppt. Drücken Sie die Taste
SOUND/RADIO
, stoppt das Naturgeräusch und Sie
gelangen zum normalen Display zurück.
9. Einstellen der Helligkeit
• Mit dem Hebel
können Sie die Helligkeit einstellen.
Die Helligkeit lässt sich in 10 Schritten einstellen.
+
erhöht die Helligkeit.
-
verringert die Helligkeit.
10. Einstellen der Lautstärke
• Mit dem Drehknopf
können Sie die Lautstärke einstellen.
11. Reinigung und Pflege
•
Reinigung und Benutzer-Wartung dürfen nicht von
Kindern ohne Beaufsichtigung durchgeführt werden.
• Bevor Sie das Gerät reinigen, vergewissern Sie sich, dass
das Gerät ausgechaltet
und der Stecker aus der Steckdose
gezogen ist.
• Entstauben Sie das Gerät regelmäßig mit einem antistati-
schen Tuch. Sie können auch ein leicht angefeuchtetes Tuch
verwenden.
• Verwenden Sie keine aggressiven Reinigungs- oder
Scheuermittel.
12. Entsorgung
Dieses Gerät darf nicht zusammen mit dem
Hausmüll entsorgt werden. Jeder Verbraucher ist
verpflichtet, alle elektrischen oder elektronischen
Geräte, egal, ob sie Schadstoffe enthalten oder
nicht, bei einer Sammelstelle seiner Stadt oder im
Handel abzugeben, damit sie einer umweltscho-
nenden Entsorgung zugeführt werden können.
Entnehmen Sie die Batterie, bevor Sie das Gerät entsorgen.
Geben Sie verbrauchte Batterien nicht in den Hausmüll, son-
dern in den Sondermüll oder in eine Batterie-Sammelstation
im Fachhandel. W
enden Sie sich hinsichtlich der Entsorgung
an Ihre Kommunalbehörde oder Ihren Händler.
13. Technische Daten
Name und Modell : ecomed Lichtwecker WL-50E
Netzteil : Eingang 100-240V~ 50/60Hz 0,25A
Ausgang 6V
=
1A
Radio : UKW, digitale Anzeige
Soundsystem : mono
Frequenzbereich : 87,5MHz – 108MHz
Abmessungen : ca. 16,5 x 8 x 19 cm
Gewicht : ca. 330 g
Artikel Nr. : 23600
EAN-Nummer : 40 15588 23600 6
Im Zuge ständiger Produktverbesserungen behalten wir
uns technische und gestalterische Änderungen vor.
Die jeweils aktuelle Fassung dieser Gebrauchsanweisung
finden Sie unter www.medisana.com
14. Garantie/Reparaturbedingungen
Bitte wenden Sie sich im Garantiefall an Ihr Fachgeschäft
oder direkt an die Servicestelle. Sollten Sie das Gerät ein-
schicken müssen, geben Sie bitte den Defekt an und legen
eine Kopie der Kaufquittung bei.
Es gelten dabei die folgenden Garantiebedingungen:
1. Auf ecomed Produkte wird ab Verkaufsdatum eine
Garantie für zwei Jahre gewährt. Das Verkaufsdatum ist im
Garantiefall durch die Kaufquittung oder Rechnung nach-
zuweisen.
2. Mängel infolge von Material- oder Fertigungsfehlern wer-
den innerhalb der Garantiezeit kostenlos beseitigt.
3. Durch eine Garantieleistung tritt keine Verlängerung der
Garantiezeit, weder für das Gerät noch für ausgewechsel-
te Bauteile, ein.
4. Von der Garantie ausgeschlossen sind:
a. alle Schäden, die durch unsachgemäße Behandlung,
z.B. durch Nichtbeachtung der Gebrauchsanweisung,
entstanden sind.
b. Schäden, die auf Instandsetzung oder Eingriffe durch
den Käufer oder unbefugte Dritte zurückzuführen sind.
c. Transportschäden, die auf dem Weg vom Hersteller zum
Verbraucher oder bei der Einsendung an die
Servicestelle entstanden sind.
d. Zubehörteile, die einer normalen Abnutzung unterliegen.
5. Eine Haftung für mittelbare oder unmittelbare Folgeschä-
den, die durch das Gerät verursacht werden, ist auch dann
ausgeschlossen, wenn der Schaden an dem Gerät als ein
Garantiefall anerkannt wird.
MEDISANA AG, 41468 NEUSS, GERMANY.
ecomed ist ein registriertes Warenzeichen der
MEDISANA AG.
Im Servicefall, für Zubehör und Ersatzteile wenden Sie
sich bitte an:
Im Servicefall, für Zubehör und Ersatzteile wenden Sie sich bitte an:
DE MEDISANA Servicecenter • Feuerbach KG • Corneliusstraße 75
40215 Düsseldorf • Deutschland • Tel.: 0211-38 10 07 (Mo-Do: 9-
13 Uhr+14-17 Uhr, Fr: 9-13 Uhr) • Fax: 0211-37 04 97
AT FSMS
•
Welser Straße 79
•
4060 Leonding
Tel. +43 (0)732 38 72 82-35
•
Fax +43 (0)732 38 72 82-20
•
Internet: www.fsms.at
CH BLUEPOINT Service Sagl • Via Cantonale 14 • 6917 Barbengo
Tel.: +41 091 980 49 72 • Fax: +41 091 605 37 55 • eMail:
point-service.ch
MHZ
D
FM
Radio
Station
Z
Z
SUN
MON
TUE
WED
THU
FRI
SAT
AM
• Before connecting the device to your power supply, please
ensure that the supply voltage stated on the rating plate is
compatible with your mains supply.
• Only use this unit according to the intended purpose and as
directed in the instructions for use. If misused, all guarantee
rights shall become null and void.
• The appliance is designed for private households only and
not for commercial use.
• Do not use the device if it is not working correctly, if it has
been dropped or has fallen into water or has been damaged.
• Never touch an appliance that has fallen into water. Unplug
the unit from the mains outlet immediately.
• You must not continue to use the unit if the lead or the
mains adaptor are damaged. In order to prevent hazards,
always send the unit in to the service centre.
• Do not use the unit in the vicinity of high-frequency electro-
magnetic transmitters, as this could damage the functions
on the device.
• Do not expose the appliance to direct sunlight or high
temperatures.
• Protect the device from moisture.
• You must never submerge the unit, the lead or the mains
adaptor in water or hold them under running water.
• Only handle the mains adaptor when your hands are dry.
• Do not lay the cable near sources of heat or pull it over any
sharp edges.
• Never carry, pull or turn the mains adaptor by the mains lead
and do not let the lead get tangled.
• Protect the device from impact and shocks.
• If a fault occurs, do not attempt to repair the unit yourself.
Repairs must only be carried out by an authorized specialist
dealer or other suitably qualified personnel.
• Place the device on a solid and flat surface for use, to ensure
that it cannot tip over or fall down.
• This appliance can be used by children aged from 8 years
and above and persons with reduced physical, sensory or
mental capabilities or lack of experience and knowledge if
they have been given supervision or instruction concerning
use of the appliance in a safe way and understand the
hazards involved.
• WARNING! Please ensure that the polythene packing is
kept away from the reach of children! Risk of suffocation!
• Children shall not play with the appliance.
• Keep batteries out of children's reach!
Do not disassemble batteries!
Do not attempt to recharge these batteries!
Do not short circuit!
Do not throw into a fire!
• Cleaning and user maintenance shall not be made by
children without supervision.
• Before cleaning the device, make sure that it is turned off
and the mains adaptor is removed from the socket.
Display
Week display
Sunrise
FM display
Radio station
Nature sound
Alarm
Sunset
Snooze
Time/date/radio/frequency display
Controls
LIGHT adjust.
TUNING
—
: Turn tuner down.
TUNING + : Turn tuner up.
LCD ON/OFF : Turn on/off the LCD backlight.
SOUND / RADIO: Select the natural sounds, radio or
the standard buzzer.
DOWN / AL ON/OFF:
- used to set alarm and hour.
- used to turn on/off the alarm.
UP / SNOOZE:
- used to set the correct alarm and hour.
- used for the snooze mode.
SET: Settings.
MODE: Mode selector.
ALARM: Alarm mode.
VOLUME adjust.
RESET button.
CONNECTOR for power supply.
1. Items supplied
Please check first of all that the device is complete and is
not damaged in any way. In case of doubt, do not use the
appliance and contact your dealer or your service centre.
The following parts are included:
• 1 Light Alarm Clock
• 1 Power supply 6V= 1A
• 1 Instruction manual
If you notice any transport damage during unpacking, please
contact your dealer without delay.
2. Positioning and setup
1. Place the device on a solid and flat surface for use to
ensure that it cannot tip over or fall down.
2. Position the device about 40 - 50 cm away from your head,
for example, on a bedside table.
3. Connect the power supply to the power point. The time
(12:00) appears on the display.
Backup battery installation (not included)
The CR2032, 3V battery can act as a backup power supply for
the main unit.
1. Remove the battery compartment at the bottom of the
unit.
2. Insert the batteries, matching the polarities.
3. Press RESET after each battery change
3. Setting the date and time
To adjust the time and date is necessary.
• Press the SET button
; you can see the year place blinks,
in that moment you can use the UP
and DOWN
buttons to select the correct year.
• Press the SET button
again; you can see the month place
blinks, in that moment you can use the UP
and DOWN
buttons to select the correct month.
• Press the SET button
again; you can see the day place
blinks, in that moment you can use the UP
and DOWN
buttons to select the correct day.
• Press the SET button
again; you can see the hour format
place 12-H blinks, in that moment you can use the UP
and DOWN
buttons to select the correct hour
format 12-H or 24-H.
• Press the SET button
again; you can see the hour place
blinks, in that moment you can use the UP
and DOWN
buttons to select the correct hour.
• Press the SET button
again; you can see the minutes
place blinks, in that moment you can use the UP
and
DOWN
buttons to select the correct minute.
• Finally press the SET button
to confirm and finish the
setting.
4. Alarm
4.1 Set the alarm time
• Press the ALARM button
, by standard the time is 12:00
AM. To set the alarm time you have to press the SET
button
and use the UP
and DOWN
buttons to
adjust to hour that you wish. Press the SET button
again
to adjust the minutes.
• Press the SET button
again to finish the alarm setting.
The Radio (FM) or Sound symbol appears in the display. You
can select the best way to waking up natural sounds, the
classical buzzer or the selected radio station. Use the
SOUND/RADIO button
to do the selection. Press the
SET button
again to confirm the selection.
4.2 Turn on/off the alarm
• When finished the alarm time setting, the alarm is activated
and the icon is displayed.
• In the time display mode, If you want to turn off the alarm
function, press ALARM button
and the icon will
flash. Then press AL ON/OFF button
, the icon stops
flashing, press ALARM button
again to exit the alarm
mode, the alarm is off and the icon will be not shown.
• When the alarm is off, the icon is not shown in the time
display mode. If you want to turn on the alarm function,
press ALARM button
to enter alarm mode and then
press AL ON/OFF button
, the icon will flash, press
ALARM button
again to exit the alarm mode, the alarm
is activated and the icon will be displayed.
5. Preset light on (Sunrise)
• The “SUNRISE” mode is when the light of the unit starts
with a gradual intensity increase. It turns itself up before
the alarm clock rings and gradually brightens up during the
period time you set.
• To activate the “SUNRISE” mode we have to press the
MODE button
and then the SET button
. Using UP
and DOWN
buttons you can set the timing that you
want, having 00, 15, 30, 45, 60 and 90 minutes as option.
• When you choose the 00 option, means that the
“SUNRISE” mode is off. In the display you can see
that means that the “SUNRISE” mode is activate.
6. “SUNSET” time setting
• The “SUNSET” mode is when the light of the unit starts with
a gradual intensity decrease. Light and radio turn it self off.
• To activate the “SUNSET” mode you have to press the
MODE button
two times and then the SET button
to
program it. Using the UP
and DOWN
buttons you
can adjust the timing, using the options 00, 15, 30, 45, 60
and 90 minutes.
• When the option is 00, means that the “SUNSET” mode is
not activated. In the display you can see flashing that
means that the “SUNSET” mode is activate.
NOTE: When setting the sunset function, the light must be
turned on.
7. SNOOZE
• When the alarm is turning on, if you press the SNOOZE
button
the sound turns off and automatically comes on
again after about 5 minutes.
• It will be off after the ringing for 1 minute, and repeat in 1
minute later. It will repeat 5 times.
• If you use the radio as alarm sound, the alarms keeps
ringing until you press the SOUND/RADIO button
.
• If you use the natural sound, the alarm will be off after 20
minutes.
• To turn off the alarm you have to press the AL ON/OFF
button
.
8. Radio & Nature sound mode
• In the normal situation, press the SOUND/RADIO button
to enter the radio mode, and then turn the button
to select FM radio frequency.
• In the radio mode, if you’d like to preset the radio
frequency, press SET button
and the will be flash,
press UP
and DOWN
buttons to preset the radio
station (10 stations in total), and then press SET button
to confirm.
• In the radio mode, if you’d like to choose the preseted radio,
press UP
or DOWN
buttons to choose the preseted
radio station to listen.
• Press SOUND/RADIO
2 times to enter nature sound
mode, you can press UP
or DOWN
buttons to select
you the sound you like. The natural sound will be played for
20 minutes and then stops. Press SOUND/RADIO button
to stop nature sound and to return to the normal display
situation.
9. Light brightness adjust
• To adjust the light brightness you have to use the LIGHT
adjusts
. You count with 10 intensity levels.
+
turn light up;
-
turn light down.
10. Adjusting sound
• Volume control
: Controls the volume.
11. Cleaning and maintenance
•
Cleaning and user maintenance shall not be made by
children without supervision.
•
Before cleaning the unit, make sure that the unit is
switched off and the mains adaptor is unplugged from the
outlet.
• Dust the device regularly using an antistatic cloth. You can
also used a slightly damp cloth.
• Do not use any aggressive detergents or abrasives.
12. Disposal
This product must not be disposed together with
the domestic waste.
All users are obliged to hand in all electrical or
electronic devices, regardless of whether or not
they contain toxic substances, at a municipal or
commercial collection point so that they can be
disposed of in an environmentally acceptable manner.
Please remove the battery before disposing of the device. Do
not dispose of old batteries with your household waste, but
at a battery collection station at a recycling site or in a shop.
Consult your municipal authority or your supplier for
information about disposal.
13. Specifications
Name and model : ecomed Wake Up Light WL-50E
Power supply : in 100 -240V~ 50/60Hz 0.25A
out 6V= 1A
Tuner : USW, digital display
Sound system : mono
Frecuency range : 87.5MHz – 108MHz
Dimensions : approx. 16,5 x 8 x 19 cm
Weight : approx. 330 g
Artikel Nr. : 23600
EAN Code : 40 15588 23600 6
In accordance with our policy of continual product
improvement, we r
eserve the right for technical and
design changes without notice.
The current version of this instruction manual can be found
under www.medisana.com
14. Warranty and repair terms
Please contact your supplier or the service centre in case of a
claim under the warranty. If you have to send in the unit,
please enclose a copy of your receipt and state what the
defect is.
The following warranty terms apply:
1. The warranty period for ecomed products is two years
from date of purchase. In case of a warranty claim, the
date of purchase has to be proven by means of the sales
receipt or invoice.
2. Defects in material or workmanship will be corrected free
of charge within the warranty period.
3. Repairs under warranty do not extend the warranty period
either for the unit or for the replacement parts.
4. The following is excluded under the warranty:
a.
All damage which has arisen due to improper
treatment, e.g. nonobservance of the user instructions.
b. All damage which is due to repairs or tampering by the
customer or unauthorised third parties.
c. Damage which has arisen during transport from the
manufacturer to the consumer or during transport to
the service centre.
d. Accessories which are subject to normal wear and tear.
5. Liability for direct or indirect consequential losses caused
by the unit are excluded even if the damage to the unit is
accepted as a warranty claim.
MEDISANA AG, 41468 NEUSS, GERMANY.
ecomed is a registered trademark of MEDISANA AG.
For service, accessories and spare parts, please contact:
Murrays Health & Beauty
School Lane
Chandlers Ford
Hampshire
UK SO534YN
Tel. +44/2380460600
WICHTIG IMPORTANT
Die Nichtbeachtung dieser Anweisung kann zu schweren Verletzungen oder
Schäden am Gerät führen.
Non-observance of these instructions can result in serious injury or
damage to the device.
WARNUNG WARNING
Diese Warnhinweise müssen eingehalten werden, um mögliche Verletzungen des
Benutzers zu verhindern.
These warning notes must be observed to prevent any injury to the user.
ACHTUNG CAUTION
Diese Hinweise müssen eingehalten werden, um mögliche Beschädigungen am
Gerät zu verhindern.
These notes must be observed to prevent any damage to the device.
HINWEIS NOTE
Diese Hinweise geben Ihnen nützliche Zusatzinformationen zur Installation oder zum
Betrieb.
These notes give you useful additional information on the installation
and operation.
Schutzklasse II Protection category II
LOT-Nummer Lot number
Hersteller Manufacturer
23600 03/2015
Lesen Sie die Gebrauchsanweisung, insbesondere die Sicher
heitshinweise, sorgfältig durch, bevor
Sie das Gerät einsetzen und bewahren Sie die Gebrauchsanweisung für die weitere Nutzung auf.
Wenn Sie das Gerät an Dritte weiter
geben, geben Sie unbedingt diese Gebrauchsanweisung mit.
DE
Gerät und Bedienelemente
GB
Device and controls
Gebrauchsanweisung
Bitte sorgfältig lesen!
Instruction Manual Please read carefully!
DE Lichtwecker
WL-50E
GB Wake Up Light
WL-50E
23600_WL-50E_Lichtwecker_DE-GB_05032015.qxd:Faltblatt_Konzept2 05.03.2015 13:06 Uhr Seite 1

Participe da conversa sobre este produto
Aqui você pode compartilhar o que pensa sobre Ecomed WL-50E Wake-up light. Se você tiver alguma dúvida, primeiro leia atentamente o manual. A solicitação de manual pode ser feita através do nosso formulário de contato.