VE5804
VE5805
EN | Instruction manual
NL | Gebruiksaanwijzing
FR | Mode d’emploi
DE | Bedienungsanleitung
ES | Manual de usuario
PT | Manual de utilizador
IT | Manuele utente
SV | Bruksanvisning
PL | Instrukcja obsługi
CS | Návod na použití
SK | Návod na použitie
RU | Руководство по
эксплуатации
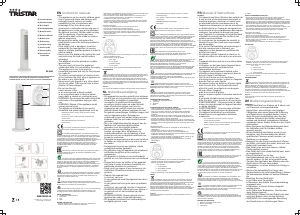
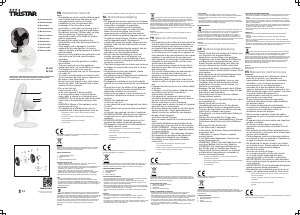
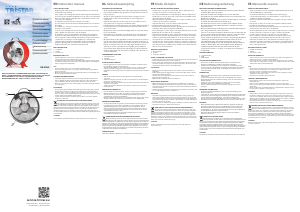
PARTS DESCRIPTION / ONDERDELENBESCHRIJVING / DESCRIPTION DES PIÈCES / TEILEBESCHREIBUNG /
DESCRIPCIÓN DE LAS PIEZAS / DESCRIÇÃO DOS COMPONENTES / DESCRIZIONE DELLE PARTI /
BESKRIVNING AV DELAR / OPIS CZĘŚCI / POPIS SOUČÁSTÍ / POPIS SÚČASTÍ / ПИСАНИЕ ЗАПЧАСТИ
1
3
4
3
4
2
WWW.TRISTAR.EU
Tristar Europe B.V. | Jules Verneweg 87
5015 BH Tilburg | The Netherlands
ENInstruction manual
SAFETY
• This appliance shall not be used by children
aged less than 8 years. This appliance can be
used by children aged from 8 years and above
and persons with reduced physical, sensory or
mental capabilities or lack of experience and
knowledge if they have been given
supervision or instruction concerning use of
the appliance in a safe way and understand
the hazards involved. Children shall not play
with the appliance. Keep the appliance and its
cord out of reach of children aged less than 8
years. Cleaning and user maintenance shall
not be made by children unless older than 8
and supervised.
• By ignoring the safety instructions the
manufacturer can not be hold responsible for
the damage.
• If the supply cord is damaged, it must be
replaced by the manufacturer, its service
agent or similarly qualified persons in order to
avoid a hazard.
• Never move the appliance by pulling the cord
and make sure the cord can not become
entangled.
• The appliance must be placed on a stable,
level surface.
• The user must not leave the device
unattended while it is connected to the supply.
• This appliance is only to be used for
household purposes and only for the purpose
it is made for.
• To protect yourself against an electric shock,
do not immerse the cord, plug or appliance in
the water or any other liquid.
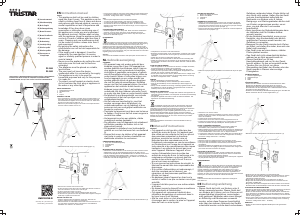
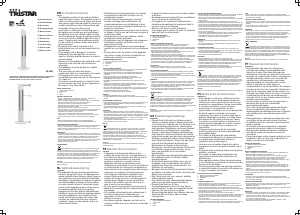
PARTS DESCRIPTION
1. Speed adjustment knob
2. Oscillation knob
3. Fan
4. Tripod
ASSEMBLY THE FAN
• Use a screwdriver to secure the wooden leg to the tripod holder. Put
the locking screw through the holes of the metal connector part and
the stand holder and tighten the screw with the main nut. Each base
leg has one screw and one main nut. (1)
• Place the 3-piece metal link pipe in the center of the tripod and then
secure it with the butterfly screws. (2)
• Install the fan main body on the top of the standing pipe. (3)
• Remove the 4 screws from the motor unit.
• Fit the rear fan grill onto the motor unit. Make sure that the 4 holes on
the motor match the 4 holes on the rear fan grill.
• Fit the 4 screws and screw it on firmly.
• Put the blade on the motor unit and carefully tighten the screw.
• Fit the front fan grill onto the rear cage and fix them together using the
metal clips. Tighten the small screw.
BEFORE THE FIRST USE
• Take the appliance andaccessoriesoutthebox.Removethe
stickers,protective foilorplasticfrom thedevice.
• Place the device on a flat stable surface and ensure a minimum of 10
cm. free space around the device. This device is not suitable for
installation in a cabinet or for outside use.
• Putthepower cable intothe socket.(Note: Make surethe voltagewhich
is indicated on the devicematchesthe localvoltage beforeconnecting
the device.Voltage220V-240V ~ 50-60Hz).
USE
• Set the speed adjustment knob to the desired position.
• To make the fan head oscillate, push down the Oscillation Knob.
• To stop the fan head from oscillating, pull-up the Oscillation Knob.
• The head of the fan can be adjusted up or down, to do this loosen the
adjusting knob, adjust the fan to the desired angle, to secure tighten the
adjusting knob.
CLEANING AND MAINTENANCE
• Clean the appliance with a damp cloth. Never use harsh and abrasive
cleaners, scouring pad or steel wool, which damages the device.
• Never immerse the electrical device in water or any other liquid. The
device is not dishwasher proof.
ENVIRONMENT
This appliance should not be put into the domestic garbage at the
end of its durability, but must be offered at a central point for the recycling
of electric and electronic domestic appliances. This symbol on the
appliance, instruction manual and packaging puts your attention to this
important issue. The materials used in this appliance can be recycled. By
recycling of used domestic appliances you contribute an important push to
the protection of our environment. Ask your local authorities for information
regarding the point of recollection.
Support
You can find all available information and spare parts at www.tristar.eu!
NLGebruiksaanwijzing
VEILIGHEID
• Dit apparaat mag niet worden gebruikt door
kinderen jonger dan 8 jaar. Dit apparaat kan
worden gebruikt door kinderen vanaf 8 jaar en
door personen met verminderde lichamelijke,
zintuiglijke of geestelijke vermogens of gebrek
aan de benodigde ervaring en kennis indien ze
onder toezicht staan of instructies krijgen over
hoe het apparaat op een veilige manier kan
worden gebruikt alsook de gevaren begrijpen
die met het gebruik samenhangen. Kinderen
mogen niet met het apparaat spelen. Houd het
apparaat en het netsnoer buiten bereik van
kinderen jonger dan 8 jaar. Laat reiniging en
onderhoud niet door kinderen uitvoeren, tenzij
ze ouder zijn dan 8 jaar en onder toezicht staan.
• De fabrikant is niet aansprakelijk voor schade
voortvloeiend uit het niet opvolgen van de
veiligheidsinstructies.
• Als het netsnoer beschadigd is, moet het
worden vervangen door de fabrikant, de
onderhoudsmonteur van de fabrikant of door
personen met een soortgelijke kwalificatie om
gevaar te voorkomen.
• Verplaats het apparaat nooit door aan het snoer
te trekken. Zorg ervoor dat het snoer nergens in
verstrikt kan raken.
• Het apparaat moet op een stabiele, vlakke
ondergrond worden geplaatst.
• De gebruiker mag het apparaat niet onbeheerd
achterlaten wanneer de stekker zich in het
stopcontact bevindt.
• Dit apparaat is uitsluitend voor huishoudelijk
gebruik en voor het doel waar het voor bestemd
is.
• Dompel het snoer, de stekker of het apparaat
niet onder in water of andere vloeistoffen om
elektrische schokken te voorkomen.
ONDERDELENBESCHRIJVING
1. Knop voor snelheidsaanpassing
2. Oscillatieknop
3. Ventilator
4. Statief
MONTAGE VAN DE VENTILATOR
• Gebruik een schroevendraaier om de houten poot vast te maken aan de
statiefhouder. Doe de vergrendelingsschroef door de gaten van het
metalen verbindingsstuk en de standaardhouder en draai de schroef vast
met de hoofdmoer. Elke basispoot heeft 1 schroef en 1 hoofdmoer. (1)
• Plaats de 3 metalen koppelingsstukken in het midden van het statief en
maak deze vast met de vleugelmoeren. (2)
• Plaats de hoofdbehuizing van de ventilator bovenop de staande buis. (3)
• Verwijder de 4 schroeven uit de motoreenheid.
• Bevestig het achterrooster op de motoreenheid. Controleer of de 4 gaten
op de motor overeenkomen met de 4 gaten op het achterrooster van de
ventilator.
• Plaats de 4 schroeven en draai deze goed vast.
• Zet het blad op de motoreenheid en draai de schroef voorzichtig vast.
• Plaats het voorrooster van de ventilator op de achterbehuizing en maak
de onderdelen aan elkaar vast met de metalen klemmen. Draai de kleine
schroef vast.
VOOR HET EERSTE GEBRUIK
• Haal het apparaat en de accessoires uit de doos.Verwijder de stickers,
de beschermfolie of het plastic van het apparaat.
• Plaats het apparaat op een vlakke, stabiele ondergrond. Zorg voor
minimaal 10 cm vrije ruimte rondom het apparaat. Dit apparaat is niet
geschikt voor inbouw of gebruik buitenshuis.
• Putthepower cable intothe socket.(Note: Make surethe voltagewhich
is indicated on the devicematchesthe localvoltage beforeconnecting
the device.Voltage220V-240V ~ 50-60Hz).
GEBRUIK
• Zet de snelheidsknop in de gewenste positie.
• Druk op de oscillatieknop om de ventilatorkop te laten oscilleren.
• Druk op de oscillatieknop om de ventilatorkop te laten stoppen met
oscilleren.
• De kop van de ventilator kan omhoog of omlaag ingesteld worden. Draai
de instelknop los, stel de ventilator in de gewenste hoek en draai de
instelknop vast om hem vast te zetten.
REINIGING EN ONDERHOUD
• Reinig het apparaat met een vochtige doek. Gebruik nooit agressieve of
schurende reinigingsmiddelen, schuursponzen of staalwol; dit beschadigt
het apparaat.
• Dompel het apparaat nooit onder in water of andere vloeistoffen. Het
apparaat is niet vaatwasserbestendig.
MILIEU
Dit apparaat mag aan het einde van de levensduur niet bij het
normale huisafval worden gedeponeerd, maar moet bij een speciaal
inzamelpunt voor hergebruik van elektrische en elektronische apparaten
worden aangeboden. Het symbool op het apparaat, in de
gebruiksaanwijzing en op de verpakking attendeert u hierop. De in het
apparaat gebruikte materialen kunnen worden gerecycled. Met het
recyclen van gebruikte huishoudelijke apparaten levert u een belangrijke
bijdrage aan de bescherming van ons milieu. Informeer bij uw lokale
overheid naar het inzamelpunt.
Support
U kunt alle beschikbare informatie en reserveonderdelen vinden op
www.tristar.eu!
FRManuel d'instructions
SÉCURITÉ
• Cet appareil ne doit pas être utilisé par des
enfants de moins de 8 ans. Cet appareil peut
être utilisé par des enfants de 8 ans ou plus et
des personnes présentant un handicap
physique, sensoriel ou mental voire ne
disposant pas des connaissances et de
l'expérience nécessaires en cas de surveillance
ou d'instructions sur l'usage de cet appareil en
toute sécurité et de compréhension des risques
impliqués. Les enfants ne doivent pas jouer
avec l'appareil. Maintenez l'appareil et son
cordon d'alimentation hors de portée des
enfants de moins de 8 ans. Le nettoyage et la
maintenance utilisateur ne doivent pas être
confiés à des enfants sauf s'ils ont 8 ans ou
plus et sont sous surveillance.
• Si vous ignorez les instructions de sécurité, le
fabricant ne saurait être tenu responsable des
dommages.
• Si le cordon d'alimentation est endommagé, il
doit être remplacé par le fabricant, son
réparateur ou des personnes qualifiées afin
d'éviter tout risque.
• Ne déplacez jamais l'appareil en tirant sur le
cordon et veillez à ce que ce dernier ne soit pas
entortillé.
• L'appareil doit être posé sur une surface stable
et nivelée.
• Ne laissez jamais le dispositif sans surveillance
s'il est connecté à l'alimentation.
• Cet appareil est uniquement destiné à des
utilisations domestiques et seulement dans le
but pour lequel il est fabriqué.
• Afin de vous éviter un choc électrique,
n'immergez pas le cordon, la prise ou l'appareil
dans de l'eau ou autre liquide.
DESCRIPTION DES PIÈCES
1. Bouton de réglage de vitesse
2. Bouton d'oscillation
3. Ventilateur
4. Trépied
ASSEMBLER LE VENTILATEUR
• Utilisez un tournevis pour fixer le pied en bois au support du trépied.
Introduisez la vis de blocage dans les trous de la partie métallique du
connecteur et du support et serrez la vis avec l'écrou principal. Chaque
pied de base a une vis et un écrou principal. (1)
• Placez le tube de liaison métallique en 3 parties au centre du trépied et
fixez-le avec les vis papillon. (2)
• Mettez le corps principal du ventilateur sur le dessus du tuyau sur pied.
(3)
• Retirez les 4 vis du bloc moteur.
• Installez la grille arrière du ventilateur sur le bloc moteur. Assurez-vous
que les 4 trous sur le moteur correspondent aux 4 trous sur la grille
arrière du ventilateur.
• Positionnez et vissez fermement les 4 vis.
• Placez la lame sur le bloc moteur et vissez soigneusement la vis.
• Positionnez la grille avant du ventilateur sur la cage arrière et fixez-les
ensemble en utilisant les clips métalliques. Serrez la petite vis.
AVANT LA PREMIÈRE UTILISATION
• Sortez l'appareil et les accessoires hors de la boîte.Retirez les
autocollants, le film protecteur ou le plastique de l'appareil.
• Mettez l'appareil sur une surface stable plate et assurez un dégagement
tout autour de l'appareil d'au moins 10 cm. Cet appareil ne convient pas
à une installation dans une armoire ou à un usage à l'extérieur.
• Putthepower cable intothe socket.(Note: Make surethe voltagewhich
is indicated on the devicematchesthe localvoltage beforeconnecting
the device.Voltage220V-240V ~ 50-60Hz).
UTILISATION
• Réglez le bouton de réglage de vitesse sur la position voulue.
• Pour que la tête du ventilateur oscille, enfoncez le Bouton d'Oscillation.
• Pour que la tête du ventilateur cesse d'osciller, tirez le Bouton
d'Oscillation.
• La tête du ventilateur est réglable vers le haut ou le bas. Pour ce faire,
desserrez le bouton de réglage, ajustez le ventilateur selon l'angle voulu
puis serrez fermement le bouton de réglage.
NETTOYAGE ET ENTRETIEN
• Nettoyez l'appareil avec un chiffon humide. N'utilisez pas de produits
nettoyants agressifs ou abrasifs, de tampons à récurer ou de laine de
verre, ceux-ci pourraient endommager l'appareil.
• N'immergez jamais l'appareil dans l'eau ni aucun autre liquide. L'appareil
ne peut pas être nettoyé en lave-vaisselle.
ENVIRONNEMENT
Cet appareil ne doit pas être jeté avec les déchets ménagers à la
fin de sa durée de vie, il doit être remis à un centre de recyclage pour les
appareils électriques et électroniques. Ce symbole sur l'appareil, le
manuel d'utilisation et l'emballage attire votre attention sur un point
important. Les matériaux utilisés dans cet appareil sont recyclables. En
recyclant vos appareils, vous contribuez de manière significative à la
protection de notre environnement. Renseignez-vous auprès des autorités
locales pour connaître les centres de collecte des déchets.
Support
Vous retrouvez toutes les informations et pièces de rechange sur
www.tristar.eu!
DEBedienungsanleitung
SICHERHEIT
• Dieses Gerät darf nicht von Kindern unter 8
Jahren verwendet werden. Dieses Gerät darf
von Kindern ab 8 Jahren und von Personen mit
eingeschränkten körperlichen, sensorischen
oder geistigen Fähigkeiten oder einem Mangel
an Erfahrung und Kenntnissen verwendet
werden, sofern diese Personen beaufsichtigt
oder über den sicheren Gebrauch des Geräts
unterrichtet wurden und die damit verbundenen
Gefahren verstanden haben. Kinder dürfen mit
dem Gerät nicht spielen. Halten Sie das Gerät
und sein Anschlusskabel außerhalb der
Reichweite von Kindern unter 8 Jahren.
Reinigungs- und Wartungsarbeiten dürfen nicht
von Kindern vorgenommen werden, es sei
denn, sie sind älter als 8 und werden
beaufsichtigt.
• Beim Ignorieren der Sicherheitshinweise kann
der Hersteller nicht für Schäden haftbar
gemacht werden.
• Ist das Netzkabel beschädigt, muss es vom
Hersteller, dem Kundendienst oder ähnlich
qualifizierten Personen ersetzt werden, um
Gefahren zu vermeiden.
• Bewegen Sie das Gerät niemals durch Ziehen
am Kabel, und stellen Sie sicher, dass sich das
Kabel nicht verwickelt.
• Das Gerät muss auf einer ebenen, stabilen
Fläche platziert werden.
• Das Gerät darf nicht unbeaufsichtigt bleiben,
während es am Netz angeschlossen ist.
• Dieses Gerät darf nur für den
Haushaltsgebrauch und nur für den Zweck
benutzt werden, für den es hergestellt wurde.
• Tauchen Sie zum Schutz vor einem
Stromschlag das Kabel, den Stecker oder das
Gerät niemals in Wasser oder sonstige
Flüssigkeiten.
TEILEBESCHREIBUNG
1. Geschwindigkeitsregler
2. Oszillationsknopf
3. Lüfter
4. Stativ
LÜFTER MONTIEREN
• Fixieren Sie das Holzbein mit einem Schraubendreher am Stativ.
Stecken Sie die Befestigungsschraube durch die Löcher im
Metallverbindungsteil und der Standhalterung und ziehen Sie die
Schraube dann mit der Hauptmutter fest. Jedes Standbein hat eine
Schraube und eine Hauptmutter. (1)
• Platzieren Sie die dreiteiligen Metallverbindungsstangen in der Mitte des
Stativs und fixieren Sie sie mit den Flügelmuttern. (2)
• Montieren Sie das Lüftergehäuse oben auf dem Standrohr. (3)
• Entfernen Sie die vier Schrauben von der Motoreinheit.
• Bringen Sie das rückwärtige Lüftergitter an der Motoreinheit an. Achten
Sie darauf, dass die vier Löcher am Motor mit den vier Löchern am
rückwärtigen ausgerichtet sind.
• Bringen Sie die vier Schrauben an und ziehen Sie sie fest an.
• Bringen Sie das Lüfterrad an der Motoreinheit an und ziehen Sie die
Schrauben sorgfältig fest.
• Bringen Sie das vordere Lüftergitter am hinteren Kasten an und fixieren
Sie beide Teile mit den Metallclips. Ziehen Sie die kleine Schraube fest.
VOR DER ERSTEN INBETRIEBNAHME
• Nehmen Sie das Gerät und das Zubehör aus der Verpackung.Entfernen
Sie die Aufkleber, die Schutzfolie oder das Plastik vom Gerät.
• Stellen Sie das Gerät auf eine ebene und stabile Fläche und halten Sie
einen Abstand von mindestens 10 cm um das Gerät herum ein. Dieses
Gerät ist nicht für den Anschluss oder die Verwendung in einem Schrank
oder im Freien geeignet.
• Putthepower cable intothe socket.(Note: Make surethe voltagewhich
is indicated on the devicematchesthe localvoltage beforeconnecting
the device.Voltage220V-240V ~ 50-60Hz).
GEBRAUCH
• Stellen Sie den Geschwindigkeitseinstellknopf auf die gewünschte
Position.


Participe da conversa sobre este produto
Aqui você pode compartilhar o que pensa sobre Tristar VE-5805 Ventilador. Se você tiver alguma dúvida, primeiro leia atentamente o manual. A solicitação de manual pode ser feita através do nosso formulário de contato.