
GET TO KNOW IT:
© 2016 Jöllenbeck GmbH. All rights reserved. SPEEDLINK, the SPEEDLINK word mark and
the SPEEDLINK swoosh are registered trademarks of Jöllenbeck GmbH. All trademarks are
the property of their respective owner. Jöllenbeck GmbH shall not be made liable for any
errors that may appear in this manual. Information contained herein is subject to change
without prior notice. Please keep this information for later reference.
JÖLLENBECK GmbH, Kreuzberg 2, 27404 Weertzen, GERMANY
TECHNICAL SUPPORT
EN
Having technical problems with this product? Get in touch with our Support team – the
quickest way is via our website: www.speedlink.com.
DE
Bei technischen Schwierigkeiten mit diesem Produkt wenden Sie sich bitte an unseren
Support, den Sie am schnellsten über unsere Webseite www.speedlink.com erreichen.
IT
In caso di dicoltà tecniche con questo prodotto rivolgetevi al nostro supporto che è
facilmente reperibile attraverso il nostro sito www.speedlink.com.
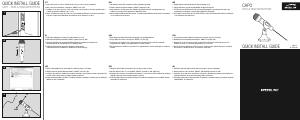
EN
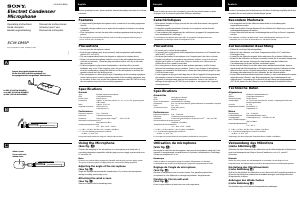
1. Plug the microphone’s jack plug into the computer’s microphone input socket (pink).
2. Switch the microphone on by sliding the ON/OFF switch to ON.
3. Make sure that the microphone is configured as the default recording device, and the recording
level is set correctly, both in the operating system and the software being used.
4. Adjust the angle of the microphone to suit. Keep your mouth 10cm away from the microphone for
the best possible sound reproduction
DE
1. Schließen Sie den Klinkenstecker des Kabels an den Mikrofoneingang (rosa) Ihres Computers an.
2. Schalten Sie das Mikrofon ein, indem Sie den „ON/OFF“-Schalter auf „ON“ schieben.
3. Bitte stellen Sie sicher, dass das Mikrofon im Betriebssystem sowie in der verwendeten Software
als Aufnahmegerät gewählt und dass der Aufnahmepegel korrekt eingestellt ist.
4. Stellen Sie die Neigung des Stativs auf Ihre Bedürfnisse ein. Für optimale Verständigung bewahren
Sie beim Sprechen etwa 10 Zentimeter Abstand.
IT
1. Collegare la spina jack del cavo all’ingresso del microfono (rosa) del computer.
2. Posizionare l‘interruttore „ON/OFF“ su „ON“ per accendere il microfono.
3. Assicurarsi che nel sistema operativo e nel software installato il microfono sia selezionato come
dispositivo di registrazione e che il livello di registrazione sia regolato correttamente.
4. Regolare l’inclinazione del cavalletto a piacere. Per garantire un‘ottima comunicazione mantenere
una distanza di 10 centimetri mentre si parla.
FR
1. Reliez le connecteur jack du câble à l’entrée microphone (rose) de votre ordinateur.
2. Allumez le microphone en amenant le commutateur « ON/OFF » sur « ON ».
3. Assurez-vous que le microphone est bien sélectionné comme périphérique d’enregistrement
dans le système d’exploitation et dans le logiciel utilisé et que le niveau d’enregistrement est
correctement réglé.
4. Réglez l’inclinaison du pied à votre convenance. Pour une compréhension optimale, tenez-vous à
10 cm environ du microphone pour parler.
ES
1. Enchufa el conector tipo jack del cable a la correspondiente entrada del micrófono (rosa) de tu
ordenador.
2. Enciende el micrófono, moviendo el interruptor „ON/OFF“ a la posición „ON“.
3. Asegúrate de que el micro esté seleccionado como aparato de grabación en el sistema operativo y
en el software que utilizas y que el nivel de voz esté bien equilibrado.
4. Ajusta la peana flexible de la manera que te resulte más cómoda. Para la emisión–recepción más
favorable mantenlo, cuando hables, a una distancia de 10cm.
RU
1.Подсоедините штекер кабеля к входу микрофона (розовый) компьютера.
2. Включите микрофон, для этого переключите выключатель „ON/OFF“ в положение „ON“.
3. Обеспечьте, чтобы микрофон был выбран в операционной системе, а также в используемом
программном обеспечении в качестве устройства записи, и чтобы уровень записи был
настроен правильно.
4. Отрегулируйте наклон штатива. Для оптимального понимания при говорении соблюдайте
расстояние примерно в 10 сантиметров до микрофона.
NL
1. Steek de jack plug van de kabel in de microfooningang (roze) van de computer.
2. Schakel de microfoon in door de „On/O“-schakelaar in de stand „ON“ te zetten.
3. Controleer of de microfoon in het besturingssysteem en in de gebruikte software is geselecteerd als
opnameapparaat en of het opnamevolume juist is ingesteld.
4. Zet de microfoon naar wens onder een hoek. Als u de microfoon ongeveer 10 centimeter voor uw
mond houdt, bent u het beste te verstaan.
PL
1. Podłącz wtyk mini jack 3,5mm do wejścia mikrofonowego komputera (różowe).
2. Włącz mikrofon, przesuwając przełącznik „ON/OFF“ do położenia „ON“.
3. Upewnij się, że mikrofon jest rozpoznany w systemie operacyjnym i w innym stosowanym
oprogramowaniu jako urządzenie do nagrywania oraz że poziom nagrywania jest poprawnie
ustawiony.
4. Dopasuj nachylenie mikrofonu do swoich potrzeb. Dla optymalnej jakości transmisji zachowaj
odległość ok. 10cm od mikrofonu.
TR
1. Kablonun jakını bilgisayarınızın mikrofon girişine (pembe) takın.
2. „ON/OFF“ şalterini „ON“ konumuna iterek mikrofonu açın.
3. Lütfen mikrofonun işletim sisteminde ve kullanılan yazılımda kayıt cihazı olarak seçilmiş
olduğundan ve kayıt seviyesinin doğru ayarlandığından emin olun.
4. Ayağın eğimini kendi ihtiyacınıza göre ayarlayın. En iyi şekilde anlaşabilmeniz için konuşma
esnasında yaklaşık 10cm mesafe bırakın.
HU
1. Csatlakoztassa a kábel jack dugóját számítógépe mikrofon bemenetére (rózsaszín).
2. Az „ON/OFF“ kapcsoló „ON“-ra állításával kapcsolja be a mikrofont.
3. Győződjön meg arról, hogy a mikrofon az operációs rendszerben, valamint a felhasznált szoftverben
felvevő készülékként legyen kiválasztva és hogy a felvételi szint megfelelően legyen beállítva.
4. Stellen Sie die Neigung des Stativs auf Ihre Bedürfnisse ein. Az optimális érthetőség érdekében
beszéd közben tartson kb. 10 cm távolságot a mikrofontól.
EL
1. Συνδέστε το βύσμα του καλωδίου στην είσοδο μικροφώνου (ροζ) του υπολογιστή σας.
2. Ενεργοποιήστε το μικρόφωνο, ωθώντας το διακόπτη „ON/OFF“ στο „ON“.
3. Εξασφαλίζετε ότι το μικρόφωνο έχει επιλεγεί στο λειτουργικό σύστημα καθώς και στο
χρησιμοποιούμενο λογισμικό ως συσκευή λήψης και ότι η στάθμη λήψης έχει ρυθμιστεί σωστά.
4. Ρυθμίστε την κλίση του τρίποδου σύμφωνα με τις ανάγκες σας. Για βέλτιστη επικοινωνία διατηρείτε
κατά την ομιλία περίπου 10 εκατοστά απόσταση.
CZ
1. Zapojte západkový konektor kabelu do vstupu mikrofonu (růžový) na Vašem počítači.
2. Mikrofon zapněte posunutím spínače „ON/OFF“ na „ON“.
3. Ujistěte se, zda je mikrofon zvolen v operačním systému a v použitém softvéru jako záznamové
zařízení, a zda je správně nastavená hladina snímání zvuku.
4. Upravte sklon stativu dle Vašich potřeb. Pro optimální porozumění dodržujte při mluvení odstup cca.
10 centimetrů.
CAPO
SL-8703-BK
VERSICO Stereo Headset
Welcome to your new comfort zone: the VERSICO Stereo Headset. It oers the impressive
full-range sound of a full-size headset – and lets you enjoy the sound experience for
hours on end thanks to its large, soft earcups and adjustable, padded headband. The
ultra-sensitive microphone plus remote, which is discretely integrated into one earcup,
make voice chat a breeze. Enjoy a truly incredible sound experience thanks to the
VERSICO’s superior sound quality and noise shielding.
QUICK INSTALL GUIDE
CAPO – DESK & HAND MICROPHONE
2
3
4
ON
OFF
UP
DOWN
1


Participe da conversa sobre este produto
Aqui você pode compartilhar o que pensa sobre Speedlink SL-8703-BK Microfone. Se você tiver alguma dúvida, primeiro leia atentamente o manual. A solicitação de manual pode ser feita através do nosso formulário de contato.