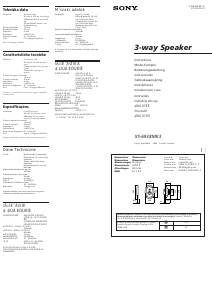
234
ø 4 × 30
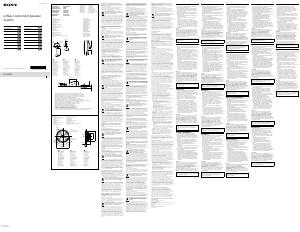
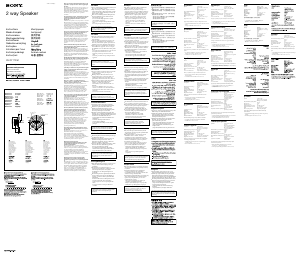
Parts list/Liste des pièces/Lista de componentes/部件表/零件一覽表/ / /Daftar suku cadang/
/Senarai bahagian/부품 목록
56
× 2
× 2
Mounting/Montage/Montaje/安装/安裝/ / /Pemasangan/
/Pemasangan/장착
Mounting from the car interior/Montage depuis l’intérieur de l’habitacle/Montaje desde el interior del automóvil/
从汽车内安装/從汽車內安裝/
/ /Memasang dari interior mobil/ /
Pemasangan daripada dalaman kereta/차량 내부에 장착
1
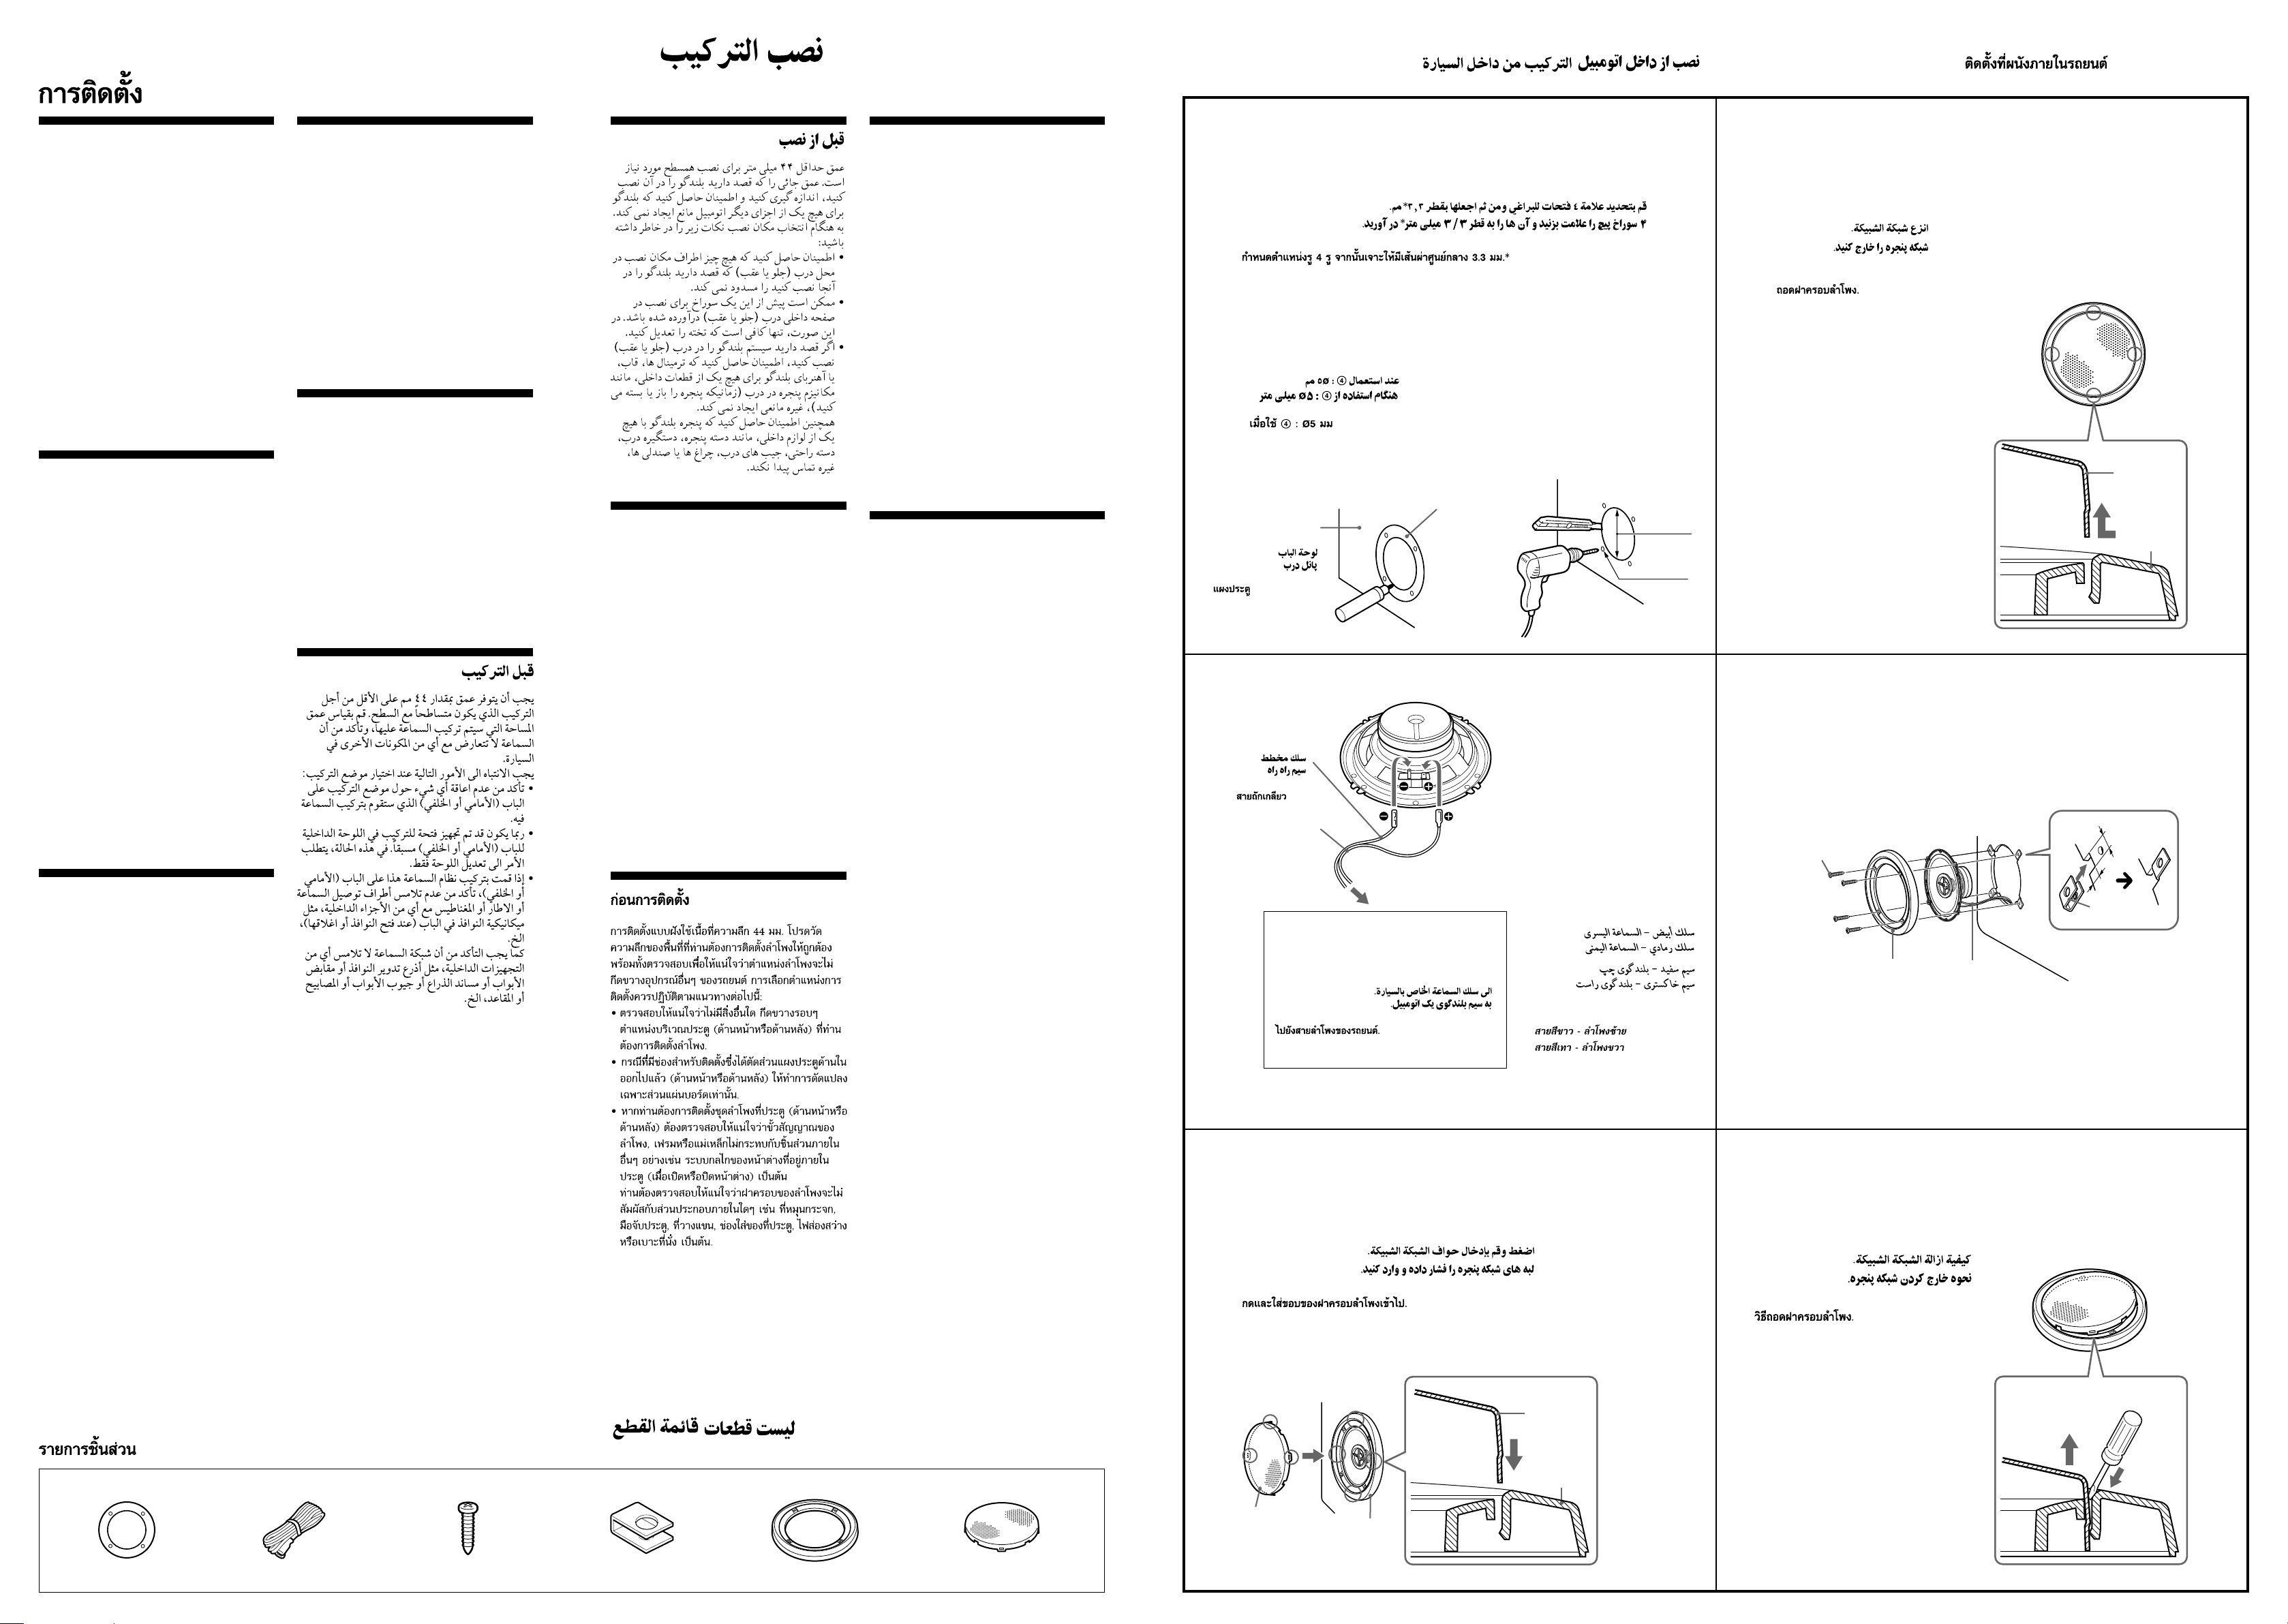
Mark the 4 bolt holes and make them 3.3 mm* in diameter.
Marquez les 4 orifices des boulons et percez des trous de 3,3 mm* de diamètre.
Marque los orificios de los 4 pernos y hágalos de 3,3 mm* de diámetro.
画出4个螺栓孔,并钻成 3.3 mm* 直径的孔。
劃出4個螺栓孔,使其直徑呈為 3.3 mm*。
Tandai 4 lubang baut dan buatlah berdiameter 3.3 mm*.
Tandakan 4 lubang bolt dan jadikan lubang lubang itu berdiameter 3.3 mm*.
4개의 볼트 구멍을 표시하고 직경이 3.3 mm*가 되도록 구멍을 뚫으십시오.
* When using 4 : ø 5 mm
* Avec 4 : ø 5 mm
* Si utiliza 4 : ø 5 mm
* 使用 4 时:ø 5 mm
* 使用 4 時:ø 5 mm
*
*
* Bila menggunakan 4 : ø 5 mm
*
* Apabila menggunakan 4 : ø 5 mm
* 4 를 사용할 경우 : ø 5 mm
c
1
ø 3.3 mm*
ø 126 mm
2
Remove the grille net.
Retirez la grille de protection.
Extraiga la red de la rejilla.
取下格栅网。
取下格柵網。
Lepaskan jaring kisi.
Tanggalkan jaring gril.
그릴 네트를 제거하십시오.
3
2
*
Striped cord
Cordon rayé
Cable rayado
条纹电线
條紋電線
Kabel bergaris
Kord berjalur
줄무늬 코드
To speaker cord of a car.
Vers le cordon de haut-parleur d’une voiture.
Al cable del altavoz de un automóvil.
至汽车扬声器电线。
至汽車揚聲器電線。
Ke kabel speaker pada mobil.
Ke kord pembesar suara kereta.
자동차의 스피커 코드에 연결.
6
5
4
Press and insert the edges of the grille net.
Appuyez pour insérer les bords de la grille de protection.
Presione e inserte los extremos de la red de la rejilla.
按下并插入格栅网的边缘。
將格柵網邊緣按下並插入。
Tekan dan masukkan sisi-sisi dari jaring kisi.
Tekan dan masukkan tepian jaring gril.
그릴 네트의 가장자리를 눌러 삽입하십시오.
5
How to remove the grille net.
Comment retirer la grille de protection.
Cómo extraer la red de la rejilla.
如何取下格栅网
。
如何取下格柵網。
Bagaimana melepaskan jaring kisi.
Cara menanggalkan jaring gril.
그릴 네트 제거 방법.
* White cord — Left speaker
Grey cord — Right speaker
* Cordon blanc — Haut-parleur gauche
Cordon gris — Haut-parleur droit
* Cable blanco — Altavoz izquierdo
Cable gris — Altavoz derecho
* 白色电线 — 左扬声器
灰色电线 —
右扬声器
* 白色電線 — 左揚聲器
灰色電線 — 右揚聲器
*
*
* Kabel putih — Speaker kiri
Kabel abu-abu — Speaker kanan
*
* Kord putih — Pembesar suara kiri
Kord kelabu — Pembesar suara kanan
* 흰색 코드 — 왼쪽 스피커
회색 코드 — 오른쪽 스피커
× 8
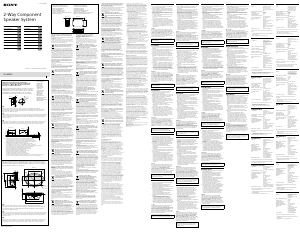
Before Mounting
A depth of at least 44 mm is required for flush
mounting. Measure the depth of the area where
you are to mount the speaker, and ensure that
the speaker is not obstructing any other
components of the car. Keep the following in
mind when choosing a mounting location:
•Make sure that nothing is obstructing around
the mounting location of the door (front or
rear) where you are to mount the speaker.
•A hole for mounting may already be cut out of
the inner panel of the door (front or rear). In
this case, you need to modify the board only.
•If you are to mount this speaker system in the
door (front or rear), make sure that the speaker
terminals, frame or magnet do not interfere
with any inner parts, such as the window
mechanism in the door (when you open or
close the window), etc.
Also make sure that the speaker grille does not
touch any inner fittings, such as the window
cranks, door handles, arm rests, door pockets,
lamps or seats etc.
Avant le montage
Pour que le haut-parleur ne dépasse pas, le
montage nécessite une profondeur d’au moins
44 mm. Mesurez la profondeur de
l’emplacement où vous souhaitez installer le
haut-parleur et assurez-vous que ce dernier ne
gênera aucun des autres éléments du véhicule.
Veuillez toujours garder les remarques
suivantes en mémoire lorsque vous choisissez
un emplacement pour l’installation :
•Vérifiez qu’il n’existe aucun obstacle autour de
l’emplacement où vous allez installer le haut-
parleur dans la portière (avant ou arrière).
•Un orifice peut déjà avoir été pratiqué dans le
panneau interne de la portière (avant ou
arrière). En pareil cas, il ne vous reste plus qu’à
modifier la plaque.
•Si vous installez ce système de haut-parleurs
dans la portière (avant ou arrière), vérifiez que
les bornes, le bord ou l’aimant des haut-
parleurs ne gênent pas les éléments internes
comme le mécanisme de lève-vitres de la
portière (lorsque vous baissez ou remontez la
vitre), etc.
Vérifiez également que la grille du haut-
parleur ne touche aucun des équipements
internes comme les manivelles des vitres, les
poignées de portières, les accoudoirs, les vide-
poches des portières, les lampes ou les sièges
etc.
Antes del montaje
Para montar el altavoz de modo que quede
empotrado en la ubicación de montaje se
requiere una profundidad mínima de 44 mm.
Mida la profundidad del área donde desee
montar el altavoz y asegúrese de que no
obstruya ningún otro componente del
automóvil. Cuando elija la ubicación de montaje,
recuerde lo siguiente:
•Asegúrese de que no haya ningún objeto cerca
de la puerta (delantera o trasera) donde desea
montar el altavoz que pueda impedir su
instalación.
•Es posible que en el panel interno de la puerta
(delantera o trasera) ya exista un orificio para
montar el altavoz. En este caso, sólo deberá
modificar el tablero.
•Si desea montar este sistema de altavoces en la
puerta (delantera o trasera), asegúrese de que
los terminales, el marco o el imán del altavoz
no interfieran con los componentes internos
como, por ejemplo, el mecanismo de la
ventanilla de la puerta (al subir o bajar la
ventanilla), etc.
Asegúrese también de que la rejilla del altavoz
no esté en contacto con accesorios internos
como, por ejemplo, los picaportes de las
ventanillas y las puertas, los reposabrazos, los
compartimentos para guardar objetos situados
en las puertas, las luces o los asientos, etc.
安装之前
嵌入式安装至少需要 44 mm 深度。请测量您要安
装扬声器的位置深度,并确保扬声器不会妨碍汽
车上的任何其他部件。选择安装位置时,请注意
下列事项:
• 确保您要安装扬声器的车门(前或后)的安装位
置周围没有障碍物。
• 车门(前或后)的内面板上可能已经开有安装
孔。在此情况下,您只需改装底板。
• 如果您要将扬声器系统安装在车门(前或后)
内,请确保扬声器端子、框架或磁体不会干扰任
何内部部件,例如车门上的车窗机械装置(当您
打开或关闭车窗时)等。
同时,也请确保扬声器格栅不会碰到任何内部装
置,例如车窗摇柄、车门把手、扶手、门套、灯
或座位等。
安裝以前
嵌入安裝至少需要 44 mm 的深度。測量安裝揚聲
器區域的深度,確保揚聲器不會妨礙汽車上的任何
其它部件。選擇安裝位置時,請注意下列事項:
• 確保您要安裝揚聲器的車門(前面或後面)上的
安裝位置周圍沒有任何障礙物。
• 車門(前面或後面)的內面板上可能已經開有安
裝孔。這種情況下,只需修正底板。
• 若您打算將該揚聲器系統安裝在車門上(前面或
後面),確保在打開或關閉車窗等情況時,揚聲
器的接頭、框架或磁體不會干擾車門內的車窗機
構等內部部件的動作。
此外,確保揚聲器的格柵不會碰到任何內部裝
置,例如車窗搖柄、車門把手、座位扶手、門
套、燈或座位等。
Sebelum Pemasangan
Kedalaman minimal 44 mm diperlukan untuk
pemasangan datar. Ukurlah kedalaman area di
mana speaker akan dipasang, dan pastikan
speaker tersebut tidak mengganggu komponen
mobil lainnya. Perhatikan hal-hal berikut saat
memilih lokasi pemasangan:
•Pastikan tidak ada yang mengganggu di
sekitar lokasi pemasangan pintu (depan atau
belakang) di mana speaker akan dipasang.
•Lubang untuk pemasangan mungkin sudah
dipotong di panel bagian dalam pintu (depan
atau belakang). Pada kasus ini, anda hanya
perlu memodifikasi board.
•Bila anda ingin memasang sistem speaker ini
di pintu (depan atau belakang), pastikan
bahwa ujung sambungan speaker, bingkai
atau magnet tidak bertentangan dengan
bagian-bagian dalam, seperti mekanisme
jendela pada pintu (saat anda membuka atau
menutup jendela), dll.
Juga pastikan agar kisi-kisi speaker tidak
menyentuh perlengkapan dalam, seperti
engkol jendela, pegangan pintu, sandaran
tangan, kantung pintu, lampu atau tempat
duduk dll.
Sebelum Pemasangan
Kedalaman sekurang-kurangnya 44 mm
diperlukan untuk pemasangan separas. Ukur
kedalaman tempat yang ingin dipasangkan
pembesar suara, dan pastikan pembesar suara
tidak menganggu komponen kereta yang lain.
Patuhi peringatan dibawah apabila memilih
lokasi pemasangan:
•Pastikan tiada benda menganggu di sekitar
lokasi pemasangan di pintu (depan atau
belakang) dimana pembesar suara akan
dipasang.
•Satu lubang pemasangan mungkin telah
ditebuk daripada panel dalam pintu (depan
atau belakang). Dalam keadaan ini, anda
hanya perlu mengubah papan sahaja.
• Jika anda mahu memasang sistem pembesar
suara ini di pintu (depan atau belakang),
pastikan terminal, bingkai ataupun magnet
pembesar suara tidak mengganggu sebarang
bahagian dalam seperti mekanisma tingkap di
pintu (apabila membuka atau menutup
tingkap) dll.
Pastikan juga gril pembesar suara tidak
menyentuh sebarang kelengkapan dalam,
seperti engkol tingkap, pemegang pintu,
tempat letak tangan, poket pintu, lampu atau
kerusi dll.
설치하기 전에
우퍼를 설치하려면 최소 44 mm의 깊이가 필요
합니다. 스피커를 설치할 장소의 깊이를 재고 스
피커가 차량의 다른 부품을 방해하지 않도록 하
십시오. 설치 장소를 선택할 때에는 다음 사항에
유의하십시오:
•스피커를 설치할 문(앞문 또는 뒷문)에 장애물
이 없는지 확인하십시오.
•문(앞문 또는 뒷문)의 내부 패널에 설치용 구
멍이 이미 뚫려 있을 수도 있습니다. 이러한 경
우에는 보드만 변경하면 됩니다.
•차량 문(앞문 또는 뒷문)에 본 스피커를 설치
하려면 스피커 단자, 프레임 또는 자석이 창문
의 기계장치(창문을 열거나 닫을 때)와 같은
내부 부품을 가로막지 않도록 하십시오.
또한, 창문 크랭크, 문 손잡이, 팔걸이, 도어 포
켓, 램프 또는 좌석 등과 같은 내부 장치에 스
피커 그릴이 닿지 않도록 주의하십시오.
1
× 8× 2
Door panel
Panneau de la portière
Panel de la puerta
门板
門板
Panel pintu
Panel pintu
문 패널
6
5
5
6
4
3
5
2
1 mm
13 mm


Participe da conversa sobre este produto
Aqui você pode compartilhar o que pensa sobre Sony XS-GF1622X Coluna auto. Se você tiver alguma dúvida, primeiro leia atentamente o manual. A solicitação de manual pode ser feita através do nosso formulário de contato.