ENGLISH
DEUTSCH
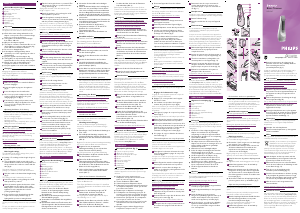
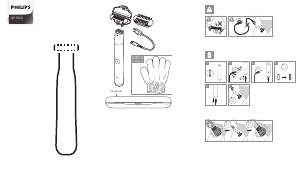
General Description (fig. 1)
.
A Precision cutting element
B Comb
C Hair length selector
D On/off slide
E Cleaning brush
F Socket for appliance plug
G Charging light
H Adapter
I Appliance plug
Important
.
Read these instructions for use carefully before using
the appliance and save them for future reference.
◗ Check if the mains voltage indicated on the
adapter corresponds to the local mains voltage
before you connect the appliance.
◗ This appliance is suitable for mains voltages
from 220 to 240 volts.
◗ Only use the adapter supplied.
◗ The adapter contains a transformer. Do not cut
off the adapter to replace it with another plug,
as this will cause a hazardous situation.
◗ Do not use a damaged adapter.
◗ If the adapter is damaged, always have it
replaced by one of the original type in order to
avoid a hazard.
◗ Keep the appliance and the adapter dry.
◗ This appliance is only intended for trimming
human hair. Do not use it for any other purpose.
◗ Charge, store and use the appliance at a
temperature between 15cC and 35cC.
◗ Keep the appliance out of the reach of children.
Charging
.
Charging this appliance takes 10 hours.
A fully charged appliance has a cordless trimming
time of up to 40 minutes.
Do not leave the appliance connected to the mains
for more than 24 hours.
1 Make sure the appliance is switched off before
you start charging it.
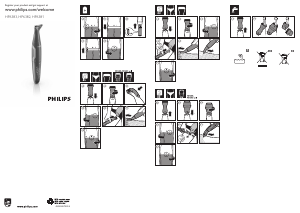
2 Insert the appliance plug into the appliance
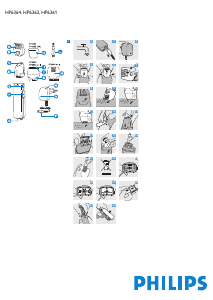
(fig. 2).
3 Insert the adapter into the wall socket.
◗ As soon as you put the adapter in the wall
socket to charge the appliance, the green
charging light goes on (fig. 3).
4 If the battery is empty and you want to trim
your bikini line, charge the appliance for at least
1.5 hours to have enough power for one
trimming session.
Optimising the lifetime of the battery
- We advise you to use the appliance the first 2 to
3 times until the battery is completely empty
before recharging it again.
- Do not recharge the appliance in between
trimming sessions.
- Discharge the battery completely twice a year by
letting the motor run until it stops.
Using the appliance
.
Remove the appliance plug from the appliance
before you start trimming or styling.
Do not press the appliance too firmly onto the skin
and stretch the skin with your free hand during
trimming or styling.
Do not move the appliance too fast. Make smooth
and gentle movements.
Trimming with the comb
Use the comb to trim your bikini line.
Hair length settings
The adjustable comb with 5 settings allows you to
cut hair to 5 different lengths:
◗ Settings 1-5: resulting in a hair length of approx.
5-9 mm.
◗ The resulting hair length corresponds to the
smallest distance between the cutting blade and
the spot where the comb is in contact with the
skin (fig. 4).
Start at the setting for maximum hair length
(setting 5) to familiarise yourself with the trimmer.
1 Slide the comb to the desired hair length setting
(fig. 5).
The setting selected is indicated by the arrow.
2 Switch the appliance on by pushing the on/off
slide upwards to position I.
3 Move the trimmer against the direction of hair
growth. Make sure the surface of the comb
always stays in contact with the skin. Hold the
appliance in such a way that the orchid is
pointing upwards (fig. 6).
◗ If the comb becomes detached from the hair
length selector, simply reattach it (fig. 7).
Styling with the precision cutting element
Use the precision cutting element to style your bikini
line.
To style your bikini line, hold the appliance with the
orchid pointing towards your skin.
1 Slide the hair length selector to position 0.This
will retract the comb to a position below the
cutting element (fig. 8).
Styling with retracted comb will result in a hair
length of approx. 1 mm.
2 Switch the appliance on by pushing the on/off
slide upwards to position I.
3 Move the appliance towards the desired
contour of your bikini line.Touch the hair lightly
with the precision cutting element (fig. 9).
You can be as creative as you like when styling your
bikini line.You can use the template on the packaging
to create a shape, but you can also make your own
templates to create a personal style.
Cleaning
.
Do not use abrasives, scourers or liquids such as
alcohol, petrol or acetone to clean the appliance.
Do not immerse the appliance in water.
1 Switch the appliance off, pull the adapter out of
the wall socket and pull the appliance plug out
of the appliance before you start cleaning the
appliance.
2 Pull the cutting element in the direction of the
arrow to remove it (fig. 10).
Be careful: do not let the cutting element fall to the
floor!
3 Clean the cutting element, the cavity under the
cutting element and the comb with the brush
supplied.
4 Reassemble the cutting element by inserting the
hook into the slot in the cavity and pushing the
cutting element back onto the appliance until
you hear a click (fig. 11).
Replacement
.
A worn or damaged cutting element should only be
replaced with an original Philips/Philishave cutting
element.
1 Remove the old cutting element.
2 Push the new cutting element onto the
appliance until you hear a click.
Environment
.
The built-in rechargeable battery contains
substances that may pollute the environment.
Remove the battery when you discard the appliance.
Do not throw the battery away with the normal
household waste, but hand it in at an official collection
point.You can also take the appliance to a Philips
service centre, which will remove the battery for you
and will dispose of it in an environmentally safe way.
1 Disconnect the appliance from the mains and
let the appliance run until the motor stops.
2 Insert a screwdriver between the two housing
halves next to the motor shaft and pry them
apart (fig. 12).
3 Pull the rechargeable battery and the on/off
circuit board out of the housing (fig. 13).
4 Insert the screwdriver into the small slot in the
printed circuit board marked with an arrow.
Push the screwdriver down until part of the
printed circuit board breaks off (fig. 14).
5 Remove the battery from the plastic part by
means of a screwdriver.
Do not connect the appliance to the mains again
after the battery has been removed.
Guarantee & service
.
If you need information or if you have a problem,
please visit the Philips website at www.philips.com or
contact the Philips Customer Care Centre in your
country (you will find its phone number in the
worldwide guarantee leaflet). If there is no Customer
Care Centre in your country, turn to your local Philips
dealer or contact the Service Department of Philips
Domestic Appliances and Personal Care BV.
Allgemeine Beschreibung (1)
.
A Präzisions-Schneideeinheit
B Kamm
C Haarlängenregler
D Ein-/Aus-Schalter
E Reinigungsbürste
F Buchse für Gerätestecker
G Ladelampe
H Netzteil
I Gerätestecker
Wichtig
.
Lesen Sie diese Bedienungsanleitung vor dem ersten
Gebrauch des Geräts sorgfältig durch und bewahren
Sie sie zur späteren Einsichtnahme auf.
◗ Prüfen Sie, bevor Sie das Gerät in Betrieb
nehmen, ob die Spannungsangabe auf dem
Netzteil mit der örtlichen Netzspannung
übereinstimmt.
◗ Das Gerät ist für Netzspannungen zwischen
220 und 240 Volt geeignet.
◗ Verwenden Sie ausschließlich das mitgelieferte
Netzteil.
◗ Das Netzteil enthält einen Transformator.Aus
Sicherheitsgründen darf das Netzteil auf keinen
Fall abgeschnitten und durch einen anderen
Stecker ersetzt werden.
◗ Verwenden Sie keinesfalls ein beschädigtes
Netzteil.
◗ Wenn das Netzteil defekt oder beschädigt ist,
darf es nur von einem Philips Service-Center
oder einer von Philips autorisierten Werkstatt
durch ein Original-Ersatznetzteil ausgetauscht
werden, um ein Sicherheitsrisiko zu vermeiden.
◗ Achten Sie darauf, dass Gerät und Netzteil nicht
nass werden.
◗ Das Gerät ist ausschließlich zum Schneiden von
menschlichem Haar vorgesehen.Verwenden Sie
es nicht für andere Zwecke.
◗ Benutzen und laden Sie das Gerät bei
Temperaturen zwischen 15c C und 35c C.
Bewahren Sie es auch in diesem
Temperaturbereich auf.
◗ Halten Sie das Gerät außer Reichweite von
Kindern.
Den Akku aufladen
.
Das Aufladen des Geräts dauert 10 Stunden.
Ein vollständig geladenes Gerät hat eine
Betriebsdauer von bis zu 40 Minuten.
Lassen Sie das Gerät nicht länger als 24 Stunden am
Netz.
1 Das Gerät muss ausgeschaltet sein, wenn Sie
mit dem Laden beginnen.
2 Stecken Sie den Gerätestecker in das Gerät
(Abb. 2).
3 Stecken Sie das Netzteil in die Steckdose.
◗ Sobald Sie das Netzteil zum Aufladen des
Geräts in die Steckdose stecken, leuchtet die
grüne Ladelampe (Abb. 3).
4 Ist der Akku leer und Sie möchten die Haare im
Bikinibereich schneiden, so laden Sie das Gerät
mindestens 1 1/2 Stunden auf. Sie haben dann
genügend Akkukapazität für eine Anwendung.
Die Lebensdauer des Akkus optimieren
- Wir empfehlen, das Gerät bei den ersten 2 bis 3
Anwendungen so lange zu benutzen, bis der Akku
ganz leer ist, und ihn erst dann wieder aufzuladen.
- Laden Sie das Gerät nicht zwischendurch auf.
- Entladen Sie den Akku zweimal im Jahr komplett,
indem Sie das Gerät laufen lassen, bis der Motor
anhält.
Benutzung des Geräts
.
Ziehen Sie den Gerätstecker aus dem Gerät, bevor
Sie mit dem Schneiden oder Stylen beginnen.
Drücken Sie das Gerät nicht zu fest auf die Haut.
Straffen Sie die Haut während des Schneidens bzw.
Stylens mit der freien Hand.
Bewegen Sie das Gerät nicht zu schnell, sondern
führen Sie es mit sanften und gleitenden
Bewegungen über die Haut.
Schneiden mit dem Kamm
Verwenden Sie den Kamm zum Schneiden der
Haare im Bikinibereich.
Haarlängeneinstellungen
Mit dem verstellbaren Kamm (5 Einstellungen)
können Sie das Haar auf 5 verschiedene Längen
schneiden:
◗ Einstellungen 1 bis 5:Verbleibende Haarlänge ca.
5 bis 9 mm.
◗ Die verbleibende Haarlänge entspricht der
geringsten Entfernung zwischen der Klinge und
dem Punkt, an dem der Kamm die Haut berührt
(Abb. 4).
Beginnen Sie mit der höchsten Haarlängeneinstellung
(5), um sich mit dem Gerät vertraut zu machen.
1 Beginnen Sie mit der maximalen
Haarlängeneinstellung (5), um sich mit dem
Gerät vertraut zu machen (Abb. 5).
Der Pfeil kennzeichnet die gewählte Einstellung.
2 Zum Einschalten des Geräts schieben Sie den
Ein-/Aus-Schalter auf Position I.
3 Führen Sie das Gerät entgegen der
Haarwuchsrichtung. Der Kamm muss dabei
stets in Berührung mit der Haut bleiben. Halten
Sie das Gerät so, dass die Geräteseite mit der
Blume nach oben zeigt (Abb. 6).
◗ Sollte sich der Kamm vom Haarlängenregler
lösen, setzen Sie ihn einfach wieder darauf
zurück (Abb. 7).
Stylen mit der Präzisions-Schneideeinheit
Verwenden Sie die Präzisions-Schneideeinheit zum
Stylen des Bikinibereichs.
Zum Stylen des Bikinibereichs halten Sie das Gerät
so, dass das Geräteseite mit der Blume auf Ihre Haut
gerichtet ist.
1 Schieben Sie den Haarlängenregler auf "0".
Dadurch wird der Kamm unterhalb der
Schneideeinheit eingezogen (Abb. 8).
Bei eingezogenem Kamm ergibt sich beim Stylen
eine Haarlänge von ca. 1 mm.
2 Schalten Sie das Gerät ein, indem Sie den Ein-
/Aus-Schalter aufwärts in Position 1 schieben.
3 Führen Sie das Gerät in Richtung der
gewünschten Kontur der Bikinizone. Berühren
NEDERLANDS
Algemene beschrijving (fig. 1)
.
A Precisieknipelement
B Kam
C Kniplengteschuif
D Aan/uitknop
E Schoonmaakborsteltje
F Opening voor apparaatstekkertje
G Oplaadlampje
H Adapter
I Apparaatstekkertje
Belangrijk
.
Lees deze gebruiksaanwijzing zorgvuldig door
voordat je het apparaat gaat gebruiken. Bewaar de
gebruiksaanwijzing om hem indien nodig te kunnen
raadplegen.
◗ Controleer of het voltage aangegeven op de
adapter overeenkomt met de plaatselijke
netspanning voordat je het apparaat aansluit.
◗ Het apparaat is geschikt voor een netspanning
tussen 220 en 240 volt.
◗ Gebruik uitsluitend de bijgeleverde adapter.
◗ De adapter bevat een transformator. Knip de
adapter niet af om hem te vervangen door een
andere stekker, omdat dit een gevaarlijke
situatie kan opleveren.
◗ Gebruik nooit een beschadigde adapter.
◗ Indien de adapter beschadigd is, laat hem dan
altijd vervangen door een van het
oorspronkelijke type om gevaar te voorkomen.
◗ Houd het apparaat en de adapter droog.
◗ Dit apparaat is uitsluitend bedoeld voor het
bijknippen van haar bij mensen. Gebruik het
apparaat niet voor andere doeleinden.
◗ Laad het apparaat op, bewaar het en gebruik het
bij een temperatuur tussen 5cC en 35cC.
◗ Houd het apparaat buiten het bereik van
kinderen.
Opladen
.
Het duurt 10 uur om het apparaat op te laden.
Een volledig opgeladen apparaat heeft een snoerloze
gebruikstijd tot 40 minuten.
Laat het apparaat niet langer dan 24 uur op
netspanning aangesloten zitten.
1 Zorg ervoor dat het apparaat uitgeschakeld is
voordat je het gaat opladen.
2 Steek het apparaatstekkertje in het apparaaat
(fig. 2).
3 Steek de adapter in het stopcontact.
◗ Het groene oplaadlampje gaat aan zodra je de
stekker van de adapter in het stopcontact
steekt om het apparaat op te laden (fig. 3).
4 Als de accu leeg is en je wilt toch je bikinilijn
bijwerken, laad het apparaat dan minstens
1,5 uur op om voldoende energie te hebben
voor één knipbeurt.
De levensduur van de accu optimaliseren
- We raden je aan het apparaat de eerste 2 à 3
keer te gebruiken totdat de accu helemaal leeg is
voordat je het apparaat weer gaat opladen.
- Laad het apparaat niet op tussen de knipbeurten.
- Ontlaad de accu twee keer per jaar door de
motor te laten lopen totdat deze stopt.
Gebruik van het apparaat
.
Trek het apparaatstekkertje uit het apparaat voordat
je gaat knippen of stylen.
Druk het apparaat niet te hard op de huid en trek
de huid met je vrije hand strak tijdens het knippen of
stylen.
Beweeg het apparaat niet te snel over de huid.
Maak rustige, vloeiende bewegingen.
Knippen met de kam
Gebruik de kam om je bikinilijn bij te knippen.
Kniplengtestanden
Met de instelbare kam met 5 standen kun je je haar
op 5 verschillende lengtes knippen.
◗ De standen 1 t/m 5 zorgen voor een haarlengte
van ongeveer 5 tot 9 millimeter.
◗ De resulterende haarlengte komt overeen met
de kleinste afstand tussen het blad van het
knipelement en de plaats waar de kam in
contact is met de huid (fig. 4).
Begin te knippen op de hoogste kniplengtestand
(stand 5) om vertrouwd te raken met de trimmer.
1 Schuif de kam naar de gewenste kniplengtestand
(fig. 5).
De ingestelde stand wordt aangegeven door de pijl.
2 Schakel het apparaat in door de aan/uitknop
naar stand I te schuiven.
3 Beweeg het apparaat tegen de richting van de
haargroei in en zorg ervoor dat het oppervlak
van de kam steeds in contact blijft met de huid.
Houd het apparaat zo vast dat de orchidee naar
boven wijst (fig. 6).
◗ Als de kam losraakt van de kniplengteschuif, kun
je hem er gewoon weer op vastklikken (fig. 7).
Stylen met het precisieknipelement
Gebruik het precisieknipelement om je bininilijn te
stylen.
Houd bij het stylen van je bikinilijn het apparaat zo
vast dat de orchidee naar de huid wijst.
1 Duw de kniplengteschuif naar stand 0. Hierdoor
wordt de kam ingetrokken tot een positie
beneden het knipelement (fig. 8).
Stylen met ingetrokken kam resulteert in een
haarlengte van ongeveer 1 millimeter.
2 Schakel het apparaat in door de aan/uitknop
naar stand I te schuiven.
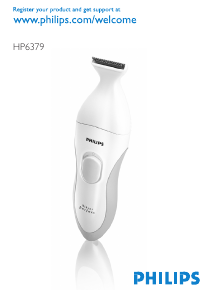
Bikini Trimmer
HP6360
www.philips.com
4203 000 30581
u
Sie dabei das Haar leicht mit der Präzisions-
Schneideeinheit (Abb. 9).
Beim Stylen des Bikinibereichs können Sie Ihrer
Fantasie freien Lauf lassen.Verwenden Sie dabei die
Schablone auf der Verpackung für eine bestimmte
Kontur oder schneiden Sie Ihre eigenen Schablonen
für Ihr ganz persönliches Styling.
Reinigung
.
Verwenden Sie zum Reinigen des Geräts keine
Scheuermittel, keine Scheuerschwämme und keine
Lösungsmittel wie Alkohol, Azeton oder Benzin.
Tauchen Sie das Gerät niemals in Wasser.
1 Schalten Sie vor dem Reinigen das Gerät aus,
ziehen Sie das Netzteil aus der Steckdose und
den Gerätestecker aus dem Gerät.
2 Ziehen Sie die Schneideeinheit in Pfeilrichtung
ab (Abb. 10).
Lassen Sie die Schneideeinheit nicht fallen!
3 Reinigen Sie die Schneideeinheit, den Hohlraum
darunter und den Kamm mit der beiliegenden
Bürste.
4 Zum Zusammensetzen der Schneideeinheit
schieben Sie den Haken in den Spalt im Inneren
des Gehäuses und setzen die Schneideeinheit
wieder auf das Gerät, bis sie hörbar einrastet
(Abb. 11).
Ersatzteile
.
Eine abgenutzte oder beschädigte Schneideeinheit
darf aus Sicherheitsgründen nur durch eine Original-
Philips/Philishave-Schneideeinheit ausgetauscht
werden.
1 Nehmen Sie die alte Schneideeinheit ab.
2 Setzen Sie die neue Schneideeinheit auf das
Gerät, bis sie hörbar einrastet.
Umweltschutz
.
Der integrierte Akku enthält Substanzen, welche die
Umwelt gefährden können.
Entnehmen Sie den Akku, bevor Sie das Gerät
entsorgen. Der Akku gehört nicht in den normalen
Hausmüll, sondern muss an einer der offiziellen
Sammelstellen abgegeben werden. Sie können das
Gerät auch einem Philips Service-Center zuführen.
Dort wird der Akku umweltgerecht entsorgt.
1 Ziehen Sie den Stecker aus der Steckdose und
lassen Sie den Motor so lange laufen, bis er
anhält.
2 Stecken Sie einen Schraubendreher zwischen
die beiden Gehäusehälften neben dem Motor,
bis sie auseinander brechen (Abb. 12).
3 Nehmen Sie den Akku und das Ein-/Aus-
Element aus dem Gehäuse (Abb. 13).
4 Stecken Sie den Schraubendreher in den
kleinen, mit einem Pfeil gekennzeichneten Spalt
in der Platine. Drücken Sie den
Schraubendreher weiter ein, bis ein Teil der
Platine abbricht (Abb. 14).
5 Lösen Sie den Akku mit einem Schraubendreher
von der Kunststoffbefestigung.
Nach Entnahme des Akkus darf das Gerät nicht
mehr am Netz betrieben werden.
Garantie und Kundendienst
.
Benötigen Sie weitere Informationen oder treten
Probleme auf, wenden Sie sich bitte an Ihren Phlips-
Händler oder setzen Sie sich mit einem Philips
Service-Center in Ihrem Land in Verbindung
(Tel. Nr. 0180/5356767). Besuchen Sie auch die
Philips Website www.philips.com.
FRANÇAIS
Description générale (fig. 1)
.
A Tête de coupe de précision
B Guide de coupe ou peigne
C Sélecteur de longueur de coupe
D Bouton marche/arrêt
E Brosse
F Prise pour petite fiche
G Témoin de charge
H Adaptateur
I Petite fiche
Important
.
Lisez les instructions du mode d'emploi avant
d'utiliser l'appareil et conservez-les pour un usage
ultérieur.
◗ Vérifiez si la tension mentionnée sur
l'adaptateur correspond à la tension réseau
avant de connecter l'appareil.
◗ Tension d'utilisation: 220V à 240V.
◗ Utilisez uniquement l'adaptateur fourni.
◗ L'adaptateur a un transformateur. N'essayez pas
de remplacer l'adaptateur secteur par un autre
pour éviter tout accident.
◗ N'utilisez pas un adaptateur endommagé.
◗ Si l'adaptateur est endommagé, pour plus de
sécurité et pour éviter tout accident, il ne doit
être remplacé que par un adaptateur d'origine.
◗ Assurez-vous que l'appareil et son adaptateur
ne sont pas en contact avec de l'eau.
◗ Cet appareil a été conçu pour couper les poils
exclusivement.Toute autre utilisation en est
interdite.
◗ Chargez, rangez et utilisez l'appareil à une
température comprise entre 15c et 35c.
◗ Conservez l'appareil à l'écart des enfants.
Charge
.
La charge de cet appareil dure environ 10 heures.
Une charge complète vous autorise une utilisation
sans fil de 40 minutes environ.
Ne laissez pas l'appareil branché sur secteur
pendant plus de 24 heures.
1 Avant de commencer la charge, assurez-vous
que l'appareil est arrêté.
2 Insérez la petite fiche dans l'appareil (fig. 2).
3 Mettez l'adaptateur secteur dans la prise murale.
◗ Lorsque vous branchez l'adaptateur dans la
prise murale pour charger l'appareil, le témoin
de charge vert s'allume (fig. 3).
4 Si vous souhaitez utiliser la tondeuse spéciale
maillot et que les accumulateurs sont
déchargés, vous devez charger la tondeuse
pendant au moins une heure et demie pour
vous en servir pendant une utilisation complète.
Optimiser la durée de vie des accumulateurs
- Il est conseillé d'utiliser l'appareil pour la
première fois jusqu'à ce que les accumulateurs
soient complètement déchargés avant de
recharger l'appareil.
- Ne rechargez pas l'appareil entre les séances de
coupe.
- Déchargez les accumulateurs complètement
deux fois par an en laissant tourner le moteur
jusqu'à l'arrêt.
Utilisation
.
Retirez la petite fiche de l'appareil avant de
commencer la coupe.
Ne pressez pas l'appareil fortement sur la peau et
tendez la peau avec l'autre main pendant la coupe.
Ne déplacez pas l'appareil trop rapidement. Faites
des mouvements doux et précis.
Coupe avec peigne de précision
Utilisez le peigne de coupe pour faire la ligne du
maillot.
Réglages de la hauteur de coupe
Le guide de coupe ajustable permet de couper les
poils à 5 longueurs différentes.
◗ Réglages 1-5: correspondent à une longueur
d'environ 5-9 mm.
◗ Les résultats correspondent à la longueur
restante des poils après la coupe (fig. 4).
Nous vous conseillons de commencer par la hauteur
la plus élevée (réglage 5) pour vous familiariser avec
la tondeuse.
1 Faites glisser le peigne de coupe sur la position
désirée (fig. 5).
Le réglage sélectionné est celui indiqué par la flèche.
2 Mettez l'appareil en marche en faisant glisser
l'interrupteur marche/arrêt sur la position I.
3 Déplacez la tondeuse dans le sens inverse de la
pousse des poils.Assurez-vous que la surface du
guide de coupe est toujours en contact avec la
peau.Tenez l'appareil de telle sorte que
l'orchidée soit dirigée vers le haut (fig. 6).
◗ Si le peigne de coupe se détache du sélecteur,
remontez-le (fig. 7).
Donnez du style avec une coupe de précision
Utilisez la tête de coupe de précision pour faire le
contour de la zone du maillot.
Pour faire le contour du maillot, tenez l'appareil avec
l'orchidée dirigée vers votre peau.
1 Faites glisser le sélecteur de hauteur de coupe
sur la position 0.Ainsi le peigne de coupe sera
escamoté (fig. 8).
Lorsque vous coupez les poils après avoir escamoté
le peigne, vous obtiendrez une longueur d'environ
1 mm.
2 Mettez l'appareil en marche en faisant glisser
l'interrupteur marche/arrêt sur la position I.
3 Dessinez le contour désiré de la ligne du
maillot, en touchant les poils légèrement avec la
tête de coupe (fig. 9).
Soyez créative! Vous pouvez utiliser les modèles sur
l'emballge pour créér un contour ou réaliser vos
propres modèles pour un style personnel.
Nettoyage
.
N'utilisez pas d'alcool, d'essence, d'acétone ou des
produits abrasifs, pour nettoyer l'appareil.
N'immergez pas l'appareil dans l'eau.
1 Avant de nettoyer l'appareil, arrêtez-le, retirez
l'adaptateur de la prise murale et ôtez la petite
fiche de l'appareil.
2 Poussez la tête de coupe dans la direction de la
flèche pour le retirer (fig. 10).
Prenez garde de à ne pas faire tomber la tête de
coupe!
3 Nettoyez la tête de coupe, la cavité au-dessous
du couteau et le peigne à l'aide de la brosse
fournie.
4 Remontez la tête de coupe en insérant le
crochet dans la fente de la cavité et en le
repoussant jusqu'à ce que vous entendiez un
clic (fig. 11).
Remplacement
.
La tête de coupe usagée ou endommagée doit être
remplacée uniquement par une tête d'origine Philips.
1 Retirez l'élément usagé.
2 Fixez la nouvelle tête de coupe sur l'appareil
(clic).
Environnement
.
Les accumulateurs rechargeables incorporés
contiennent des substances qui peuvent polluer
l'environnement.
Lorsque vous vous séparerez de votre appareil en
fin de vie, retirez les accumulateurs. Ne les jetez pas
avec les ordures ménagères, mais déposez-les à un
endroit prévu à cet effet par les pouvoirs publics.
Vous pouvez également porter l'appareil dans un
Centre Service Agréé Philips. Les accumulateurs y
seront traités dans le respect de l'environnement.
1 Débranchez l'appareil de la prise de courant et
laissez-le fonctionner jusqu'à qu'à l'arrêt
complet du moteur.
2 Insérez un tournevis entre les deux parties et
séparez en deux le corps de l'appareil (fig. 12).
3 Tirez les accumulateurs rechargeables et le
circuit imprimé hors de l'appareil (fig. 13).
4 Insérez le tournevis dans la fente du circuit
marquée d'une flèche. Poussez le tournevis
jusqu'à rompre une partie du circuit (fig. 14).
5 Enlevez les accumulateurs de la partie en
plastique à l'aide du tournevis.
L'appareil ne doit plus être raccordé au secteur une
fois les accumulateurs retirés.
Garantie et service
.
Pour plus d'informations, visitez notre Philips Web
site: www.philips.com ou veuillez contacter le
Service Consommateurs Philips de votre pays (vous
trouverez le numéro de téléphone dans le dépliant
sur la garantie internationale). S'il n'y a aucun Service
Consommateurs Philips dans votre pays, contactez
votre distributeur ou le Service Department of
Philips Domestic Appliances and Personal Care BV.
3 Beweeg het apparaat in de richting van de
gewenste contouren van je bikinilijn. Raak het
haar voorzichtig aan met het
precisieknipelement (fig. 9).
Je kunt zo creatief zijn als je wilt bij het stylen van je
bikinilijn. Je kunt het sjabloon op de verpakking
gebruiken om een vorm te creëren, maar je kunt ook
je eigen sjablonen maken voor een persoonlijke stijl.
Schoonmaken
.
Gebruik geen schuurmiddelen, schuursponzen of
vloeistoffen zoals alcohol, petroleum of aceton om
het apparaat schoon te maken.
Dompel het apparaat nooit in water.
1 Schakel het apparaat uit, haal de adapter uit het
stopcontact en trek het apparaatstekkertje uit
het apparaat voordat je het apparaat schoon
gaat maken.
2 Trek het knipelement in de richting van de pijl
van het apparaat af (fig. 10).
Pas op: laat het knipelement niet op de grond vallen!
3 Maak het knipelement, de holte onder het
knipelement en de kam schoon met het
bijgeleverde borsteltje.
4 Bevestig het knipelement weer op het apparaat
door het nokje in de sleuf in de holte te plaatsen
en het knipelement dan terug te duwen op het
apparaat totdat het vastklikt (fig. 11).
Vervanging
.
Vervang een beschadigd of versleten knipelement
uitsluitend door een origineel Philips/Philishave
knipelement.
1 Verwijder het oude knipelement.
2 Duw het nieuwe knipelement op het apparaat
totdat het vastklikt.
Milieu
.
De ingebouwde oplaadbare accu bevat stoffen die
schadelijk kunnen zijn voor het milieu.
Verwijder de accu wanneer je het apparaat
afdankt. Gooi de accu niet bij het normale
huisvuil, maar lever deze apart in op een
door de overheid daartoe aangewezen
plaats. Je kunt het apparaat ook naar een Philips
servicecentrum brengen, waar men de accu voor je
zal verwijderen en ervoor zal zorgen dat deze op
milieuvriendelijke wijze wordt verwerkt.
1 Haal de adapter uit het stopcontact, trek het
apparaatstekkertje uit het apparaat en laat het
apparaat lopen totdat de motor stopt.
2 Plaats naast de motoras een schroevendraaier
tussen de twee helften van de behuizing en wrik
ze van elkaar los (fig. 12).
3 Trek de accu en de printplaat van de
aan/uitknop uit de behuizing (fig. 13).
4 Steek de schroevendraaier in de kleine opening
in de printplaat die gemarkeerd is met een pijl.
Duw de schroevendraaier naar beneden totdat
een deel van de printplaat afbreekt (fig. 14).
5 Wrik de accu los uit het apparaat met de
schroevendraaier.
Sluit het apparaat niet meer aan op netspanning
nadat je de accu verwijderd hebt.
Garantie & service
.
Als u informatie nodig heeft of als u een probleem
heeft, bezoek dan onze website (www.philips.com),
of neem contact op met het Philips Customer Care
Centre in uw land (u vindt het telefoonnummer in
het 'worldwide guarantee' vouwblad). Als er geen
Customer Care Centre in uw land is, ga dan naar uw
Philips dealer of neem contact op met de afdeling
Service van Philips Domestic Appliances and
Personal Care BV.
º


Participe da conversa sobre este produto
Aqui você pode compartilhar o que pensa sobre Philips HP6360 Aparador de biquíni. Se você tiver alguma dúvida, primeiro leia atentamente o manual. A solicitação de manual pode ser feita através do nosso formulário de contato.