
LITE TOUCH BACKLIGHT
Using the Lite Touch feature, the display will activate for three seconds so you can
see the display in the dark. The light then automatically turns off.
[ SEE FIG. 4 ]
UNIQUE NIGHTFINDER™ FUNCTION
Press the [NIGHT FINDER] button once and appears on the display. The
display backlight flashes every few seconds.
Note: The Nightfinder™ feature is intended for use in a very dark environment.
You may not be able to see the flashing display under normal light conditions.
G. NIGHT FINDER button
H. Buzzer
I. Battery cover
[ SEE FIG. 6 & FIG.7 ]
IMPORTANT: The Nightfinder™ should only be used in an unfamiliar enviroment,
such as hotel room, so as not to drain the battery. Under constant use conditions,
the battery life will be reduced significantly.
THE RESET FUNCTION
If your clock does not operate properly, take out the battery. Wait for 30 seconds
and then insert it back into the battery compartment to reset your clock display. You
will then need to set the clock and alarm times again.
MAINTENANCE
When handled properly, this unit is engineered to give you years of satisfactory
service. Here are a few product care instructions:
1. Do not immerse the unit in water. If the unit comes in contact with water, dry
it immediately with a soft lint-free cloth.
2. Do not clean the unit with abrasive or corrosive materials. Abrasive cleaning
agents may scratch the plastic parts and corrode the electronic circuit.
3. Do not subject the unit to excessive: force, shock, dust, temperature, or
humidity. Such treatment may result in malfunction, a shorter electronic life
span, damaged batteries, or distorted parts.
4. Do not tamper with the unit’s internal components. Doing so will terminate
the unit’s warranty and may cause damage. The unit contains no user-
serviceable parts.
5. Only use new batteries as specified in this instruction manual. Do not mix
new and old batteries as the old batteries may leak.
6. Read this instruction manual thoroughly before operating the unit.
SPECIFICATIONS
Operation : 0°C to 50°C (32°F to 122°F) temperature
Accuracy : +/- 0.5 seconds per day
Power Source : One pc. UM-4 or ‘AAA’ size Alkaline battery
(Alkaline battery required)
Dimension : 82 x 64 x 15 mm / 3.23" x 2.52" x 0.6" (H x W x D)
Weight : 45 g / 1.6 oz. (without battery)
CAUTION
- The content of this manual is subject to change without further notice.
- Due to printing limitations, the displays shown in this manual may differ
from the actual display.
- The contents of this manual may not be reproduced without the permission
of the manufacturer.
ABOUT OREGON SCIENTIFIC
Visit our website (www.oregonscientific.com) to learn more about Oregon Scientific
products such as digital cameras; MP3 players; children's electronic learning
products and games; projection clocks; health and fitness gear; weather stations;
and digital and conference phones. The website also includes contact information
for our customer care department in case you need to reach us, as well as frequently
asked questions and customer downloads.
We hope you will find all the information you need on our website, however if
you'd like to contact the Oregon Scientific Customer Care department directly,
please visit:
www2.oregonscientific.com/service/support
OR
Call 949-608-2848 in the US.
For international enquiries, please visit:
http://www2.oregonscientific.com/about/international/default.asp
ENGLISH
USER MANUAL
FEATURES
- Unique Night Finder™ feature to locate the clock in the dark.
- View the current time and alarm time simultaneously.
- Wake gently! The audible alarm initially sounds with a series of beeps at a
low level, and gradually increases in volume.
- Five minute snooze function activates with unique Lite Touch feature.
- Bright blue
backlight illuminates the display for easy night-time
viewing and flashes when the alarm goes off.
- Protective hinged covers keeps buttons from resetting in transit and also acts
as a table-top stand.
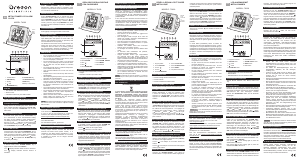
DESCRIPTION OF PARTS
A. Night Finder indicator
B. Alarm ON/OFF indicator
C. Down button
D. ALARM ON/OFF switch
E. TIME SET/LOCK/ALARM SET switch
F. Up button
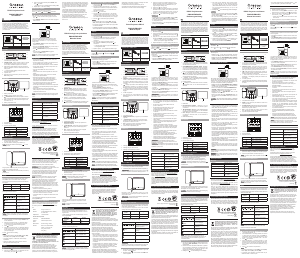
A) 12 hour display
B) 24 hour display
[ SEE FIG. 1 ]
INSTALLING AND REPLACING THE BATTERY
The unit uses one AAA Alkaline battery.
If the display becomes dim, removes the exhausted battery and follow these steps
to replace it:
1. Slide the battery door in the direction of the arrow.
2. Insert the AAA battery as indicated by the polarity symbols (+ and -) marked
inside the battery compartment.
3. Replace the battery compartment door.
TABLE STANDING
To use the cover as a stand, rotate the hinged cover over the back of the clock.
[ SEE FIG. 5 ]
HOW TO SET THE CLOCK TIME
1. Lift the cover to reveal the setting buttons.
2. Slide the [TIME SET/LOCK/ALARM SET] switch to the TIME SET
position. The time on the top of display flashes [SEE FIG.2]:
C) 12 hour display
D) 24 hour display
3. Press the [UP] or [DOWN] arrow button to increase/decrease the setting in
one minute increments until the desired hour and minute are displayed. Press
and hold the [UP] or [DOWN] button for faster setting.
4. When the correct time is displayed, slide the [TIME SET/LOCK/ALARM
SET] switch to the LOCK position. The time display stops flashing and the
time is set.
HOW TO SET THE ALARM TIME
1. Slide the [TIME SET/LOCK/ALARM SET] switch to the ALARM SET
position. The alarm time on the bottom of the display flashes.
[SEE FIG.3]:
E) 12 hour display
F) 24 hour display
2. Press the [UP] or [DOWN] arrow button to increase/decrease the setting in
one minute increments until the desired hour and minute are displayed. Press
and hold the [UP] or [DOWN] button for faster setting.
3. Slide the [TIME SET/LOCK/ALARM SET] switch to the LOCK position.
The alarm time display stops flashing and the alarm time is set.
IMPORTANT: After your alarm time has been set, you MUST slide the [ALARM
ON/OFF] switch to the ON position to activate the alarm.
ABOUT THE ALARM
1. Slide the [ALARM ON/OFF] switch to the ON position. An alarm ON/OFF
indicator is displayed on the LCD display. Now the alarm will sound at the
programmed time.
2. The alarm wakes you gently with a series of beeps that gradually increase in
volume.
3. To silence the alarm slide the [ALARM ON/OFF] switch to the OFF position.
The alarm indicator disappears from the display and the alarm is deactivated.
Note :
Remember, you must slide the [ALARM ON/OFF] switch to the ON position to
use again. However, for your convenience, the alarm will automatically shut off
after one minute and will sound again at the same time the next day.
HOW TO USE THE SNOOZE
The Lite Touch feature enables you to activate the eight minute snooze by gently
rocking the alarm backwards on its stand with the touch of your fingers.
[ SEE FIG. 4 ]
ITALIANO
MANUALE DELLE ISTRUZIONI
CARATTERISTICHE
- Funzione Night Finder™, unica nel suo genere, che permette di visualizzare
l’ora al buio.
- Visualizzazione simultanea di ora e allarme attuali.
- Svegliatevi con dolcezza!l L’allarme suona inizialmente con una serie di segnali
bassi ed aumenta gradualmente di volume.
- Snooze di cinque minuti che si attiva con la funzione speciale Lite Touch.
- Retroilluminazione
in azzurro vivo che permette di visualizzare
facilmente l’ora al buio e che lampeggia all’attivarsi dell’allarme.
- Coperchio protettivo incernierato che impedisce il ripristino del pulsanti durante
il trasporto e che funge anche da poggia-unità.
DESCRIZIONE DEI COMPONENTI
A. Indicatore Nightfinder
B. Indicatore di allarme acceso/spento
C. Pulsante di arretramento rapido [DOWN]
D. Interruttore di accensione/spegnimento allarme
E. Interruttore di impostazione ora/bloccaggio/allarme
F. Pulsante di avanzamento rapido [UP]
A) Visualizzazione orario 12 ore
B) Visualizzazione orario 24 ore
[VEDI FIG. 1]
INSTALLAZIONE E SOSTITUZIONE DELLA
BATTERIA
L’ unità utilizza una batteria alcalina AAA.
Se il display si affievolisce, togliere la batteria scarica e sostituirla os´servando le
seguenti istruzioni:
1. Aprire lo sportellino del vano batteria spingendolo nella direzione indicata
dalla freccia.
2. Inserire la batteria AAA rispettando i simboli di polarita (+ e-) indicati
all’interno dello scomparto.
3. Richiudere il coperchio del vano batteria.
SISTEMAZIONE IN PIANO
Per usare il coperchio incernierato a mo’di poggia-unità, ruotarlo sul reto
dell’orologio.
[VEDI FIG. 5]
IMPOSTAZIONE DELL’ORA
1. Sollevare il coperchio per accedere ai pulsanti di regolazione.
2. Spostare l’interuttore [TIME SET/LOCK/ALARM SET] nella posizione
TIME SET. L’ora nella parte superiore del display inizia a lampeggiare
[VEDI FIG.2]:
C) Visualizzazione orario 12 ore
D) Visualizzazione orario 24 ore
3. Premere il pulsante di freccia in alto [UP] o freccia in basso [DOWN] per
aumentare/ridurre l’impostazione in incrementi di un minuto, fino avisualizzare
l’ora e i minuti desiderati. Per accelerate questa operazione, tenere premuti
questi pulsanti.
4. Una volta visualizzata l’ora corretta, spostare l’interruttore [TIME SET/
LOCK/ALARM SET] nella posizionel LOCK. L’oracessa di lampeggiare e
viene così fissata.
IMPOSTAZIONE DELL’ALLARME
1. Spostare l’interruttore [TIME SET/LOCK/ALARM SET] nella posizione
ALARM. L’ora dell’allarme, nella parte inferiore del display, inizia a
lampeggiare [VEDI FIG. 3]
E) Visualizzazione orario 12 ore
F) Visualizzazione orario 24 ore
2. Premere il pulsante di freccia in alto [UP] o freccia in basso [DOWN] per
aumentare/ridurre l’impostazione in incrementi di un minuto, fino a visualizzare
l’ora e i minuti desiderati. Per accelerare questa operazione.
3. Spostare l’interruttore [TIME SET/LOCK/ALARM SET] nella posizione
LOCK per fissare l’ora dell’allarme.
IMPORTANTE: dopo aver impostato l’allarme. NISOGNA spostare l’interruttore
[ALARM ON/OFF] nella posizione ON per attivare l’allarme.
IMFORMAZIONI SULL’ALLARME
1. Spostare l’interruttore [ALARM ON/OFF] nella posizione ON. Sul display
LCD compare l’indicatore di allarme ON/OFF. In questo modo l’allarme
suonera all’ora programmata.
2. L’allarme da un risveglio ‘dolce’ con una serie di segnali che aumentano
gradualmente di volume.
3. Per fermare l’allarme, spostare l’interruttore [ALARM ON/OFF] nella
posizione OFF. L’indicatore dell’allarme scompare dal display e l’allarme
viene disattivato.
Nota:
Va ricordato che per riattivare la funzione, l’interruttore [ALARM ON/OFF] deve
essere spostato nella posizione ON. Per maggiore comodita tuttavia, l’allarme si
spegne automaticamente dopo un minuto e suonera nuovamente il giorno dopo alla
stessa ora.
USO DELLA FUNZIONE SNOOZE
La funzione Lite Touch permette di attivare uno snooze di otto minuti. A questo
proposito basta spingere delicatamente l’allarme con un dito sul proprio supporto.
[VEDI FIG.4]
RETROILLUMINAZIONE LITE TOUCH
Usando questa funzione, il display si accende per tre secondi per consentire di
visualizzare i dati al buio, dopodiche si spegne automaticamente.
[VEDI FIG.4]
FUNZIONE SPECIALE NIGHTFINDER™
Premere il pulsante [NIGHT FINDER] una volta: sul display compare il simbolo
e la retroilluminazione si accende in modo intermittente per alcuni secondi.
Nota: la funzione Nightfinder™ e studiata per essere usata in ambienti molto scuri.
In condizioni di luce normale, la luce intermittente del display non e chiaramente
visibile.
G. Pulsante Nightfinder
H. Cicalino
I. Coperchio batteria
[VEDI FIG. 6 R FIG 7.]
IMPORTANTE: per evitare che la batteria si scarichi, il Nightfinder™ va utilizzato
solamentein ambienti non familiari, come ad essempio in una stanza d’albergo.
L’uso pro lingato provoca una riduzone significativa della durata della batteria.
LA FUNZIONE RESET
Se l’orologio non funziona correttamente, togliere la batteria. Attendere 30 secondi,
quindi reinserire la batteria nell’apposito vano per resettare il display dell’ orologio.
Dopodiche bisognera impostare nuovamente l’ora e l’allarme.
MANUTENZIONE
Osservando i seguenti suggerimenti,il Travel Alarm Clock grantira un rendimento
efficiente per molti anni.
1. Tenere l’orologio in un ambiente asciutto. Se si bagna, asciugarlo
immediatamente. 1 liquidi possono contenere sostanze minerali che possono
corrodere i circuiti elettronici.
2. L’orologio va utilizzato e conservato in ambienti a temperature normali. Gli
estremi di temperatura possono accorciare la durata dei dispositivi elettronici,
danneggiare le batterie e deformare o sciogliere i componenti di plastica.
3. Maneggiare l’orologio con delicatezza ed attenzione Le cadute possono
danneggiare le schede di circuito e provocare così un funzionamento scorretto
del Travel Alarm Clock.
4. Tenere l’orologio al riparo da polvere e sporco, che possoao causare l’usura
prematura dei componenti.
5. Pulire occasionalmente l’orologio con unpanno umido per mantenerne
intatto l’aspetto. Non pulire l’orologio con sostanze chimiche, solventi o
detergenti forti.
6. Usare solamente batterie nuove delle dimensioni e del tipo richiesti. Rimuovere
sempre le batterie scariche o consumate, poiche possono far disperdere sostanz
chimiche che possono danneggiare i circuitti elettronici.
7. La modifica o la manomissione dei componenti interni dell’oroologio puo
causare un malfunzionamento e puo rendere nulla la granzia.
DATI TECNICI
Temperatura di funzionamento : da 0°C a 50°C
Precisione : +/- 0.5 secondi al giorno
Sorgente di alimentazione : Una batteria alcalina pc UM-4 o “AAA”
(richiesta una batteria alcalina)
Dimensioni : 82 x 64 x 15 mm/3.23 x 2.52 x 0.6 inch
(A x L x P)
Peso : 45 g/1.6 oz (senza batteria)
CAUTION
- Il contenuto di questo manuale soggetto a modifiche senza preavviso.
- Per ragioni tipografiche, le videate mostrate in questo n anuale possono
differire dalle videate effettive.
INFORMAZIONI SU OREGON SCIENTIFIC
Per avere maggiori informazioni sui nuovi prodotti Oregon Scientific, come le
fotocamere digitali, il lettori MP3, i computer didattici per ragazzi, gli orologi con
proiezione dell’ora, le stazioni barometriche, gli orologi da polso multifunzione,
gli strumenti per la cura della persona ed il fitness, ed altro ancora, visita il nostro
sito internet
www.oregonscientific.com
Puoi trovare anche le informazioni necessarie per contattare il nostro servizio clienti,
le risposte ad alcune domande più frequenti (FAQ) o i software da scaricare
gratuitamente.
Sul nostro sito internet potrai trovare tutte le informazioni di cui hai bisogno, ma se
desideri contattare direttamente il nostro Servizio Consumatori puoi visitare il sito
www2.oregonscientific.com/service/support oppure chiamare al 949-608-2848
(numero valido esclusivamente per gli USA). Per ricerche di tipo internazionale
puoi visitare invece il sito
www2.oregonscientific.com/about/international/
default.asp
FRANCAIS
MANUEL D’INSTRUCTIONS
CARACTERISTIQUES
- La fonction unique Balise Nocturne Night Finder™ permet de localiser
l’horloge dans l’obscurité.
- Affichez l’heure et l’heure de réveil simultanément.
- Reveillez-vous en douceur! Le réveil commence à sonner à bas volume puis
augmente le son progressivement.
- La fonction “Somme” d’une durée de 5 minutes est déclenchée à l’aide du
syst me Ultra-Sensible
- L’éclairage
bleu vif éclaire l’écran et permet la lecture dans l’obscurité;
il clignote également lorsque le réveil sonne.
- Le couvercle de protection à charni res empêche l’activation des touches
pendant le transport et sert également de support
DESCRIPTIF DES ELEMENTS
A. Témoin indicateur du Night Finder.
B. Témoin de M/A sonnerie
C. Touche recul
D. Bouton de M/A SONNERIE
E. Bouton de MISE A L’HEURE / VERROUILLAGE / PROGRAMMATION
REVEIL
F. Touche d’avancée
A) Affichage en format 12H
B) Affichage en format 24H
[VOIR SCHEMA 1]
INSTALLATION ET REMPLACEMENT DE LA PILE
L’appareil utilise une pile Alcaline du type AAA.
Si l’affichage à l’écran s’affaiblit, retirez la pile usée et remplacez-la comme suit:
1. Faites glisser le couvercle du compartiment à pile dans le sens de la fl che.
2. Installez la pile de type AAA en respectant la polarité ( + et - ) indiquée à
l’intérieur du compartiment.
3. Remettez le couvercle du compartiment à pile.
SUPPORT HORIZONTAL
Pour transformer le couvercle en support, faites pivoter le couvercle vers l’arri re
de l’horloge.
[VOIR SCHEMA 5]
MISE A L’HEURE DE L’HORLOGE
1. Soulevez le couvercle pour accéder aux touches de programmation.
2. Faites glisser le bouton [TIME SET / LOCK / ALARM SET] en position
TIME SET. L’heure affichée en haut de l’écran commence alors à clignoter.
[VOIR SCHEMA 2]:
C) Affichage en format 12H
D) Affichage en format 24H
3. Appuyez sur la touche [UP] ou [DOWN] pour faire avancer ou reculer les
chiffres jusqu’a ce que l’heure désirée apparaîsse à l’écran. Gardez la touche
enfoncée pour accélérer le changement.
4. Lorsque l’heure exacte est affichée, faites glisser le bouton [TIME SET /
LOCK / ALARM SET] en position LOCK. L’heure affichée cesse de
clignoter, signalant que l’heure est programmée.
PROGRAMMATION DU REVEIL
1. Faites glisser le bouton [TIME SET / LOCK / ALARM SET] en position
ALARM SET. L’heure de réveil affichée en bas de l’écran commence alors à
clignoter. [VOIR SCHEMA 3]
E) Affichage en format 12H
F) Affichage en format 24H
2. Appuyez sur la touche [UP] ou [DOWN] pour faire avancer ou reculer les
chiffres jusqu’a ce que l’heure désirée apparaîsse à l’écran. Gardez la touche
enfoncée pour accélérer le changement.
3. Faites glisser le bouton [TIME SET / LOCK / ALARM SET] en position
LOCK. L’heure de réveil affichée cesse de clignoter, signalant que l’heure de
réveil est programmée.
IMPORTANT: Lorsque l’heure de réveil est programmée, vous devez faire glisser
le bouton [ALARM ON/OFF] en position ON pour mettre le réveil.
SONNERIE
1. Faites glisser le bouton [ALARM ON/OFF] en position ON. Le témoin de
marche/arrêt sonnerie est affiché à l’écran LCD. Le réveil sonnera alors à
l’heure programmée.
2. La sonnerie vous réveille en douceur, le volume, atténué au départ, augmentant
progressivement.
3. Pour arrêter la sonnerie, faites glisser le bouton [ALARM ON/OFF] en position
OFF. Le témoin de marche/arrêt sonnerie disparaît alors de l’écran et la sonnerie
est désactivée.
Remarque :
Vous devez remettre le bouton [ALARM ON/OFF] en position ON si vous désirez
ré-activer la sonnerie. Cependant, la sonnerie s’arrêtera automatiquement apr s une
minute et sonnera de nouveau le lendemain à la même heure.
LA FONCTION “SOMME”
Faites basculer l’horloge lég rement en arri re et le syst me Ultra-Sensible activera
la fonction “Somme” pendant 8 minutes.
[VOIR SCHEMA 4]
ECLAIRAGE D’ECRAN AVEC LE SYSTEME
ULTRA-SENSIBLE
Le syst me Ultra-Sensible éclaire l’écran pendant 3 secondes, permettant sa lecture
dans l’obscurité, puis s’éteint automatiquement.
[VOIR SCHEMA 4]
FONCTION NIGHTFINDER™ UNIQUE
Appuyer une fois sur [NIGHT FINDER] et apparaîtra sur l'afficheur. Le rétro-
éclairage clignotera à intervalles de quelques secondes.
Remarque : Le Nightfinder™ est conçu pour utilisation dans l'obscurité. L'affichage
clignotant peut être très difficile à voir dans des conditions d'éclairage normales.
G. Commande du Night Finder.
H. Sonnette
I. Couvercle de compartiment à pile
[VOIR SCHEMAS 6 & 7]
REMARQUE IMPORTANTE : Afin de conserver la pile, utilisez la Nightfinder™
uniquement dans un environnement étranger tel qu’une chambre d’hôtel. L’utilisation
continue de cette fonction accélérera sensiblement l’usure de la pile.
REMISE A ZERO
En cas de mauvais fonctionnement de votre horloge, retirez la pile, attendez 30
secondes puis remettez-la en place; l’horloge sera alors remise à zéro. Vous devrez
ensuite la remettre à l’heure et reprogrammer le réveil.
PRECAUTIONS
Ce produit a été conçu pour assurer un bon fonctionnement pendant plusieurs années
à condition d’en prendre soin. Certaines précautions s’imposent:
1. Ne pas immerger l’appareil.
2. Ne pas nettoyer l’appareil à l’aide de produits abrasifs ou corrosifs. Ces produits
peuvent rayer les parties en plastique et attaquer les circuits électroniques.
3. Ne pas exposer l’appareil aux chocs excessifs, ni aux excès de force, poussière,
chaleur, froid ou humidité qui pourraient résulter en un mauvais
fonctionnement, le raccourcissement de la vie de l’appareil, l’endommagement
des piles et la déformation des composants.
4. Ne pas toucher les composants internes de l’appareil. Ceci rendra nul la garantie
et peut causer des dommages. L’appareil ne contient aucun composant
pouvant être réparé par l’utilisateur.
5. Utiliser uniquement des piles neuves du type préconisé dans le manuel
d’utilisation. Ne pas mélanger piles neuves et piles usées afin d’éviter les fuites.
6. Lire soigneusement le manuel d’instructions avant de faire fonctionner
l’appareil.
CARACTERISTIQUES TECHNIQUES
Plage de fonctionnement : 0°C - 50°C
Degré de précision : +/- 5 secondes / jour
Alimentation : 1 pile alcaline de type AAA ou UM-4.
(Pile alcaline uniquement)
Dimensions : 82 x 64 x 15mm / 3.23" x 2.52" x 0.6" (L x P x H)
Poids : 45 g /1.6 oz (sans pile)
ATTENTION
- Le contenu de ce livret est susceptible de modifications sans avis préalable.
- En raison des restrictions imposées par l’impression, les affichages figurant
dans ce livret peuvent différer de ceux du produit.
- Le contenu de ce livret ne peut être reproduit sans l’autorisation du fabricant.
A PROPOS D’OREGON SCIENTIFIC
En consultant notre site internet (www.oregonscientific.fr), vous pourrez obtenir
des informations sur les produits Oregon Scientific: photo numérique; lecteurs MP3;
produits et jeux électroniques éducatifs; réveils; sport et bien-être; stations météo;
téléphonie. Le site indique également comment joindre notre service après-vente.
Nous espérons que vous trouverez toutes les informations dont vous avez besoin
sur notre site, néanmoins, si vous souhaitez contacter le service client Oregon
Scientific directement, allez sur le site www2.oregonscientific.com/service/support
ou appelez le 949-608-2848 aux US. Pour des demandes internationales, rendez
vous sur le site:
www2.oregonscientific.com/about/international/default.asp
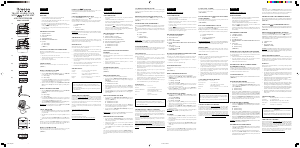
TRAVEL ALARM CLOCK
WITH BACKLIGHT
A)
B)
FIG. 1
C)
D)
FIG. 2
E)
F)
FIG. 3
FIG. 4
FIG. 5
FIG. 6
AND NIGHT FINDER
Model: AS316NE
FIG. 7
Anmerkung:
Beachten Sie, das Sie den [ALARM ON/OFF] Schalter wieder in die Position
“ON” bringen müssen, um die Alarmfunktion erneut zu aktivieren. Sie können
aber auch den Alarmton eine Minute lang eingeschaltet lassen, woraufhin dieser
erlischt, und zur gleichen Zeit des nachsten Tages erneut ausgelost wird.
DER EINSATZ DER SCHL UMMERN-FUNKTION
Mittels der LiteTouch-Funktion können Sie eine 8 Minuten dauernde Schlummerzeit
aktivieren, indern Sie die Uhr leicht mit den Fingerspitzen berühren und nach hinten neigen.
[SIEHE ABB. 4]
LITE TOUCH ANZEIGEBELEUCHTUNG
Mittels der Lite Touch-Funktion können Sie die Anzeige zum leichten Ablesen drei
Sekunden lang einschalten. Die Anzeigebeleuchtung erlischt daraufhin automatisch wieder.
[SIEHE ABB.4]
EINZIGARTIGE NIGHTFINDER™ FUNKTION
Betätigen Sie die [NIGHT FINDER]-Taste einmal, und der Indikator erscheint
in der Anzeige, Die Anzeige blinkt nun in Abstanden von ei'nigen Sekunden.
Anmerkung: Die Nightfinder™ Funktion ist nur fur den Einsatz in einer sehr
dunklen Umgebung geschaffen. Unter normalen Lichtbediungungen kann es sein,
daß Sie das Blinken der Anzeige nicht sehen.
G. “Night Finder”-Taste
H. Summer
I. Batteriefachabdeckung
[SIEHE ABB. 6 & ABB. 7] .
WICHTIG: Die NightFinder™-Funktion sollte nur dann eingesetzt werden, wenn
Sie sich in einer ungewohnten Umgebung, z.B. einem Hotelzimmer aufhalten. um
die Batterie zu schonen. Wenn die NightFinder-Funktion ständig eingeschaltet ist.
ist die Lebensdauer der Batlerie erheblich kürzer,
DIE RÜCKSETZEN-FUNKTION
Nehmen Sie die Batterie aus dem Gerät heraus, wenn die Uhr nichl ordnungsgemäß
Funktioniert. Warten Sie 30 Sekunden, und legen Sie die Batterie erneut ein, um
eine Rücksetzung der Uhr durchzuführen. Sie müssen mun die Uhrzeit und die
Alarmzeit jedoch erneut einstellen.
WARTUNG
Beachten Sie die nachfolgenden Hinweise, so daß Sie lange Jahre Spaß an Ihrer
Reiseuhr haben werden.
1. Schützen Sie die Uhr vor Nässe. Wischen Sie das Geräat sofort trocken, falls
dieses naß wird. Flüssigkeiten können Mineralien enthalten, die eine Korrosion
der Schaltkreise verursachen könnten.
2. Sie sollten die Uhr nur unter normalen Umgebungstemperaturen einsetzen
und aufbewahren. Extreme Temperaturen könnten die Lebensdauer der
elektronischen Schaltkreise verkürzen, die Batterien beschädigen, oder
Plastikteile schmelzen.
3. Bchandeln Sie die Uhr schonend. Durch Herunterwerfen können die Schaltkreise
der Reiseuhr beschädigt werden, und Funktionsstörungen auftreten.
4. Schützen Sie die Uhr vor Staub und Schmutz, da dadurch vorzeitige
Abnutzungserscheinungen auftreten könnten.
5. Wischen Sie die Uhr gelegentlich mit einem feuchten Tuch sauber, um die
Erscheinung der Oberflächen zu erhalten.Verwenden Sie zur Reinigung der Uhr
niemals aggressive Chemikalien, Reinigungslösungen oder scharfe Reiniger.
6. Verwenden Sie stets neue Batterien des angegebenen Typs. Nehmen Sie alte oder
schwache Batterien aus dem Gerät heraus. Aus Batterien können Chemikalien
auslaufen, die die elektronischen Schaltkreise schwer beschadigen würden.
7. Veränderungen und Eingriffe an den internen Bauieilen des Gerätes konnen
Funktionsstörungen verursachen, und die Garantieerklärung für die Uhr könnte
nichtig werden.
TECHNISCHE DATEN:
Betricb : Umgebungstemperaturen von 0°C bis 50°C (32°F bis I22°F)
Genauigkeit : +/- 0.5 Sekunden pro Tag
Stromversorgung : Eine Alkaline-Batterie des Typs “AAA” oder “UM-4”
Abmessungen : 82 x 64 x l5mm/3.23 x 2.52 x 0.59 inch (H x B x T)
Gewicht : 45 Gramm/1.6 oz (ohne Batterie)
CAUTION
- Der Inhalt dieser Bedienungsanleitung kann sich ändern, ohne daß Sie hiermit
darauf hingewiesen werden.
- Aufgrund der Einschränkungen dureh die Drucktechnik kann die hierin
abgebildete Anzeige von der tatsachlichen Erscheinung der Anzeige abweichen.
ÜBER OREGON SCIENTIFIC
Besuchen Sie unsere Website (www.oregonscientific.de) und erfahren Sie mehr über
unsere Oregon Scientific-Produkte wie zum Beispiel Digitalkameras, MP3-Player,
Kinderlerncomputer und Spiele, Projektionsfunkuhren, Produkte für Gesundheit
und Fitness, Wetterstationen und Digital- und Konferenztelefone. Auf der Website
finden Sie auch Informationen, wie Sie im Bedarfsfall unseren Kundendienst
erreichen und Daten herunterladen können.
Wir hoffen, dass Sie alle wichtigen Informationen auf unserer Website finden.
Für internationale Anfragen besuchen Sie bitte unsere Website:
www2.oregonscientific.com/about/international/default.asp
DEUTSCH
BEDIENUNGSANLEITUNG
EIGENSCHAFTEN
- Einzigartiger NightFinder™ erleichtert das Auffinden der Uhrim Durnkeln
- Gleichzeitige Anzeige der Uhrzeit und der Alarmzeit.
- Sanftes Erwachen! Der Audio-Alarm beginnt zunachst mit einer Rcihe von
leisen Piep-Tonen, die langsam lauter werden.
- 5 Minuten Schlummerfunktion mit einzigartiger Lite Touch-Funktion.
- Helle, blaue
-Anzeigebeleuchtung erleichtert das Ablelesen im
Dunkeln, und blinkt solange der Alarm eront.
- Scharnierte Schutzabdeckung verhindert daß die Einstellungen wahrend der
Reise verändert werden konnen, und dient gleichzeitig als Ständer für die
Tischaufstellung.
BESCHREIBUNG DER TEILE
A. "Night Finder"-lndikator
B. Alarm EIN/AUS-lndikator
C. Abwärts-Taste
D. Alarm EIN/AUS-Schalter
E. ZEIT EINSTELLEN/LOCK/ALARM EINSTELLEN Funktionswahl-
Schalter
F. Aufwärts-Taste
A) 12-Stunden-Anzeige
B) 24-Stunden-Anzeige
[SIEHE ABB. 1]
EINLEGEN UND AUSWECHSELN DER BATTERIE
Das Geräi funktioniert mil einer Alkaline-Batterie des Typs “AAA” Nehmen Sie
die erschöpfte Batterie heraus. und befolgen Sie beim Batteriewechsel die
nachfolgenden Hinweise:
1 . Schieben Sie die Batteriefachabdeckung in Pfeilrichtung auf.
2. Legen Sie eine Batterie des Typs “AAA” ein, und achten Sie auf die
Polarisierungsangaben (+und-) im Inneren des Batteriefachs.
3. Schließen Sie das Batterienfach wieder.
HINWEIS ZUM SCHUTZ UNSERER UMWELT /
BATTERIEENTSORGUNG
Batterien gehören nicht in den Hausmüll. Als Verbraucher sind Sie gesetzlich
verpflichtet, gebrauchte Batterien zurückzugeben. Sie können Ihre alten Batterien
bei den öffentlichen Sammelstellen in Ihrer Gemeinde oder überall dort abgeben,
wo Batterien der betreffenden Art verkauft werden.
TISCHAUFSTELLUNG
Klappen Sie die Abdeckung nach hinten weg. Um diese als Ständer für die L’hr zu verwenden.
[SIEHE ABB.5]
EINSTELLEN DER UHRZEIT
1. Heben Sie die Abdeckung an, um die Einstelltasten freizulegen.
2. Schieben Sie den [TIME SET/LOCK/ALARM SET] Funktionenwahl-
schalter in die Position "TIME SET". Die obere Zeitangabe beginnt nun zu
blinken. [SIEHE ABB. 2]
C) 12-Stunden-Anzeige
D) 24-Stunden-Anzeige
3. Betatigen Sie die [UP] oder [DOWN] Pfeiltasten, um die Einstellung in
Minuten-Intervallen zu erhöhen/verringern; die jeweiligen Einstellungen für
Stunden und Minuten werden nun angezeigt. Halten Sie die [UP] oder [DOWN]
Pfeiltasten gedruckt, um die Einstellung schnell vorwarts schreiten zu lassen.
4. Bringen Sie den [TIME SET/LOCK/ALARM SET] Funktionenwahl-schalter
in die Position “LOCK”, sobald die korrekte Zeit angezeigt wird. Die
Zeitanzeige blinkt nun nicht mehr. und die Zeit ist eingestellt.
EINSTELLEN DER ALARMZEIT
1. Schieben Sie den [TIME SET/LOCK/ALARM SET] Funktionenowaht-schalter
in die Position “ALARM SET”. Die untere Zeitangabe beginnt nun zu blinken.
[SIEHE ABB. 3]
E) 12-Stunden-Anzeige
F) 24-Stunden-Anzeige
2. Betätigen Sie die [UP] oder [DOWN] Pfeiltasten. um die Einsiellung in
Minuten-Intervallen zu erhöhen/verringern; die jeweiligen Einstellungen für
Stunden und Minuten werden nun angezeigt. Halten Sie die [UP] oder [DOWN]
Pfeitasten gedruckt, um die Einstellung schnell vorwärts schreiten zu lassen.
3. Bringen Sie den [TIME SET/LOCK/ALARM SET] Funktionenwahl-schalter
in die Position “LOCK”, sobald die korrekte Alarmzeit angezeigt wird. Die
Anzeige blinkt nun nicht mehr, und die Alarmzeit ist eingestellt.
WICHTIG: Sie MÜSSEN den [ALARM ON/OFF] Schalter in die Position “ON”
bringen, um die Alarmfunktion zu aktivieren.
HINWEISE ZUR ALARMFUNKTION
1. Schieben Sie den [ALARM ON/OFF] Schalter in die Position “ON”. Ein
“ON/OFF”-lndikator erscheint darauf in der LCD-Anzeige. Der Alarm ertönt
nun zur eingestellten Alarmzeit.
2. Der Alarm weckt Sie schonend mit langsam lauter werdenden Piep-Tönen.
3. Bringen Sie den [ALARM ON/OFF] Schalter in die Position “OFF”, um
den Alarm abzuschalten. Der Alarm-Indikator in der Anzeige erlischt, und die
Alarmfunktion ist nun de-aktiviert.
AS316NE_R4 9/6/04, 4:08 PM1


Participe da conversa sobre este produto
Aqui você pode compartilhar o que pensa sobre Oregon AS316NE Despertador. Se você tiver alguma dúvida, primeiro leia atentamente o manual. A solicitação de manual pode ser feita através do nosso formulário de contato.