2.3. Gebruik en sorg:
2.3.1. Voltooi die toestel se kragkabel voorheen uit Elke
gebruik.
2.3.2. Moenie die toestel gebruik as die dele of toebehore nie
Sories is nie behoorlik toegerus nie.
2.3.3. Moenie die toestel oorskakel terwyl dit gebruik word nie
Of verbind met die kragtoevoer.
2.3.4. Skakel die toestel uit die kragtoevoer Verskaf wanneer
dit nie in gebruik is nie en voordat enige Skoonmaak taak.
2.3.5. Hierdie toestel moet buite bereik gebêre word Van
kinders.
2.3.6. Hou buite bereik van kinders.
2.3.7. As om een of ander rede die toestel sou vang Brand,
maak die toestel uit die kragtoevoer Voorsien en gebruik nie
water om die vuur te plaas nie UIT.
2.4. diens:
2.4.1. Maak seker dat die toestel net bedien word oorspronklik
Onderdele of bykomstighede word gebruik om bestaande te
vervang dele / bykomstighede.
2.4.2. As die kragtoevoer beskadig is, is die vervaardipersoon
moet Vervang dit om ‘n gevaar te vermy.
2.4.3. Enige misbruik of versuim om die instruksies te volg Vir
gebruik maak die waarborg en die vervaardiger se Aanspreek-
likheid ongeldig.
3. Instruksies vir gebruik
3.1. Voor gebruik:
3.1.1. Verwyder die beskermende film van die toestel (indien
ap- van toepas).
3.1.2. Voordat u die produk vir die eerste keer gebruik, maak
skoon Op die wyse wat in die skoonmaakafdeling beskryf
word.
3.2. Vergadering:
Stap 1:
Koppel die panele deur die snitte aan te pas en die een paneel
in die ander te druk
Stap 2:
Plaas die aangrensende kant panele op die apparaat basis
Stap 3:
Plaas die hangladers in hul gleuwe op die panele.
Plaas die dehydrator rakke in die eenheid.
Stap 4:
Plaas die deksel op die toestel
Aanbevole gloeilamp: 240V; BD22 HALOGEN gloeilamp vir
doeltreffende gebruik.
3.3. Gebruik en versorging:
3.3.1. vleis:
1. Berei jou vleis volgens jou resep en Smaakvoorkeur, met of
sonder ‘n droë speserymengsel of Week dit in asyn voordat dit
in die appel geplaas word. ring.
2. Plaas die vleis in die apparaat met die hang- Ingstawe en
hake voorsien. Maak seker dat jou Vleis is nie meer as 34 cm
lank nie.
3. Plaas die boonste omslag en plaas die prop in die
muurprop.
4. Laat die vleis droog word. NOTA: Die presiese aantal ver-
eiste dae sal Hang af van jou resep, die grootte van jou snitte,
die tipe Van vleis gebruik en persoonlike smaak.
5. Moenie meer as 3kg vleis by enige een hang nie tyd.
3.3.2. vrugte:
1. Maak seker dat die toestel skoon is voor gebruik.
2. Moenie terselfdertyd vleis en vrugte droog nie.
3. Plaas die onderste rak in die eerste plek en plaas die vrugte
Stukke op die rak. Spreid hulle eweredig uit Die rak en maak
seker dat alle stukke dieselfde is grootte.
4. Sodra die onderste rak vol is, kan jy die Volgende rak in die
apparaat en herhaal die proses.
5. Sodra die vrug in die apparaat geplaas is Jy mag die deksel
bo-op plaas en dan die Steek die stekker in die stopcontact.
6. Uitdrogende vrugte kan enigiets tussen 8 en 36 uur.
7. Om te toets of die vrugte gereed is, neem een stuk en Druk
dit, as daar enige vog is, benodig jy dit Om die droogproses
voort te sit.
8. As jy onseker is, kan jy ook een stuk uitneem, En plaas dit
in ‘n glasbottel of deursigtige plastiek Sak en seël. As daar na
‘n paar minute kon- Digtheid moet die vrugte ontwater word
Vir langer.
9. Om die dehidrerende rakke te verwyder, haak jou Vinger in
die middelste gat van die rak en lig, Alternatiewelik kan jy die
vleis drooghake gebruik Om in die rak te haak.
3.4. Sodra jy die toestel klaar gebruik het:
3.4.1. Skakel die toestel uit die kragtoevoer aanbod.
3.4.2. Laat die fan toe om heeltemal te stop voor verwyder- In
die omslag.
3.4.3. Maak die apparaat skoon soos beskryf in die skoon-
maak artikel.
4. Skoonmaak
4.1. Skakel die toestel uit die stroomtoevoer Voorsien en laat
dit heeltemal afkoel voordat dit onderneem word. In enige
skoonmaak taak.
4.2. Maak die toestel en die toebehore skoon met ‘n Klam lap
en ‘n paar druppels opwasmiddel en Droog dan deeglik
4.3. Moet nie oplosmiddels, of produkte met ‘n suur gebruik
nie Of basis pH soos bleikmiddel, of skuurprodukte, vir Skoon-
maak van die toestel.
4.4. Moet nooit die toestel in water of enige water onderdompel
nie Ander vloeistof of plaas dit onder lopende water.
4.5. Hierdie toestel en al sy toebehore is nie Skottelgoedwas-
ser veilige
5. Anomalieë en herstel
5.1. Neem die toestel na ‘n gemagtigde ondersteuningsentrum
as produk beskadig is of ander probleme opduik.
5.2. As die aansluiting op die hoofstroom beskadig is, Dit moet
vervang word en jy moet voortgaan soos jy sou in die geval
van skade.
6. Wenke en aanbevelings:
6.1. Vleis:
Keuring van die vleis:
Biltong kan gemaak word uit feitlik enige vleis of Wildsvleis,
maar onthou - hoe beter die snit en graad Van die vleis, hoe
English
Dear customer,
Thank you for choosing to purchase a Mellerware brand prod-
uct. Thanks to its technology, design and operation and the fact
that it exceeds the strictest quality standards, a fully satisfactory
use and long product life can be assured.
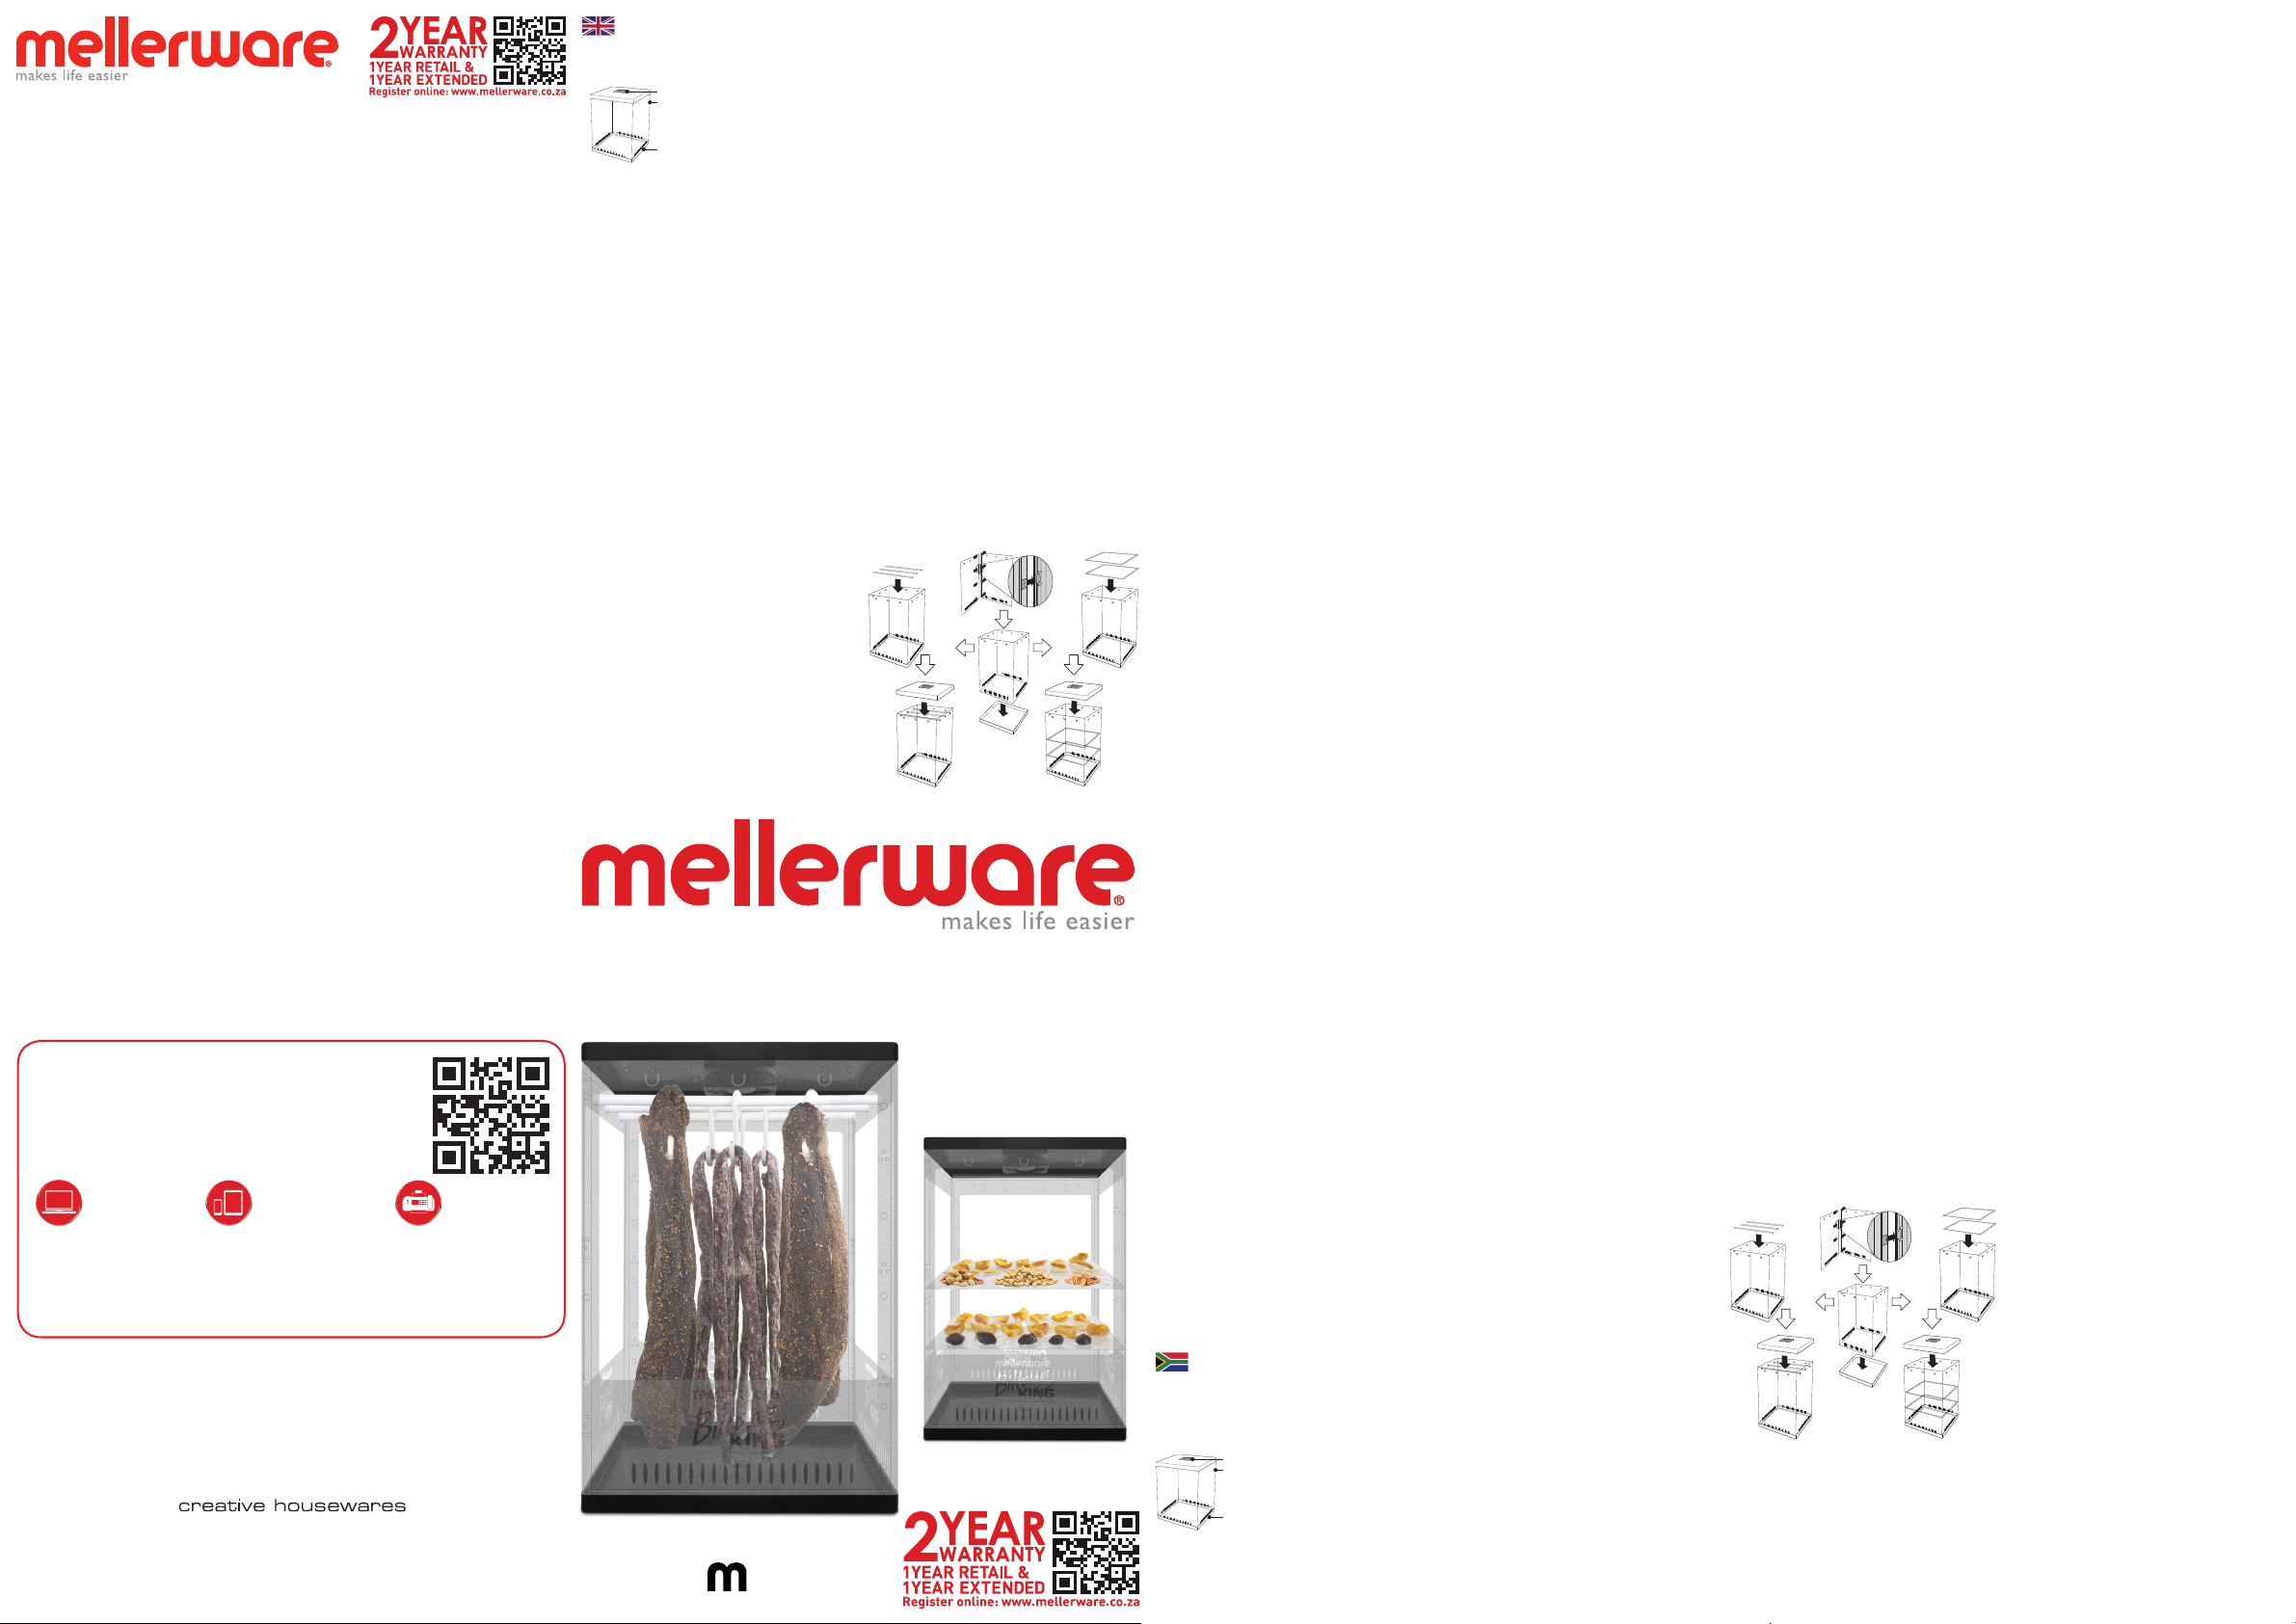
1. Parts description
1. Built-in circulating fan
unit with light fitting
2. Clear view panels with
air intake
3. Base unit
2. Safety advice and warnings!
Read these instructions carefully before switching on the appliance
and keep them for future reference. Failure to follow and observe
these instructions could lead to an accident. Clean all the parts
of the product that will be in contact with food, as indicated in the
cleaning section, before use.
2.1. Use or working environment:
2.1.1. Keep the working area clean and well lit. Cluttered and
dark areas invite accidents.
2.1.2. Use the appliance in a well ventilated area.
2.1.3. Do not place the appliance on hot surfaces, such as
cooking plates, gas burners, ovens or similar items.
2.1.4. Keep children and bystanders away when using this
appliance.
2.1.5. Place the appliance on a horizontal, flat, stable surface
and away from other heat sources and contact with water.
2.1.6. Keep the appliance away from flammable material such
as textiles, curtains, cardboard or paper, etc.
2.1.7. Do not place flammable material near the appliance.
2.1.8. Do not use the appliance in association with a program-
mer, timer or other device that automatically switches it on.
2.1.9. Do not use the appliance if the cable or plug is damaged.
2.1.10. Ensure that the voltage indicated on the rating label
matches the mains power supply voltage before plugging in
the appliance.
2.2.11. Connect the appliance to the mains power supply with
an earth socket withstanding a minimum of 10 Amperes.
2.1.12. The appliance’s plug must fit into the mains power sup-
ply socket properly. Do not alter the plug.
2.1.13. If using a multi plug check ratings carefully as the cur-
rent used by several appliances could easily exceed the rating
of the multi plug.
2.1.14. If any of the appliance casings breaks, immediately dis-
connect the appliance from the mains power supply to prevent
the possibility of an electric shock.
2.1.15. Do not use the appliance if it has fallen on the floor or if
there are visible signs of damage.
2.1.16. Do not force the power cord. Never use the power cord to
lift up, carry or unplug the appliance.
2.1.17. Do not wrap the power cord around the appliance.
2.1.18. Do not clip or crease the power cord.
2.1.19. Do not allow the power cord to hang or to come into
contact with hot surfaces.
2.1.20. Check the state of the power cord. Damaged or tangled
cables increase the risk of electric shock.
2.1.21. The appliance is not suitable for outdoor use.
2.1.22. Power cord should be regularly examined for signs
of damage, and if the cord is damaged, the appliance must
not be used.
2.1.23. Do not touch the plug with wet hands.
2.2. Personal safety:
2.2.1. CAUTION: Do not leave the appliance unattended during
use as there is a risk of an accident.
2.2.2. Do not touch the rotating parts of the appliance, as it may
cause serious injury.
2.2.3. This appliance is only for domestic use, not for industrial
or professional use. It is not intended to be used by guests in
hospitality environments such as bed and breakfast, hotels,
motels, and other types of residential environments, even in
farm houses, areas of the kitchen staff in shops, offices and
other work environments.
2.2.4. This appliance is not intended for use by persons
(including children) with reduced physical, sensory or mental
capabilities, or lack of experience and knowledge, unless they
have been given supervision or instruction concerning use of
the appliance by a person responsible for their safety.
2.2.5. This appliance is not a toy. Children should be supervised
to ensure that they do not play with the appliance.
2.3. Use and care:
2.3.1. Fully unroll the appliance’s power cable before each use.
2.3.2. Do not use the appliance if the parts or accessories are
not properly fitted.
2.3.3. Do not turn the appliance over while it is in use or con-
nected to the mains power supply.
2.3.4. Unplug the appliance from the mains power supply
when not in use and before undertaking any cleaning task.
2.3.5. This appliance should be stored out of reach of children.
2.3.6. Keep out of the reach of children.
2.3.7. If for some reason, the appliance were to catch fire,
disconnect the appliance from the mains power supply and DO
NOT USE WATER TO PUT THE FIRE OUT.
2.4. Service:
2.4.1. Make sure that the appliance is serviced only by suitably
qualified technician, and that only original spare parts or acces-
sories are used to replace existing parts/accessories.
2.4.2. If the power cord is damaged, the manufacturer or its
service agent or a similarly qualified person must replace it in
order to avoid a hazard.
2.4.3. Any misuse or failure to follow the instructions for use ren-
ders the guarantee and the manufacturer’s liability null and void.
3. Instructions for use
3.1. Before use:
3.1.1. Remove the appliance’s protective film(if applicable).
3.1.2. Before using the product for the first time, clean in the
manner described in the cleaning section.
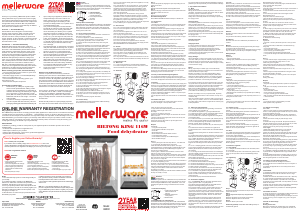
3.2. Assembly:
1
3
2
Step 1:
Connect the panels by aligning the clips and pushing the one
panel into the other
Step 2:
Place the connected side panels onto the appliance base
Step 3:
Place the hanging rods into their slots on the panels. Place the
dehydrator shelves into the unit
Step 4:
Place the lid on the appliance
Recommended light bulb:
240V; BD22 HALOGEN Incandescent lamp for efficient use.
3.3. Use and care:
3.3.1. Meat:
1. Prepare your meat according to your recipe and taste prefer-
ence, using either a dry spice mix or soak it in vinegar before
placing it in the appliance.
2. Place the meat into the appliance using the hanging rods
and hooks provided. Ensure that your meat is no longer than
34cm long.
3. Replace the top cover and insert the plug into the wall socket.
4. Leave the meat to dry. NOTE: The exact number of days
required will depend on your recipe, size of your cuts, the type
of meat used and personal taste.
5. Do not hang more than 3kg of meat at any one time.
3.3.2. Fruit:
1. Ensure that the appliance is clean before use.
2. Do not dry meat and fruit at the same time.
3. Place the bottom shelf in first then place the fruit pieces on
the shelf. Spread them out evenly on the shelf and ensure that
all pieces are the same size.
4. Once the bottom shelf is full you can place the next shelf in
the appliance and repeat the process.
5. Once the fruit has been placed in the appliance you may
place the lid on top and then insert the plug into the wall socket.
6. Dehydrating fruit can take anything between 8 and 36 hours.
7. To test if the fruit is ready, take out one piece and squeeze
it, if there is any moisture then you need to continue the drying
process.
8. If you are unsure you can also take out one piece, and place
it in a glass jar or transparent plastic bag and seal. If after a
few minutes there is condensation then the fruit needs to be
dehydrated for longer.
9. To remove the dehydrating shelves hook your finger into the
centre hole of the shelf and lift, alternatively you can use the
meat drying hooks to hook into the shelf.
3.4. Once you have finished using the appliance:
3.4.1. Unplug the appliance from the mains power supply.
3.4.2. Allow the fan to stop completely before removing the cover.
3.4.3. Clean the appliance as described in the cleaning section.
4. Cleaning
4.1. Disconnect the appliance from the mains power supply and
allow it to cool completely before undertaking any cleaning task.
4.2. Clean the appliance and its accessories with a damp cloth
and a few drops of washing-up liquid and then dry thoroughly
4.4. Do not use solvents, or products with an acid or base pH such
as bleach, or abrasive products, for cleaning the appliance.
4.5. Never submerge the appliance in water or any other liquid
or place it under running water.
4.6. This appliance and all of its accessories are not dishwasher
safe.
5. Anomalies and repair
5.1. Take the appliance to an authorised support centre if
product is damaged or other problems arise.
5.2. If the connection to the mains has been damaged, it must be re-
placed and you should proceed as you would in the case of damage.
6. Tips and Recommendations:
6.1. Meat:
Selecting the meat:
Biltong can be made from virtually any meat or venison, but
remember - the better the cut and grade of the meat, the better
the Biltong. Topside or Silverside is perfect.
Choose the meat according to your preference (and avail-
ability). Bear in mind fatty meats are more likely to spoil during
the drying process.
Slicing the meat:
A Home Biltong Maker is best suited for hanging thinly sliced
strips of meat for best results.
The thicker the meat, the longer it takes to dry. Aim for slices of
anything up to 1-2cm thick and 20cm in length(Too many short
pieces may have you running out of space with the deeper part
of the machine not being fully utilized).
Slice the meat with the grain and use a very sharp carving knife
for the best results. Try to remove excess fat as this will help with
the drying process.
Use a maximum of 3kg of meat.
Seasoning the meat:
See below recipes
Hanging the meat:
In order to create a free airflow for quicker drying and to prevent
the possibility of mould, follow the below steps:
• Always hang the meat with the thickest part to the top.
• Don’t let any of the meat touch the sides of the machine.
• Don’t let any of the pieces of meat touch each other.
• Always fit the cover after hanging the meat to prevent insects
such as flies spoiling the batch.
Drying Sausage:
Various sausages you buy at your butcher or in the shop (you
could even make your own!) are suitable for drying and you can
experiment to get your desired results. Just remember to use
the thinner variety for quicker results. Mutton sausage is usually
not well suited for drying.
Mould:
Biltong, especially the “wettish” type, can be affected by
mould whether it has been purchased or home-made and not
consumed within a couple of days.
Mould is more likely to occur when making Biltong during
hot and humid summer periods especially at coastal areas.
Although the “Biltong Making Season” is usually in the winter
months, it can be made all year round in your Biltong Maker
provided it is situated in a cool and dry environment.
In the summer months try to cut the pieces thinner so they can
dry quicker. Never dry the meat in a stale room that has been
closed for a long period. The fresher the air and the better the
ventilation, the less danger there is of mould occurring.
Most people use Biltong Makers in their kitchens. However, take
care if you have a compact kitchenette as steam from cooking
pots, kettles and the washing-up creates humidity.
Mould is more likely to form on pre-packed meat, especially
sausage (wors) that has been on the cold rack of a shop for a
number of days.
Take care if the bloodiness in which the meat is lying has gone
“tacky” when you unseal it, as this is a mould stimulant. Wipe it
thoroughly with a cloth soaked in vinegar before continuing any
further preparation.
6.2. Fruit:
Whichever fruit you decide to use make sure it is cut into small
enough pieces in order for it to dry properly.
Ensure that the shelves aren’t overcrowded and that the holes
on the drying shelves aren’t all covered by the fruit. Also make
sure that there is sufficient airflow for the fruit to dry.
Cut the fruit into small, equal sized pieces and spread them out
over the drying shelf in a single layer.
All fruit should be cleaned before use and all seeds removed.
As with meat a certain amount of experimentation is necessary
in order to learn how best to prepare the fruit for your taste.
Apples
Core and slice the apples.
It is best to soak apples in a lime and water solution, alterna-
tively you could steam them for a couple of minutes before
dehydrating. You could also sprinkle cinnamon onto the apples
before placing them into the dehydrator. Apples should be cut
into thin, even slices for best results.
Bananas
Banana’s should be soaked in a lime and water solution for
best results.
They should be sliced thinly, between 4 and 8mm.
Strawberries
Slice into even slices. For strawberries pre-treatment is not
needed.
Mangos
Remove the skin and try to slice large pieces away from the pip.
Cut the pieces into 3mm thick slices.
Spread the pieces of mango on the dehydrator shelf in a single
layer. It can take up to three days to dehydrate a mango.
Biltong Recipes:
Recipe 1
Ingredients:
• 2 kg good quality meat
• Biltong spice (available from various super markets)
Method:
1. Slice the meat into suitable strips, making sure that there
some thin strips for those who like their Biltong a bit dry.
2. Place the meat in a tray.
3. Sprinkle 80 grams of dry Biltong spice evenly over all sides
off the meat.
4. Protect the meat against flies and leave for 3-4 hours.
5. Dry the meat with some paper towels and hang in the
Biltong Maker (or a dry, drafty area).
Recipe 2
Ingredients:
• 500 grams roasting beef.(Silverside, Topside or such)
(London Broil) cut into very thin long strips
• 2 tbs of brown vinegar
• 1 tbs of Worcestershire sauce
• Some good quality coarse salt (about a cup should do)
• 1 tbs of soft brown sugar
• White pepper
• 1 tsp of chilli powder or peri-peri spice
• Roasted ground coriander.(a very important spice in Biltong
so be liberal!)
• A teaspoon of bicarbonate of soda, especially if venison or a
lower grade of meat is used
Method:
1. Punch some small holes in the lids of two small bottles and
pour the vinegar in one and the
Worcestershire sauce in the other
2. Dust the meat with some white pepper, the bicarbonate of
soda, coriander and chilli powder
or peri-peri spice
3. Sprinkle a little of the coarse salt and sugar on the bottom of
the marinating dish
4. Layer the meat in the dish with the thicker pieces at the
bottom
5. Over each layer sprinkle a bit of the vinegar and the
Worcestershire sauce
6. Sprinkle a little more salt and sugar
7. Ensure that you utilize the spices in such a manner
that they run out just as you pack the last pieces of meat in
the dish
8. Let the meat draw in its own brine for about 12 hours
9. Remove the meat and squeeze dry with your hands ensur-
ing that no salt or spices cling to the
meat
10. At this stage you may want to press some more coriander,
coarsely ground black pepper and chilli powder or peri-peri
spice(watch out, don’t make it too hot!) into the meat.
11. Make sure that you take note of the proceedings so that
you are able to make adjustments later, if necessary, with
subsequent batches.
12. Skewer the meat and hang.
Recipe 3
Ingredients:
• 2 kg beef or venison (silverside, topside or such) (London
Broil)
• 3 cups coarse salt (not table salt or sea salt but the big
lumpy salt)
• 2 cups soft brown sugar
• 5 ml bicarbonate of soda (this softens the meat)
• 2.5 ml coarsely ground black pepper
• 12.5 ml coarsely ground roasted coriander seeds
• 1.5 cups brown vinegar mixed with 100ml Worcestershire
sauce.
Method:
1. Cut the meat into strips of approximately 1cm thickness.
2. Layer in a bowl with the vinegar mix for ½ hour.
3. Mix all dry spices together.
4. Roll meat in the mixed dry spices in a CLEAN bowl.
5. Allow meat to draw in its own brine for 3 hours. (thicker
pieces to the bottom)
6. Remove meat and put back into vinegar mix for +/- 10
minutes.
7. Remove again and wipe meat with same vinegar to make
sure NO SALT sticks to the meat.
8. Squeeze meat with your hand to get rid of as much liquid
as possible.
9. Hang until ready.
Recipe 4
Ingredients:
• 2 kg lean roasting beef.(Silverside, Topside or such)(London
Broil)
• 125 gram rock salt (Any coarse salt will do. The coarser
the better)
• 25 ml brown sugar.
• 5 ml bicarbonate of soda.
• 2.5 ml coarsely ground black pepper.
• 12.5 gram coarsely ground coriander seeds.
• 200 ml vinegar mixed with 50ml Worcestershire sauce.
• 1 liter warm water.
Method:
1. Cut meat into strips of approximately 1cm thick.
2. Mix together all dry ingredients.
3. Rub dry spice mixture into the meat.
4. Layer meat in bowl with the thicker pieces at the bottom,
sprinkling a little vinegar mixture over
each layer.
5. Leave in cool place for 24 hours.
6. Remove meat, strain the vinegar mix and add a liter of warm
water to the mix.
7. Dip the meat into the vinegar/water mix and rub off any salt
and spices that still cling.
8. Squeeze meat dry with hands or dry with paper towel.
9. Skewer meat and hang.
Recipe 5
Ingredients:
• 1,5 kg Sirloin/Rump Steak
• 45 ml Robertsons Steak & Chops Spice
• 45 ml Salt
• 60 ml Brown Sugar
• 60 ml Robertsons Coriander Seeds cracked
• 10 ml Bicarbonate of Soda
• 10 ml Robertsons Freshly Ground Black Pepper
• 80 ml Red Wine Vinegar
Method:
1. Start by slicing the meat into strips about 4 - 5 cm wide and
1½ cm thick, with the natural grain of the meat.
2. Mix the Robertsons Steak & Chops Spice, salt, sugar,
cracked Robertsons Coriander Seeds, bicarbarbonate of soda
and Robertsons Freshly Ground Black Pepper together in a
bowl to form a rubbing mixture.
3. Take a glass or stainless steel container; rub some of the
mixture into each piece of meat and
make a single layer of meat strips in the bottom of the container.
4. Splash some of the vinegar over the layer of meat strips and
then continue the same process until all of the meat is layered
and you have no vinegar left.
5. Cover the container with cling film and leave it to marinade for
12 - 24 hours depending on the
thickness of the meat and the intensity of the flavour you desire.
6. Now you need to find a cool, dry and well ventilated place to
hang the meat. Biltong Machines for home use work very well.
7. Hang the meat until the outside is dark and the center is
according to your taste.
8. Depending on the dryness of the air and the ventilation, the time
will vary. It is usually 3 - 4 days.
--------------------------------------------------------------------------------------------
Afrikaans
Geagte kliënt,
Dankie dat u gekies het om ‘n Mellerware te koop Handelsmerk
produk. Danksy sy tegnologie, ontwerp en Operasie en die feit
dat die strengste kwalifikasie oorskry. Standaarde, ‘n ten volle
bevredigende gebruik en lang produk Die lewe kan verseker
word.
1. Onderdele beskrywing
1. Ingeboude sirkulerende
waaier eenheid met
ligte pas
2. Duidelike uitsigpanele
met luginlaat
3. Basiseenheid
2. Veiligheidsadvies en waarskuwings!
Lees hierdie instruksies sorgvuldig deur voordat u aanskakel Die
apparaat en hou dit vir toekomstige verwysing. Fail- Ure om te volg
en waar te neem, kan hierdie instruksies lei Tot ‘n ongeluk. Maak al
die dele van die produk skoon Sal in kontak wees met kos, soos
aangedui in die skoonmaak Afdeling, voor gebruik.
2.1. Gebruik of werksomgewing:
2.1.1. Hou die werksarea skoon en goed belig. Clut-Tered en
donker gebiede nooi ongelukke uit.
2.1.2. Gebruik die apparaat in ‘n goed geventileerde area.
2.1.3. Moenie die toestel op warm oppervlaktes plaas nie Soos
kookplate, gasbrander, oonde of soortgelyke items.
2.1.4. Hou kinders en omstanders weg wanneer hulle gebruik
word Hierdie toestel.
2.1.5. Plaas die toestel op ‘n horisontale, plat, stabiele plek Op-
pervlak en weg van ander hittebronne en kontak Met water.
2.1.6. Hou die apparaat weg van vlambare maat- Rial soos
tekstiele, gordyne, karton of papier, ens.
2.1.7. Moenie vlambare materiaal naby die aansoek plaas
nie.
2.1.8. Moenie die toestel in kombinasie met a gebruik nie
Programmeerder, timer of ander toestel wat outomaties Skakel
dit aan.
2.1.9. Moenie die toestel gebruik as die kabel of stekker is nie
beskadig.
2.1.10. Maak seker dat die spanning aangedui op die gradering
Etiket pas die stroomtoevoerspanning voor Plug in die toestel.
2.2.11. Skakel die toestel aan op die kragtoevoer. Ply met ‘n
aardkas wat ‘n minimum van 10 behou Ampère.
2.1.12. Die stekker van die toestel moet in die kragtoevoer pas
Kragtoevoer aansluiting behoorlik. Moenie die prop verander
nie.
2.1.13. As ‘n multiplug gebruik moet word, moet die grader-
ings noukeurig nagegaan word Die stroom wat deur verskeie
toestelle gebruik word, kan maklik Oorskry die aanslag van
die multiplug.
2.1.14. As enige van die toestel kouse breek, imme-Ontkoppel
die toestel dadelik vanaf die kragtoevoer Voorsien die moontlik-
heid van ‘n elektriese skok.
2.1.15. Moenie die toestel gebruik as dit op die Vloer of as daar
sigbare tekens van skade is.
2.1.16. Moenie die netsnoer dwing nie. Moet nooit die Kragtoevoer
om die toestel op te hef, te dra of te trek.
2.1.17. Moet nie die toevoerkabel om die apparing.
2.1.18. Moenie die kragtoevoer sny of vou nie.
2.1.19. Moenie toelaat dat die kragtoevoer hang of aan nie Kom
in kontak met warm oppervlaktes.
2.1.20. Kontroleer die toestand van die netsnoer. Beskadig of
Verstrengelde kabels verhoog die risiko van elektriese skok.
2.1.21. Die toestel is nie geskik vir buite gebruik nie.
2.1.22. Voeding moet gereeld ondersoek word Tekens van
skade, en as die koord beskadig is, moet die Nasien moet nie
gebruik word nie.
2.1.23. Moenie die prop met nat hande aanraak nie.
2.2. Persoonlike veiligheid:
2.2.1. VOORSIENING: Moenie die toestel onbewaak laat nie
Tydens gebruik as daar ‘n ongelukgevaar is.
2.2.2. Moenie aan die draaiende dele van die toestel raak nie,
Aangesien dit ernstige besering kan veroorsaak.
2.2.3. Hierdie toestel is slegs vir huishoudelike gebruik, nie
vir Industriële of professionele gebruik. Dit is nie bedoel
om te wees nie Wat deur gaste in gasvryheidsomgewings
gebruik word Bed en ontbyt, hotelle, motelle en ander soorte
Residensiële omgewings, selfs in plaashuise, gebiede Van
die kombuispersoneel in winkels, kantore en ander werk
omgewings.
2.2.4. Hierdie toestel is nie bedoel vir gebruik deur Persone
(insluitend kinders) met verminderde fisiese, Sensoriese of
geestelike vermoëns, of gebrek aan ondervinding En kennis,
tensy hulle toesig gegee is. Sie of instruksie oor die gebruik
van die toestel deur ‘N persoon wat verantwoordelik is vir hul
veiligheid.
2.2.5. Hierdie toestel is nie ‘n speelding nie. Kinders moet wees
Onder toesig om te verseker dat hulle nie met die toestel.
1
3
2
Model:
BK002
complies with
INTERNATIONAL
IEC60335
SAFETY SPECIFICATIONS
116W
BILTONG KING 116W
Food dehydrator
Thank you for purchasing a Mellerware product. Meller-
ware guarantees that your product has been thoroughly
inspected and tested before being dispatched and is free
from mechanical and electrical defects and complies with
the applicable safety standards. With every Mellerware
product purchased you get a 2 year warranty as detailed
in the terms and conditions below.
First Year – 1 Year Retail Warranty:
Should defects due to faulty parts or workmanship
develop, under normal use, within 12 months from the
original purchase date, please return the product to
the store from where it was purchased for repair free of
charge. However, for the custormer’s convenience we will
replace products where the purchase price is equal to or
less than R750 incl. VAT
Second Year – 1 Year Extended Warranty
Mellerware takes pride in their product quality and
therefore offer an extended 12 month warranty over and
above the 1 Year Retail Warranty. Should defects due to
faulty material or workmanship develop, under normal
domestic use, after the 12 month period and within 24
months from the original date of purchase, please return
the product postage pre-paid to Mellerware for repair.
Mellerware will repair the product free of charge and
return it to you directly. Mellerware will replace a product
with a similar product in the same or better condition, if
the repair cannot be conducted for whatever reason.
NB: The 1 Year Extended Warranty is only valid for cus-
tomers who have registered their warranty online at www.
mellerware.co.za within the first year after making their
purchase. See overleaf for details and instructions.
Before returning your product, check the following:
• Your household mains supply socket is in good condi-
tion, working and switched on.
• The mains supply circuit is not overloaded (White trip
switch on your DB board is off).
• You have read the trouble shooting guide in your
Instructions for Use.
• All accessories and parts are present.
The following conditions apply:
1. Please ensure you retain your original receipt
as this must be presented when making a claim
under the terms of the warranty. It is impossible to
determine the warranty period without your original
proof of purchase, so please keep this in a safe
place. (NB. Your warranty can be scanned onto the
Mellerware web site for safe storage – see reverse
side for details.)
2. If a refund or exchange is required the product
must be complete with all accessories, parts and
packaging. Missing parts will render the warranty void.
3. Upon receipt of your appliance, check it for any
transport damage to ensure it is safe for use.
Return it to the store as soon as possible for
exchange if damaged. The warranty is void if
products are damaged after use, so please do not
use the damaged product.
4. Your product is designed for normal domestic
household use. Failure to read and comply with
the instructions for use, cleaning and mainte-
nance will render your warranty void, so please
read these instructions carefully to ensure your
safety, and to get the most effective use from the
product. (e.g. not removing lime scale; water de-
posits; insect infestation, and/or burnt products)
5. Any abuse, negligent, improper or accidental use
or care will render the warranty void and Creative
Housewares (Pty) Ltd will not be liable for any
loss or damage.
6. Any attempted repair, or replacement of unauthor-
ised parts will render the warranty void, so please
contact an authorised service centre or service
agent for any service or repair requirements.
7. NB: The warranty on replaced products will be
from the original date of purchase and not from
when the date replacement was made.
8. All repairs carry a 3 month warranty even if this
falls outside of the 2 year warranty period.
9. Mellerware will attempt to conduct repairs within
reasonable time in line with industry standards
but cannot be held responsible or liable for any
circumstances not under our control.
10. Terms and Conditions are subject to change
without prior notice.
Repairs Out of the Warranty Period
If service or repair becomes necessary outside the
warranty period, this service is still available however all
transport/postage, spares and labour costs will be for the
customers’ account. All chargeable repairs will require
the customers’ written acceptance of the quote. Once the
go-ahead has been received Mellerware will undertake to
conduct the repair within a reasonable time and maintain
the condition of the product as received. All repairs are
warranteed for 3 months from the date of the repair.
For any service, enquiries and complaints please contact
our Customer Care on 086 111 5006 or e-mail help@
chwsa.co.za from 08h00 to 15h00 Monday to Friday
excluding public holidays. Please also note that the com-
pany is normally closed for 2 weeks around Christmas
and New Year.
Please send all products for repair postage pre-paid to
one of the service centres listed on the back of this page.
ONLINE WARRANTY REGISTRATION
Why register your warranty?
We at Mellerware pride ourselves on bringing premium quality appliances to market, and as a commitment to this level
of quality we offer a 2 year warranty (1 Year Retail + 1 Year Extended) on all of our products. We often hear that our
customers lose their receipts and can therefore no longer claim if they have a problem. To take advantage of the 1 Year
Extended Warranty you will need to register your warranty online within the first year of purchase in order to make a
valid claim. Now you can register your product, upload your warranty online, never have to worry about losing your
receipt again and enjoy the benefit of your 2 year warranty.
Added Benefits
In addition to providing you with an online profile of your registered products we will also provide a host of value
added benefits:
• Incentives and Competitions for registered users
• New recipes or ideas for your products
• New product developments – be the first to get the latest appliances
• Special offers on promotional items
How to Register your Online Warranty?
STEP1 Create your user prole:
If you haven’t done so already, simply visit www.mellerware.co.za, click on the
“Product Registration” link and follow the easy instructions. You will receive a user-
name and password once registered. This will give you access to your user profile.
STEP2 Pick a registration method:
DESKTOP/
LAPTOP
SMART
PHONE/
TABLET
FAX
• Fax the following to 021 931 4058
• First Name and Surname
• Contact telephone and fax number.
• Product Model number and Type.
• Traceability Code (found on a label
on the product)
• A clear and legible copy of your receipt.
• Scan the QR code above or visit
www.mellerware.co.za
• Click on the “Registration” link and login using
your user name and password.
• Click on “Register your products and upload
receipts” and follow the easy instructions.
• Scan or take a photo and upload your receipt.
• Open your internet browser and visit
www.mellerware.co.za
• Click on the “Registration” link and login
using your user name and password.
• Click on “Register your products and
upload receipts” and follow the easy
instructions.
• Scan and upload your receipt.
Notes
1. The online warranty system is a safe storage facility for
your receipt.
2. You will be required to register on the Mellerware
website. You will receive a username and password once
registered. This will give you access to your profile.
3. From your profile you will be able to load products that
you have purchased. In order to successfully register your
warranty you will need to either scan and upload, or fax
through your receipt to us.
4. All instructions on how to load your products are avail-
able inside your profile.
5. Please note that you must check that your receipt has
been uploaded correctly. Creative Housewares cannot be
held responsible for faxes or files not received.
6. For assistance with registration please email: marketing@
chwsa.co.za
NB: Your 1 year extended warranty is only valid if your
product is registered online within the first year after purchas-
ing your Mellerware product. Failure to register your product
on-line within the first year will render the extended warranty
as void.
Cape Town
20 Tekstiel Street, Parow, Cape Town, 7493,
South Africa • P.O. Box 6156 Parow East, 7501,
South Africa Tel: +27 21 931 8117
Fax: +27 21 931 4058
Durban
35 Adrain Road, Windermere,
Durban, South Africa, 4001
Tel: +27 31 303 3465
Fax: +27 31 303 8259
www.creativehousewares.co.za
Johannesburg
Unit 25 & 26 San Croy Office Park
Die Agora Road, Croydon, 1619
Tel:+27 11 392 5652
Fax:+27 11 392 1694


Participe da conversa sobre este produto
Aqui você pode compartilhar o que pensa sobre Mellerware BK002 Biltong King Desidratador de alimentos. Se você tiver alguma dúvida, primeiro leia atentamente o manual. A solicitação de manual pode ser feita através do nosso formulário de contato.