
Karlsson is a trademark of Present Time®
Televisieweg 16, 1322 AL, Almere
www.presenttime.com
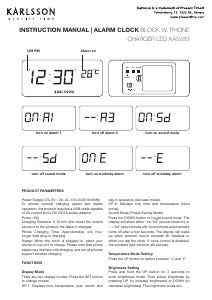
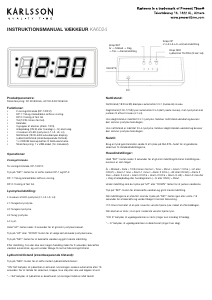
INSTRUCTION MANUAL ALARM CLOCK KA6070
Thank you for purchasing this LED Cuckoo Alarm Clock. Please read the following
instructions and warnings carefully before use to ensure the safe and satisfactory
operation of this product.
Instructions for Use
Functions
• Time and Calendar (Year, Month, and Date)
• Snooze Cuckoo Alarm
• Temperature (selectable in °C/°F)
• Hourly Cuckoo Chime
Initial Setup
Connect the cable to a 5V adapter (not included) and the Type-C DC-5V (5) jack.
The clock will start at “12:00”.
Setting the Time and Calendar
In the normal display mode, press the SET (1) button. The hour digits will ash.
Use the UP (6) or DOWN (7) button to set the hour. Ensure AM/PM is set correctly.
A ‘PM’ LED in the top-left corner of the time display indicates PM time in 12-hour
format.
Press the SET (1) button again to set the minutes. Use the UP (6) or DOWN (7)
button to adjust.
Continue in the sequence: hour -> minute -> year -> month -> date.
Press the MODE (2) button to return to the main time display. The time and calendar
are now set.
Setting the Alarm
- Press and hold the SET (1) button for 3 seconds. The hour digits will ash. Use the
UP (6) or DOWN (7) button to set the alarm hour (ensure AM/PM is correct).
- Press the SET (1) button again to set the minutes, using the UP (6) or DOWN (7)
button.
- Press the MODE (2) button to return to the main display.
Activating/Deactivating the Snooze Alarm
- Press and hold the MODE (2) button for 3 seconds. An alarm LED above the colon
will light up, indicating the snooze alarm is active.
- When the alarm sounds, press any button on the back of the clock to temporarily
stop the alarm. The cuckoo sound will repeat after the snooze interval (default: 5
minutes). This cycle repeats up to 4 times.
- If no button is pressed, the alarm will sound for 1 minute per snooze interval, up to
4 times, before deactivating.
- To stop the snooze function permanently, press and hold the MODE (2) button for
3 seconds until the alarm LED turns off.
Hourly Cuckoo Chime
The clock chimes every hour, except between 22:00 and 06:00. The rst chime
occurs at 07:00. If an alarm overlaps with the chime, the alarm takes priority. During
the silent period (22:00–06:00), alarms remain active.
Temperature Display
The display alternates between time and temperature. To switch between °C and
°F, press the DOWN (7) button. For a continuous time display, press and hold the
DOWN (7) button until the cuckoo sound plays, then release.
12/24-Hour Format
Press the UP (6) button in the normal display mode to toggle between 12-hour and
24-hour formats.
Viewing Year, Month, Date, Alarm, and Temperature
Press the MODE (2) button repeatedly to cycle through year -> month -> date ->
alarm time -> temperature. Press MODE (2) again to return to the time display.
Brightness Levels
The clock adjusts brightness automatically:
- 07:00–18:59: High
- 19:00–22:59: Medium
- 23:00–06:59: Low
Backup Battery
A CR2032 button cell (not included) serves as a backup power source. To install:
1. Open the battery compartment (9) using a at screwdriver or coin.
2. Insert the cell with the positive (+) side facing out.
3. Close the compartment securely.
TEST (4) Button
Press the TEST button at any time to hear the cuckoo chime.
RESET (3) Button
If the clock becomes unresponsive, use a blunt object (e.g., pen tip or toothpick) to
press the RESET hole. The clock will reset to the initial display.
Warnings
1. Do not expose this product to liquids.
2. Clean with a soft cloth or paper towel only.
3. Avoid using corrosive cleaners or chemical solutions.
4. Keep this instruction manual for future reference.
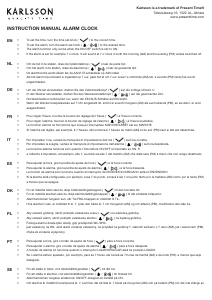
(1) SET button
(2) MODE button
(3) RESET hole
(4) TEST button
(5) DC-5V jack
(6) UP button
(7) DOWN button
(8) SPEAKER
(9) CELL compartment


Participe da conversa sobre este produto
Aqui você pode compartilhar o que pensa sobre Karlsson KA6070YE Despertador. Se você tiver alguma dúvida, primeiro leia atentamente o manual. A solicitação de manual pode ser feita através do nosso formulário de contato.