Manual Denver TRC-1400 Estação meteorológica

Precisa de um manual para o seu Denver TRC-1400 Estação meteorológica? Abaixo você pode visualizar e baixar gratuitamente o manual em PDF em português. Este produto tem atualmente 5 perguntas frequentes, 0 comentários e tem 0 votos. Se este não for o manual que você deseja, por favor contacte-nos.

Seu produto está com defeito e o manual não oferece solução? Vá a um Repair Café para obter serviços de reparo gratuitos.

Manual

Loading…

~ P. 2 ~~ P. 1 ~
INDOOR & WIRELESS OUTDOOR THERMOMETER
WITH REAL TIME CLOCK & SNOOZE ALARM
MODEL: 883F01
INSTRUCTION MANUAL
1. INTRODUCTION
Thank you for purchasing our In/Outdoor thermometer with wireless thermometer sensor and real time clock. The
main unit is designed to receive temperature signals from maximum 3 remote sensors in different locations, and it is
also equipped with a snooze alarm. To ensure proper operations, please read this instruction manual carefully and
save it for future reference.
2. DESCRIPTION OF BUTTONS
A. [SNOOZE/LIGHT] button
Activate the snooze function when an alarm sounds or turn on the backlight for 5 seconds.
B. [MODE ALERT] button
Press the [MODE] side to display the real time clock or alarm time. When display the real time clock, press and
hold the [MODE] side for 3 seconds to activate the clock setting mode.
Press the [ALERT] side to enable or disable temperature alert. Press & hold the [ALERT] button to enter
temperature alert setting mode.
C. [CLR MAX/MIN] button
Press the [MAX/MIN] side to display the maximum and minimum reading of indoor and outdoor temperature,
and then press the [CLR] side to clear the memorized maximum and minimum temperature.
D. [- +(°C/°F)] button
Press the [+(°C/°F)] side to select the temperature display in Celsius (°C) or Fahrenheit (°F). Both [-] and [+]
buttons can be used to enter values under setting mode.
E. [CHANNEL] button
Press it to display the temperatures of different remote sensors or auto scroll (
) among different channels.
F. [RESET] button
This button is located inside the battery compartment of the main unit, press this button allows you to return all
settings back to factory values.
3. BATTERY INSTALLATION
a. Press the door tab and slide down the battery cover at the back of the main unit. Insert 2pcs of AAA size
batteries according to the “+” and “-” polarity marks shown in the battery compartment.
b. The (---) dash icon will flash at the lower part of the screen and the main unit is now ready to register with the
remote sensor and to receive temperature signal from the RF remote sensor(s).
c. Lift off the bracket stand of the RF remote sensor by releasing the 2 fixing snaps at the bottom, then use a small
screwdriver to remove the battery cover screws.
d. Insert 2pcs of AAA size batteries according to the “+” and “-” polarity marks shown in the battery compartment.
e. Once the batteries are inserted, the sensor will automatically transmit the temperature signal to the main body at
30 seconds interval or when there is a 0.2°C change in temperature. The sensor is also equipped with a manual
transmission button (TX), you can enforce the sensor to transmit the temperature signal by pressing this (TX)
button for 2 seconds.
f. Once the main unit received the temperature signal, the icon “ 1 ” and the temperature of the corresponding
sensor will be displayed on the lower part of the screen.
g. If you have more than one remote sensor, please do not insert batteries for all remote sensors at the same time
otherwise it will cause unsuccessful registration. So, you have to place the batteries for one sensor first. After
registration of the first sensor is completed (i.e. the temperature is displayed on the screen), then insert the
batteries for the second sensor and wait for complete registration before proceed the registration of the third
sensor.
4. HOW TO SET TIME
a. Make sure the [:] colon icon is blinking on the upper part of the screen, if [:] is not blinking, press the [MODE]
button once to change it.
b. Press and hold the [MODE] button for 3 seconds, the hour format 12 or 24hr will start to blink.
c. Use the [- +(°C/°F)] button to select the desired time format then press the [MODE] side again to confirm
and proceed to set hour and minute.
d. Press the [-] button to enter the minute value and press the [+(°C/°F)] button to enter the hour value, then
press the [MODE] button to confirm and proceed to set T2 time zone.
e. T2 time zone setting is for people who can easily adjust the local time when they move from one time zone to
another. If time offset is not required, keep the time offset value equals to 0 and press the [MODE] button to
exit.
5. HOW TO SET ALARM
a. Make sure the [:] colon icon is not blinking on the upper part of the screen, if [:] is blinking, press the [MODE]
button once to change it.
b. Press and hold the [ALERT] button for 3 seconds, then the hour and min will start to blink.
c. Press the [-] button to enter the min value and press the [+(°C/°F)] button to enter the hour value, press the
[MODE] button to confirm, the alarm will be automatically activated and the [
] icon will be displayed on the
upper part of the screen.
d. To deactivate or reactivate the alarm clock, press [CLR] button once.
6. SNOOZE FUNCTION
a. The alarm will go off for one minute, press any button (except [SNOOZE] button) will stop the alarm. If
[SNOOZE] button is pressed, the snooze function will be triggered and the alarm will stop for 8 minutes.
NOTE:
If the main unit idles for 8 seconds during setting, it will exit the setting mode and return to normal display.
NOTE:
Please insert batteries for the main unit first, then the RF remote sensor.
Descarregue o manual em português (PDF, 0.72 MB)
(Considere o meio ambiente e apenas imprima este manual se for realmente necessário)

Loading…

Avaliação

Deixe-nos saber o que você pensa sobre a Denver TRC-1400 Estação meteorológica, deixando uma classificação do produto. Quer compartilhar suas experiências com este produto ou fazer uma pergunta? Por favor, deixe um comentário na parte inferior da página.
Você está satisfeito com Denver TRC-1400 Estação meteorológica?
Sim Não
Seja o primeiro a avaliar este produto
0 votos

Participe da conversa sobre este produto

Aqui você pode compartilhar o que pensa sobre Denver TRC-1400 Estação meteorológica. Se você tiver alguma dúvida, primeiro leia atentamente o manual. A solicitação de manual pode ser feita através do nosso formulário de contato.

Mais sobre este manual

Entendemos que é bom ter um manual em papel para o seu Denver TRC-1400 Estação meteorológica. Você sempre pode baixar o manual em nosso site e imprimi-lo você mesmo. Se desejar um manual original, recomendamos que entre em contato com Denver. Eles podem fornecer um manual original. Você está procurando o manual do seu Denver TRC-1400 Estação meteorológica em outro idioma? Escolha o seu idioma preferido em nossa página inicial e pesquise o número do modelo para ver se o temos disponível.

Especificações

Marca Denver
Modelo TRC-1400
Categoria Estações meteorológicas
Tipo de arquivo PDF
Tamanho do arquivo 0.72 MB

Todos os manuais para Denver Estações meteorológicas
Mais manuais de Estações meteorológicas

Perguntas frequentes sobre Denver TRC-1400 Estação meteorológica

Nossa equipe de suporte pesquisa informações úteis e respostas a perguntas frequentes sobre produtos. Se você encontrar algum dado incorreto em nossas perguntas frequentes, informe-nos usando nosso formulário de contato.

Minha estação meteorológica previu que choveria, mas isso não aconteceu. Por que isto acontece? Verificado

A previsão do tempo da estação meteorológica é baseada na pressão atmosférica. Geralmente pressão baixa significa tempo ruim, e pressão alta tempo bom. É possível que padrões atmosféricos evoluam de forma diferente ao que a pressão atmosférica indica.

Isso foi útil (1403) Consulte Mais informação

Qual é a melhor localização para uma estação meteorológica e seus sensores? Verificado

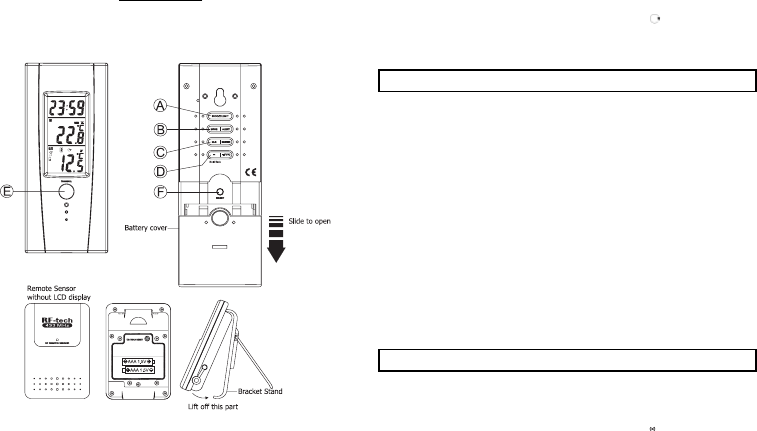
A própria estação meteorológica é colocada no interior e deve ser mantida afastada de fontes de calor, como cozinha, janelas ou aparelhos elétricos. Um sensor de temperatura externo separado deve ser colocado na sombra e a pelo menos 1,25 m acima do solo. Um sensor de chuva deve ser colocado em uma área aberta onde sempre possa coletar a chuva. Um sensor de vento também precisa ser colocado em uma área aberta, com quaisquer obstáculos influenciando o vento.

Isso foi útil (334) Consulte Mais informação

A bateria do meu dispositivo está oxidada. Ainda posso usá-la com segurança? Verificado

Sim, o dispositivo ainda pode ser usado com segurança. Em primeiro lugar, remova a bateria oxidada. Nunca use as mãos desprotegidas para fazer isso. Em seguida, limpe o compartimento da bateria com um cotonete embebido em vinagre ou suco de limão. Deixe secar e insira novas baterias.

Isso foi útil (234) Consulte Mais informação

Minha estação meteorológica tem um pluviômetro. Ela também pode medir a quantidade de neve que caiu? Verificado

Alguns pluviômetros são equipados com um elemento de aquecimento, que faz a neve derreter e permite que seja medida. Sem o elemento de aquecimento, o pluviômetro ficará obstruído e nenhuma medição poderá ser realizada.

Isso foi útil (234) Consulte Mais informação

Posso deixar uma bateria substituível em um dispositivo por muito tempo? Verificado

Baterias substituíveis podem permanecer em um dispositivo por muito tempo se o dispositivo estiver em uso. Quando um dispositivo está sendo armazenado por um longo período, é aconselhável remover as baterias para evitar a oxidação.

Isso foi útil (234) Consulte Mais informação
Manual Denver TRC-1400 Estação meteorológica