Table A
Burner Type
Ø pan/pot
(cm)
AUX
SR
R
10 - 18
12 - 22
16 - 26
Auxiliary
Semi Rapid
Rapid
Power
(kW)
1,00
1,75
2,70
G20/20 mbar
(methane)
95 l/h
167 l/h
257 l/h
G30/28-30 mbar
(LPG)
73 g/h
127 g/h
196 g/h
04 GB
2.3. ADAPTING THE HOB TO DIFFERENT
TYPES OF GAS
•Remove the grids and burners
•Insert on hexagonal spanner (7 mm) into the burner support (Figure
7)
•Unscrew the injector and replace it with one suitable for the gas to be
used (see gas type table)
To adapt the Hob for use with different types of gas, carry out the
following instructions:
2.4. REGULATING THE MINIMUM FLAME
Using a small «Terminal» type screwdriver the regulating screw can
be adjusted as in Figure 9. Turning the screw clockwise reduces the
gas flow, whilst turning it anticlockwise increases the flow – Use this
adjustment to obtain a flame of approximately 3 to 4 mm in length and
then replace the control knob.
When the gas supply available is LPG - the screw to set the idle flame
must be turned (clockwise) to the end stop.
When you have carried out the new gas regulation, replace the old gas
rating plate on your appliance with one (supplied with hob) suitable for
the type of gas for which it has been regulated.
After lighting the burners, turn the control knob to the minimum setting
and then remove the knob (this can easily be removed by applying
gentle pressure).
3. USE OF HOB - USER INSTRUCTIONS
This appliance must only be used for the purpose for which it is
intended, domestic cooking, and any other use will be considered
improper and could therefore be dangerous. The Manufacturer will
not be responsible for any damage or loss resulting from improper
use.
3.1. USING THE GAS BURNER
• İgnite the burner by pressing the sparker button.
• Push in and turn the knob anticlockwise to the ignition symbol.
- While pushing in the button ignite the burner by using a lighter and
keep button pushed in 5 seconds after ignition.
If the burners have not been used for a couple of days, wait for a few
seconds before lighting the burner, this will allow any air present in the
pipes to escape.
To ignite the burners, place a lighted taper close to the burner, press in
and turn the control knob anti-clockwise.
For appliances fitted with electronic ignition carry out the following:
The ignition system will continue to generate sparks as long as the
control knob is being pressed.
Prior to switching on the gas hob ensure that the burners and burner
caps are correctly placed within their position.
For hobs fitted with automatic ignition simply push in and turn the knob
to the ignition symbol.
If the burner has not ignited within 5 seconds, turn the knob to the 0
position and repeat the operation.
For models fitted with a safety tap (which cuts-off the flow of gas if the
flame is accidentally extinguished) the burners are ignited and
described above, but care must be taken.
Warning: If there is no electricity on appliance, to ignite the burner a
lighter should be used;
- Push in and turn the knob anti-clockwise to the ignition symbol,
GENERAL ADVISE
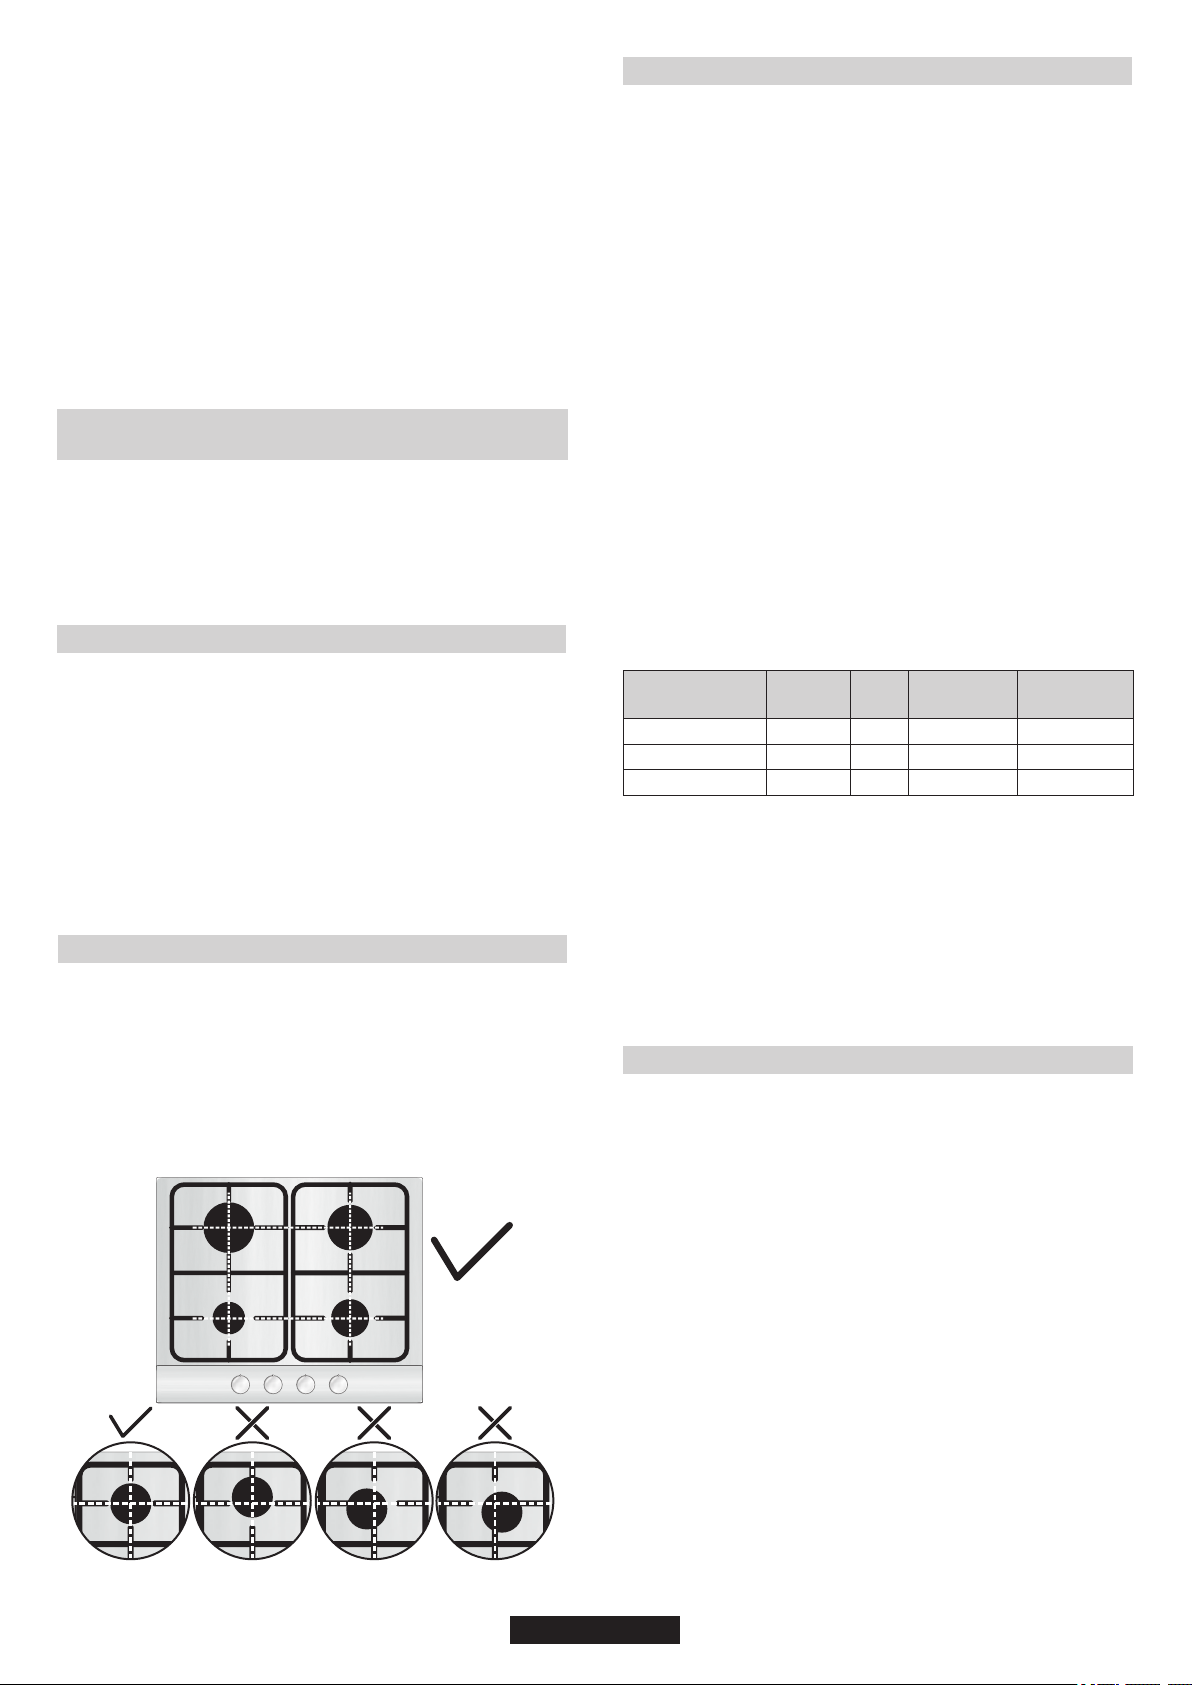
For best results, use cooking vessels with a flat surface. The size of
the surface should match the gas burner side as follows. Table A.
4. MAINTENANCE AND CLEANING
It is important the Burners are replaced correctly.
Chromed grids and burners
Never use abrasives, corrosive detergents, bleaching agents or
acids. Avoid any acid or alkaline substances (lemon, juice, vinegar
etc.) on the enamelled, varnished or stainless steel sections.
Before cleaning the hob, ensure the appliance has cooled down.
Remove the plug from the socket or (if connected directly) switch off
the electricity supply.
When cleaning the enamelled, varnished or chrome sections, use
warm soapy water or a non caustic detergent. For stainless steel use
an appropriate cleaning solution.
The burners can be cleaned with soapy water. To restore their original
shine, use a household stainless steel cleaner. After cleaning, dry the
burners and replace.
Cleaning and user maintenance shall not be made by children without
supervision
Our After Sales Service Centre can provide spare parts if required.
Chromed grids and burners have a tendency to discolour with use.
This does not jeopardize the functionality of the hob.
For smaller containers the gas burner should be regulated so that the
flame does not overlap the base of the pan. Vessels with a concave or
convex base should not be used.
Such operation must be carried out only by qualified Service
Engineers.
If over the years the gas taps become stiff to turn it is necessary to
lubricate them.
WARNING: If a flame is accidentally extinguished, turn the knob
to the off position and do not attempt to re-ignite if for at least 1
minute.
2)Tighten the joints with the spanner, remembering to twist the
pipes into position.
IMPORTANT: carry out a final check for leaks on the pipe
connections using a soapy solution. NEVER USE A FLAME.
Also, make sure that the flexible pipe cannot come into contact
with a moving part of the cabinet (eg.adrawer) and that it is not
situated where it could be damaged.
Warning: If gas can be smelt in the vicinity of this appliance turn off
the gas supply to the appliance and call the engineer directly. Do not
search for a leak with a naked flame.
3)Attach fitting C to mains gas supply using rigid copper pipe or
flexible steel pipe.
Before using burner, be sure, grid perimeters center the burner as
below figure.
If you are using Cast Iron Grids; underneath the grid, position of it is
stated. Be sure for the exact grid is used in correct position.

Participe da conversa sobre este produto
Aqui você pode compartilhar o que pensa sobre Candy CKD621LX Placa. Se você tiver alguma dúvida, primeiro leia atentamente o manual. A solicitação de manual pode ser feita através do nosso formulário de contato.